Poppy Seed Chicken Casserole

IMG_2758

I can’t think of a better, more satisfying comfort meal than this classic poppy seed chicken casserole.  While it is NOT low-calorie, it’s definitely great for feeding a crowd and using up leftover chicken or rotisserie chicken.

My original intent when making this casserole was to go with my mom’s recipe that she got from a friend many years ago called Poppy Seed Chicken (please excuse the pictures. I hadn’t quite mastered my picture-taking skills back in 2010).  My mom’s recipe has egg noodles baked in with the poppy seeds, chicken, soups and Ritz crackers, but I had seen recipes WITHOUT the egg noodles and wanted to give it a try.

“But you have egg noodles included in your pictures!!!”, you say.

Yes, that is true. BUT, I cooked the egg noodles separately for my husband Matt. I ate my poppy seed chicken sans the noodles, and just with fresh veggies. I wasn’t craving all those extra carbs!

Anyways, this recipe was a total hit with Matt…. he LOVED it! I think it reminded him of his mom’s old-fashioned southern cooking. I’m more of a healthy cook and don’t use a lot of butter. This recipe originally called for a whole stick of butter melted in with the crackers, but I just used half a stick. Butter is good, but a whole stick along with the already buttery Ritz crackers is overkill, in my opinion.

Enjoy! I’ve never met a single person who didn’t like this… kids included!

IMG_2739
Add crushed Ritz crackers to a bowl.


IMG_2740
Add in poppy seeds.
IMG_2741
Add melted butter and stir until completely incorporated.
IMG_2738
Mix together chicken, soup and sour cream. Add in Worcestershire sauce, garlic and lemon juice. Spread into a greased 9 x 13-inch pan.
IMG_2743
Sprinkle cracker mixture on top.
IMG_2748
Cover and bake for 15 minutes at 350 degrees. Uncover and bake an additional 15 minutes.
IMG_2756
Serve over cooked egg noodles, if desired.
IMG_2758
Obviously, this pretty picture is Matt’s plate. 🙂
IMG_2761
Close up and served with mixed veggies and Ranch Style beans in the background.


Poppy Seed Chicken Casserole
Prep time:
Cook time:
Total time:
Serves: 8
Ingredients
  • 2 cups chicken, cooked and shredded
  • 2 cups Ritz crackers, crushed
  • 1 Tbsp. poppy seeds
  • 1 (10.75 oz) can cream of chicken and herb soup
  • 8 oz sour cream
  • 1/4 cup butter melted
  • 1 tsp. Worcestershire sauce
  • 1 clove minced garlic
  • 2 tsp. lemon juice
  • Egg noodles, optional – to serve with
Instructions
  1. Preheat oven to 350 degrees F.
  2. Mix together chicken, soup and sour cream in a large bowl. Add in Worcestershire sauce, garlic and lemon juice. In another bowl, mix together crushed crackers, poppy seeds, and melted butter and stir until butter is completely incorporated.
  3. Spray a 9 x 13-inch baking pan with non-stick cooking spray. Spread chicken mixture on the bottom and sprinkle with cracker mixture.
  4. Cover pan with foil and bake for 15 minutes. Remove foil and baker for 15 more minutes.
  5. Serve over egg noodles, if desired.

Chicken Pesto Pasta

chicken pesto pasta

Working full-time and not getting home until after 6 pm many days of the week, I’m usually starved and ready for food! As you all know, I love to cook, so eating cereal for dinner is not my idea of a great dinner. When Matt’s home, I will almost always prepare a homemade dinner. That’s where this quick and easy chicken pesto pasta dish comes in hand!

With only 5 main ingredients plus a few pantry staples, you’ll have a delicious Italian meal sitting on your table in less than 30 minutes.

If you know Matt, he can be very direct, which is good if you’re wanting an honest opinion. There’s been many a nights that I’ve cooked dinner, and he says “I don’t like this”, or “the chicken is dry”. Need I say more? Hahaha?

While I don’t always like to hear it, it helps me to become a better cook because I definitely know what I need to work on.

With this dish, Matt loved it every bit of it! No complaints, only praise. I think he went back for seconds, maybe thirds. While the pictures don’t do it justice, the pesto combined with the chicken broth, crisp pine nuts, juicy rotisserie chicken and fresh lemon juice makes for a perfect combination.

Top it off with some fresh Parmesan cheese and a side salad, and you’ve got yourself a meal. Enjoy!

chicken pesto pasta
chicken pesto pasta

Chicken Pesto Pasta
Prep time:
Cook time:
Total time:
Serves: 4
Recipe adapted from Prevention Magazine
Ingredients
  • 2 cups shredded rotisserie chicken
  • 1 1/2 cups reduced-sodium chicken broth
  • 1/2 cup basil pesto
  • 10 oz. bow-tie pasta (can use fettuccine, rotini, or pasta of your choice)
  • 1-2 Tbsp. fresh lemon juice
  • 1/4 cup pine nuts, toasted
  • 1-2 Tbsp. olive oil, optional
Instructions
  1. Stir together chicken, broth, and 1/4 cup of the pesto in a large, deep skillet.
  2. Cook pasta, drain and add to skillet with lemon juice to taste. Cook over medium heat, stirring, until heated through, about 3 minutes.
  3. Season to taste with salt and pepper and top with pine nuts. Drizzle with oil, optional, and remaining 1/4 cup pesto.
Calories: 497 Fat: 15.5 Saturated fat: 3 Carbohydrates: 55 Sodium: 354 Fiber: 7 Protein: 34


Chicken Pot Pie

Chicken Pot Pie

Chicken pot pie. The ULTIMATE comfort food!

Surprisingly, my mom never made chicken pot pie from scratch. Mom – if you did make it, sorry because I don’t remember. 🙂

Instead, ever week or so we would eat individual Marie Callender’s chicken pot pies. We absolutely loved them!

As a kid, I had a method to eating my chicken pot pie. First, instead of eating the pie pie right side up, I would eat it upside down. If you’ve ever made a Marie Callender’s pot pie, you bake it in a cardboard container for 50 minutes or so. When it was done, we just flipped it out of its container on our plate, and never thought to turn it right side up!

Each member of our family ate our pot pies in a special way. I would cut a circle in the top of the pot pie, carefully remove the crust and eat it first. I would then eat the rest of the pot pie going in a circle, making sure I got a bite of flakey crust with eat bite!

My dad would pile his pot pie with a ginormous amount of green peas. My mom ate hers normal, of course, and my sister…we’ll I can’t remember how she ate hers. All I know is that she had leftover crust, while mine was pretty much gone!

Chicken Pot Pie

As mentioned before, I am the resident recipe columnist for our monthly neighborhood magazine. For the month of June I interviewed one of my neighbors, Mary Ann, a retired nurse who has a passion for cooking.

Not only was Mary Ann willing to be a part of the magazine, but she was gracious and sweet enough to cook me an entire chicken pot pie to take home after I completed her photo shoot for the magazine.

Since I had a 10-inch wide, 2 to 3-inch deep chicken pot pie all for myself and Matt, I thought it fitting to invite our entire family over for dinner to share. It was neat to have my parents and Matt parents all around the same dining table for some well-needed family time. If you know me, I LOVE family and enjoy ever moment I can get with them.

Chicken Pot Pie

For those that don’t live in my neighborhood and therefore don’t get our magazine, I’m sharing with you this delicious pot pie recipe and an excerpt from my article:

If you’re looking for old-fashioned, ultimate comfort food, then search no more.  Resident Mary Ann, a retired nurse and freestyle cook, makes you feel right at home with her delicious deep dish chicken pot pie.  Overflowing with fresh veggies, savory chicken and topped with a lid of golden-brown, flaky crust, this pot pie is the quintessential supper food sure to bring the family together.

As a freestyle cook, Mary Ann encourages you to add or substitute your favorite kind of soup, leftover ham, turkey, and/or your choice vegetable favorites. “This is comfort food, so the process should be personal,” she says. Enjoy!

Chicken Pot Pie

Enjoy your family time and I hope this chicken pot pie brings back happy memories to you as much as it did me!

Chicken Pot Pie
Serves: 6
Ingredients
  • 10-inch baking dish, 2 ½ to 3 inch deep
  • 2 refrigerated piecrusts or 2 large frozen puff pastries, thawed
  • 2 cups chopped chicken, poached; or leftover rotisserie chicken
  • 1 can cream of onion soup
  • 1 can potato soup
  • 2 cups vegetable mixture (1 red onion, 1/2 cup celery, 1 chopped red pepper, 1/2 cup chopped mushroom, 2 Tbsp. olive oil)
  • 2 cups of cooked or leftover carrots, asparagus, peas and/or green beans
  • 1 Tbsp. fresh or freeze-dried poultry herbs, chives, pepper, & garlic
  • 1 beaten egg
Instructions
  1. Preheat convection oven to 375 degrees F. If using a conventional oven, preheat to 400 degrees F.
  2. Sauté veggies in oil until lightly browned; turn out in bowl.
  3. Add the chicken and soup, and mix together. (If the mixture seems dry, add a little more soup of your choice).
  4. Place bottom crust in baking dish and spoon chicken mixture inside.
  5. Top with herbs and pepper by recipe and to taste.
  6. Place top crust on top, seal, and cut a few slits into the pie crust.
  7. Brush top crust with egg wash.
  8. Place pie in oven and cook for 40 minutes or until golden brown.
Notes
Source: my neighbor, Mary Ann


Riso alla Pitocca (Traditional Chicken and Rice)

chicken and riceLike chicken? Check.

Like risotto? Check.

Like Italian food? Check.

Then you should really like Riso alla Pitocca, Italian for traditional chicken and rice and from Lidia Matticchio Bastianich’s cookbook, Lidia’s Favorite Recipes. If you’re looking for foolproof Italian dishes, you’re might want to buy her book!

chicken and rice

I love this recipe because while it sounds simple, the combination of fresh ingredients create an irresistible and authentic Italian dish.

Chopped onions, carrots and celery create bold and bright colors to this dish. The chicken makes this dish savory, and the wine, chicken broth and cheeses create a unique complexity of flavors that cannot be beat.

chicken and rice

Once you get your pestata (crushed onion, carrot, celery and garlic) and chicken cooked, add the liquid ingredients and rice and bring to a boil. Then let is cook for 14 minutes and you’re pretty much done.

All that’s left is to stir in the butter, parsley and my favorite ingredient… Parmigiano-Reggiano!

chicken and rice

Did I mention my parents’ cat likes this dish? Their cat is kind of weird…. she actually likes people food! I’ve never seen a cat that acts as much like a dog as this one does. Its actually kind of cute and makes me love her even more.

Enjoy!

cat

Riso alla Pitocca (Traditional Chicken and Rice)
Recipe Type: Main
Cuisine: Italian
Serves: 4-6
Ingredients
  • 1 1/2 pounds boneless, skinless chicken thighs (we used chicken breasts)
  • 1 cup onion cut into 1-inch chunks
  • 1 cup carrot cut into 1-inch chunks
  • 1 cup celery, cut into 1-inch chunks
  • 2 plump cloves garlic, peeled
  • 1/2 cup extra-virgin olive oil
  • 1 Tbsp. kosher salt
  • 1 fresh bay leaf
  • 1 cup dry white wine
  • 5 cups hot chicken or turkey stock, plus more if needed
  • 2 cups Italian short-grain rice, such as Arborio or Carnaroli
  • 2 Tbsp. butter, cut into pieces
  • 3 Tbsp. chopped fresh Italian parsley
  • 1/2 cup grated Grana Padano or Parmigiano-Reggiano cheese, plus more for passing
Instructions
  1. Trim any excess fat from the chicken thighs, and cut the thighs into 1-inch chunks. Use a food processor to mince the onion, carrot, celery, and garlic into a fine textured pestata (means “to crush” or “to grind” in Italian).
  2. Pour the olive oil into a saucepan and set over medium-high heat. Stir in the pestata, and season with 1 teaspoon of the salt. Cook for about 5 minutes, stirring frequently, until the pestata has dried. Toss in the chicken pieces and the bay leaf, and sprinkle with remaining salt. Tumble the chicken in the pan until browned and caramelized all over, about 4 minutes.
  3. Raise the heat, pour in the white wine, and cook, stirring and scraping up the browned bits in the pan, until the wine has almost completely evaporated. Pour in the hot stock, stirring, and add the rice.
  4. Bring to a boil over high heat, then cover and reduce the heat to keep the riso bubbling gently. Cook for about 14 minutes, or until both the rice and the chicken chunks are fully cooked and the consistency is creamy.
  5. Turn off the heat, drop in the butter pieces, and stir vigorously until thoroughly combined; then stir in the parsley and 1/2 cup of grated cheese. Spoon the riso into warm pasta bowls, and serve immediately, passing additional grated cheese at the table.
Notes
Source: Lidia’s Favorite Recipes by Lidia Matticchio Bastianich and Tanya Bastianich Manuali

Crock Pot Chicken Tacos

IMG_3140 Two thumbs up are in order for my FIRST-EVER crock pot meal!

Hard to believe, right? Growing up my mom never used or even owned a crock pot. Now that I have a crock pot (“thanks Paula for the wonderful Christmas gift!”), I’ll be slow cooking all time!

I will admit, I was a little scared prior to using the crockpot. I’m a little fearful of fire . In my younger days I caught salmon on fire while broiling it in the oven.  Actually it was the excess olive oil on the foil that caught on fire.

That being said, that’s nothing compared to the Easy Mac I caught on fire in the microwave when I was in eighth grade… not so easy now is it?? How did it it catch on fire you ask? I forgot to add water.

Last but not least, my CHI flat  iron caught on fire two years ago. Black smoke starting coming out of the on/off switch. When I took it back to Ulta, the sales associate said, “What, you don’t want to look smokin’ hot!!” I had to laugh at that one.

Lucky for me, no fires were were started with this slow cooker. I was extra careful to watch it,  just in case something were to happen. 🙂

IMG_3130

This meal doesn’t get any easier. Simply throw your chicken breasts into the pot. Add the taco seasoning. Add the salsa. Turn on the heat. And wait…..

In the meantime, you could go for a nice run, work from home, run some errands, eat a a snack, get on Facebook…. 🙂 IMG_3132 After a few hours, you can check on the chicken. When it is done, shred it with two forks and return it to the pot. IMG_3137 I found that the chicken got even more tender when I returned it to the slow cooker. Meanwhile, preheat your oven. Get the taco shells ready, your tomatoes, green onions and other toppings chopped, and set your table because dinner is about to be served.

Super easy, right? Matt even gave his approval! IMG_3140

QUESTION TIME: 

Have you ever caught food on fire? If so, what was it? 

Crock Pot Chicken Tacos
Serves: 4-6
Ingredients
  • 2 lbs. chicken breasts
  • 1 packet taco seasoning
  • 16 ounce jar salsa (I used Tostitos)
  • Corn taco shells
  • Taco toppings: shredded cheddar cheese, pico de gallo, green onions, lettuce
Instructions
  1. Lay chicken breasts in a single layer in bottom of crock pot. Sprinkle on taco seasoning then pour in salsa. Lift chicken breast halves to get salsa underneath. Cook on low for 4-5 hours, or high for 2-3 hours, or until chicken breasts are tender. Shred then mix with some or all of the cooking liquid.
  2. Preheat oven to 425 degrees F. Add shredded chicken in the bottom of tacos shells then top with cheese. Bake on a foiled-lined baking sheet for 2-3 minutes, or until cheese is melted. Top with desired toppings.
  3. Serve with Spanish rice and refried beans.
Notes
Source: Iowa Girl Eats


Spicy Chicken Cakes

If you like crab cakes, you’ll LOVE these spicy chicken cakes from Cooking Light! I’m not saying they taste like crab cakes, but they sure do look like them. The cakes were super easy to make, inexpensive (especially when compared to crab meat), and my husband and I both gave them two thumbs up.
Unlike the name, I don’t recall the chicken cakes being too spicy. They were well seasoned, flavorful, and the aioli sauce brought an “elegance” to the dish that gave me the feeling I was eating in a 5-star steak and seafood restaurant.
Serve the chicken cakes over a bed of arugula, top with a dollop of aioli, and you’ve got yourself a healthy, protein-packed meal that is under 300 calories and less than 10 grams of fat. This is truly one of my new “favorites”. Enjoy!
Combine chicken mixture in a medium-sized bowl.
Over medium heat, cook chicken patties for 7 minutes.
Flip and cook for another 7 minutes, or until done.
Serve over a bed of arugula and a dollop of aioli.

Spicy Chicken Cakes
Ingredients
CAKES:
2 (1 1/2-ounce) slices whole wheat bread
1 pound skinless, boneless chicken breast
1/4 cup chopped fresh chives
3 Tbsp. low-fat mayonnaise
1 tsp. Cajun seasoning
1/4 tsp. salt
2 large egg whites
2 tsp. canola oill

AIOLI:
2 Tbsp. low-fat mayonnaise
2 tsp. prepared horseradish
1 tsp. bottled minced garlic
1/8 tsp. salt

Directions
1. To prepare cakes, place bread in a food processor; pulse 10 times or until coarse crumbs measure 1 cup (discard remaining breadcrumbs). Set breadcrumbs aside.
2. Place chicken in food processor; pulse until ground. Combine chicken, chives, 3 tablespoons mayonnaise, seasoning, 1/4 teaspoon salt, egg whites and breadcrumbs in a medium bowl; mix well (mixture will be wet). Divide mixture into 8 equal portions, shaping each into 1/2-inch-thick patty.
3. Heat oil in a large nonstick skillet over medium heat. Add patties; cook 7 minutes on each side or until done.
4. To prepare aioli, combine 2 tablespoons mayonnaise and remaining ingredients in a small bowl. Serve with cakes.

Recipe from: Cooking Light
Serves: 4 (serving size: 2 chicken cakes and about 1 1/2 teaspoons aioli)

NUTRITIONAL INFORMATION: 242 Calories | 7.1g Fat | 0.5g Fiber | 749mg Sodium  | 29.5g Protein

Tabbouleh

Anyone ever heard of tabbouleh? If not, here’s your chance to not only learn what’s in this traditional Arabic salad, but also a chance to make it. Before I get into the healthful benefits and how good it tastes, you need to know how to pronounce it. I’ve seen several pronunciations, but the most common is this: TAB-BOO-LAY.

Now that you got that out of the way, it’s time to make tabbouleh! Why? This Lebanese salad, typically consisting of cracked wheat, tomatoes, parsley, mint, lemon juice, and olive oil has all kinds of delicious flavors packed together, but without all those pesky calories.

A full 1 1/4-cup serving is only 150 calories and packs over 11 grams of protein and 4.5 grams of fiber. Bulgar, an ingredient in this salad that you may not have heard of, is very similar to white rice. The only difference… it has more fiber and protein, a lower glycemic index, and higher levels of most vitamins and minerals.

In addition, summer is right around the corner, and if you live in Texas, like me, you’ll want a refreshing side dish or light lunch idea for when it’s 100+ degrees F outside.

A few tips to note:

  • If you’re making the mixture a few hours or more in advance, store the cucumber and tomato separately and add them close to serving time to keep the salad at its best.
  • For a savory Middle-East light lunch, serve this salad with hummus and pita chips.
  • Add Parmesan or Feta cheese for more flavor.
Enjoy!
Chop tomatoes, parsley, mint, chicken, bell pepper and cucumber and toss.
Add bulger.
Toss with lemon juice and olive oil.
Serve immediately or chill.


Tabbouleh with Chicken and Red Bell Pepper
Ingredients
1/2 cup uncooked bulgar
1 1/2 cups diced plum tomatoes
3/4 cup shredded rotisserie chicken breast
3/4 cup minced fresh flat-leaf parsley
1/2 cups finely chopped red bell pepper
1/2 cup diced cucumber
1/4 cup minced fresh mint
1 1/2 Tbsp. lemon juice
1 Tbsp. olive oil
1/2 tsp. salt
1/4 tsp. pepper

Directions
1. Cook bulgar per directions on package. Cool.
2. Add tomatoes and remaining ingredients; toss well.

Nutritional Information: 150 Calories | 4.7g Fat | 16.9g Carbohydrate | 11.2g Protein | 4.5g Fiber

Yield: 4 (1 1/4 cup) servings
Recipe from: Cooking Light

Lemon Chicken

Here’s a healthy chicken recipe that my mom and I made a while ago for a “girls night”dinner while my dad and husband, Matt, were at a baseball game. The chicken is less than 200 calories, has only 6 grams of fat, and packs 27 grams of protein.

Dried tarragon, dijon mustard, olive oil and lemon juice create a delicious combination of flavors in this quick and easy poultry dish. The lemon juice can be a little tart, but is very refreshing, especially if you make this dish in the spring or summer. Serve the chicken over rice, pasta or potatoes, and drizzle with extra sauce. Enjoy!

Pound chicken into thin cutlets and place in a shallow glass baking pan.

Whisk together the olive oil, mustard, lemon juice, and tarragon

Pour mixture over chicken.

Bake for 40-45 minutes at 350 degrees F.


Serve over rice and drizzle with remaining sauce.


Lemon Chicken
Ingredients
1 pound boneless, skinless chicken breasts
2 Tbsp olive oil
3 Tbsp Dijon mustard
3 Tbsp fresh squeezed lemon juice
1 tsp dried tarragon, basil or oregano

Directions
1.  Wash the chicken and pat dry with paper towels.  Put the chicken between sheets of wax paper and pound with mallet or rolling pin until even thickness.  Place chicken in a shallow glass-baking pan.
2.  Preheat the oven to 350 degrees F.  In a small bowl, whisk together the olive oil, mustard, lemon juice, and tarragon (or basil or oregano).  Pour it over chicken and bake uncovered 40 to 45 minutes.
3.  Slice the cooked chicken on the diagonal and serve one chicken breast or 4 ounces per person.  Serve over pasta, rice, or potatoes and spoon some of the sauce over each serving.

Yield:  4 servings
Recipe from: Best Bites From the Wellness Kitchen  by the Seretean Wellness Center at Oklahoma State University

Nutritional Information
Calories: 175
Protein:  27 g
Carbohydrate: 1 g
Total Fat: 6 g
Saturated Fat: 1 g
Cholesterol: 65 mg
Fiber: 1 g
Sodium: 115 g

Chicken Chili

Here’s an extremely healthy chili recipe from Ina Garten (aka – Barefoot Contessa) that I strongly recommend. It is loaded with chunks of white meat chicken for lean protein, contains tons of Vitamin C from the red & yellow bell peppers, and packs quite a bit of heat with the chili powder, cayenne pepper and red pepper flakes in the seasonings.
Ina Garten states from Barefoot Contessa Parties! that “We had been making traditional chili at Barefoot Contessa for almost 20 years. I decided to update it with chicken to make it lighter, and it’s even more popular than our regular chili.”
I can definitely see why… my husband even ate two bowls of it. Serve with perfect corn bread and enjoy!
Saute onions in olive oil until translucent, 10-15 minutes. Add garlic and cook for 1 minute.

Add peppers and spices and cook for 1 minute.

Process tomatoes and add to the pot with basil. Bring to a boil and simmer for 30 minutes, uncovered. Add diced chicken and simmer for another 20 minutes.

Serve warm with corn bread and toppings of choice including shredded cheese, onions, or sour cream.


Chicken Chili
Ingredients
8 cups yellow onions (6 onions)
1/4 cup good olive oil, plus extra for chicken
1/4 cup minced garlic (8 cloves)
4 red bell peppers, cored, seeded and large-diced
4 yellow bell peppers, cored, seeded and large-diced
2 teaspoons chili powder
2 teaspoons ground cumin
1/2 teaspoon dried red pepper flakes, or to taste
1/2 teaspoon cayenne pepper, or to taste
4 teaspoons kosher salt, plus more for chicken
4 (28-ounce) cans whole peeled plum tomatoes in puree, undrained
1/2 cup minced fresh basil leaves
8 split chicken breasts, bone in skin on
Freshly ground black pepper

Directions
1. Cook the onions in the oil over medium-low heat for 10-15 minutes, until translucent. Add the garlic and cook for 1 more minute. Add the bell peppers, chili powder, cumin, red pepper flakes, cayenne, and salt. Cook for 1 minute.
2. Crush the tomatoes by hand or in batches in a food processor fitted with a steel blade (pulse 6 to 8 times). Add to the pot with the basil. Bring to a boil, then reduce the heat and simmer, uncovered, for 30 minutes.
3. Preheat the oven to 350 degrees F.
4. Rub the chicken breasts with olive oil and place them on a baking sheet. Sprinkle generously with salt and pepper. Roast the chicken for 35-40 minutes, just until cooked. Let cool slightly.
5. Separate meat from the bones and skin and cut it into 3/4-inch chunks. Add to the chili and simmer, uncovered, for another 20 minutes. Serve with toppings of choice (onions, corn chips, grated cheddar, sour cream), or refrigerate and reheat gently before serving.

Yield: 12 servings
Recipe from Barefoot Contessa Parties!

Chicken and Dumpling Soup

I’ve been on a huge soup craze lately, and I’m not sure why….maybe because soups are low carb, maybe because it’s winter (although sometimes it feels more like spring in Dallas), or maybe its just because I’ve found some truly outstanding soup recipes.
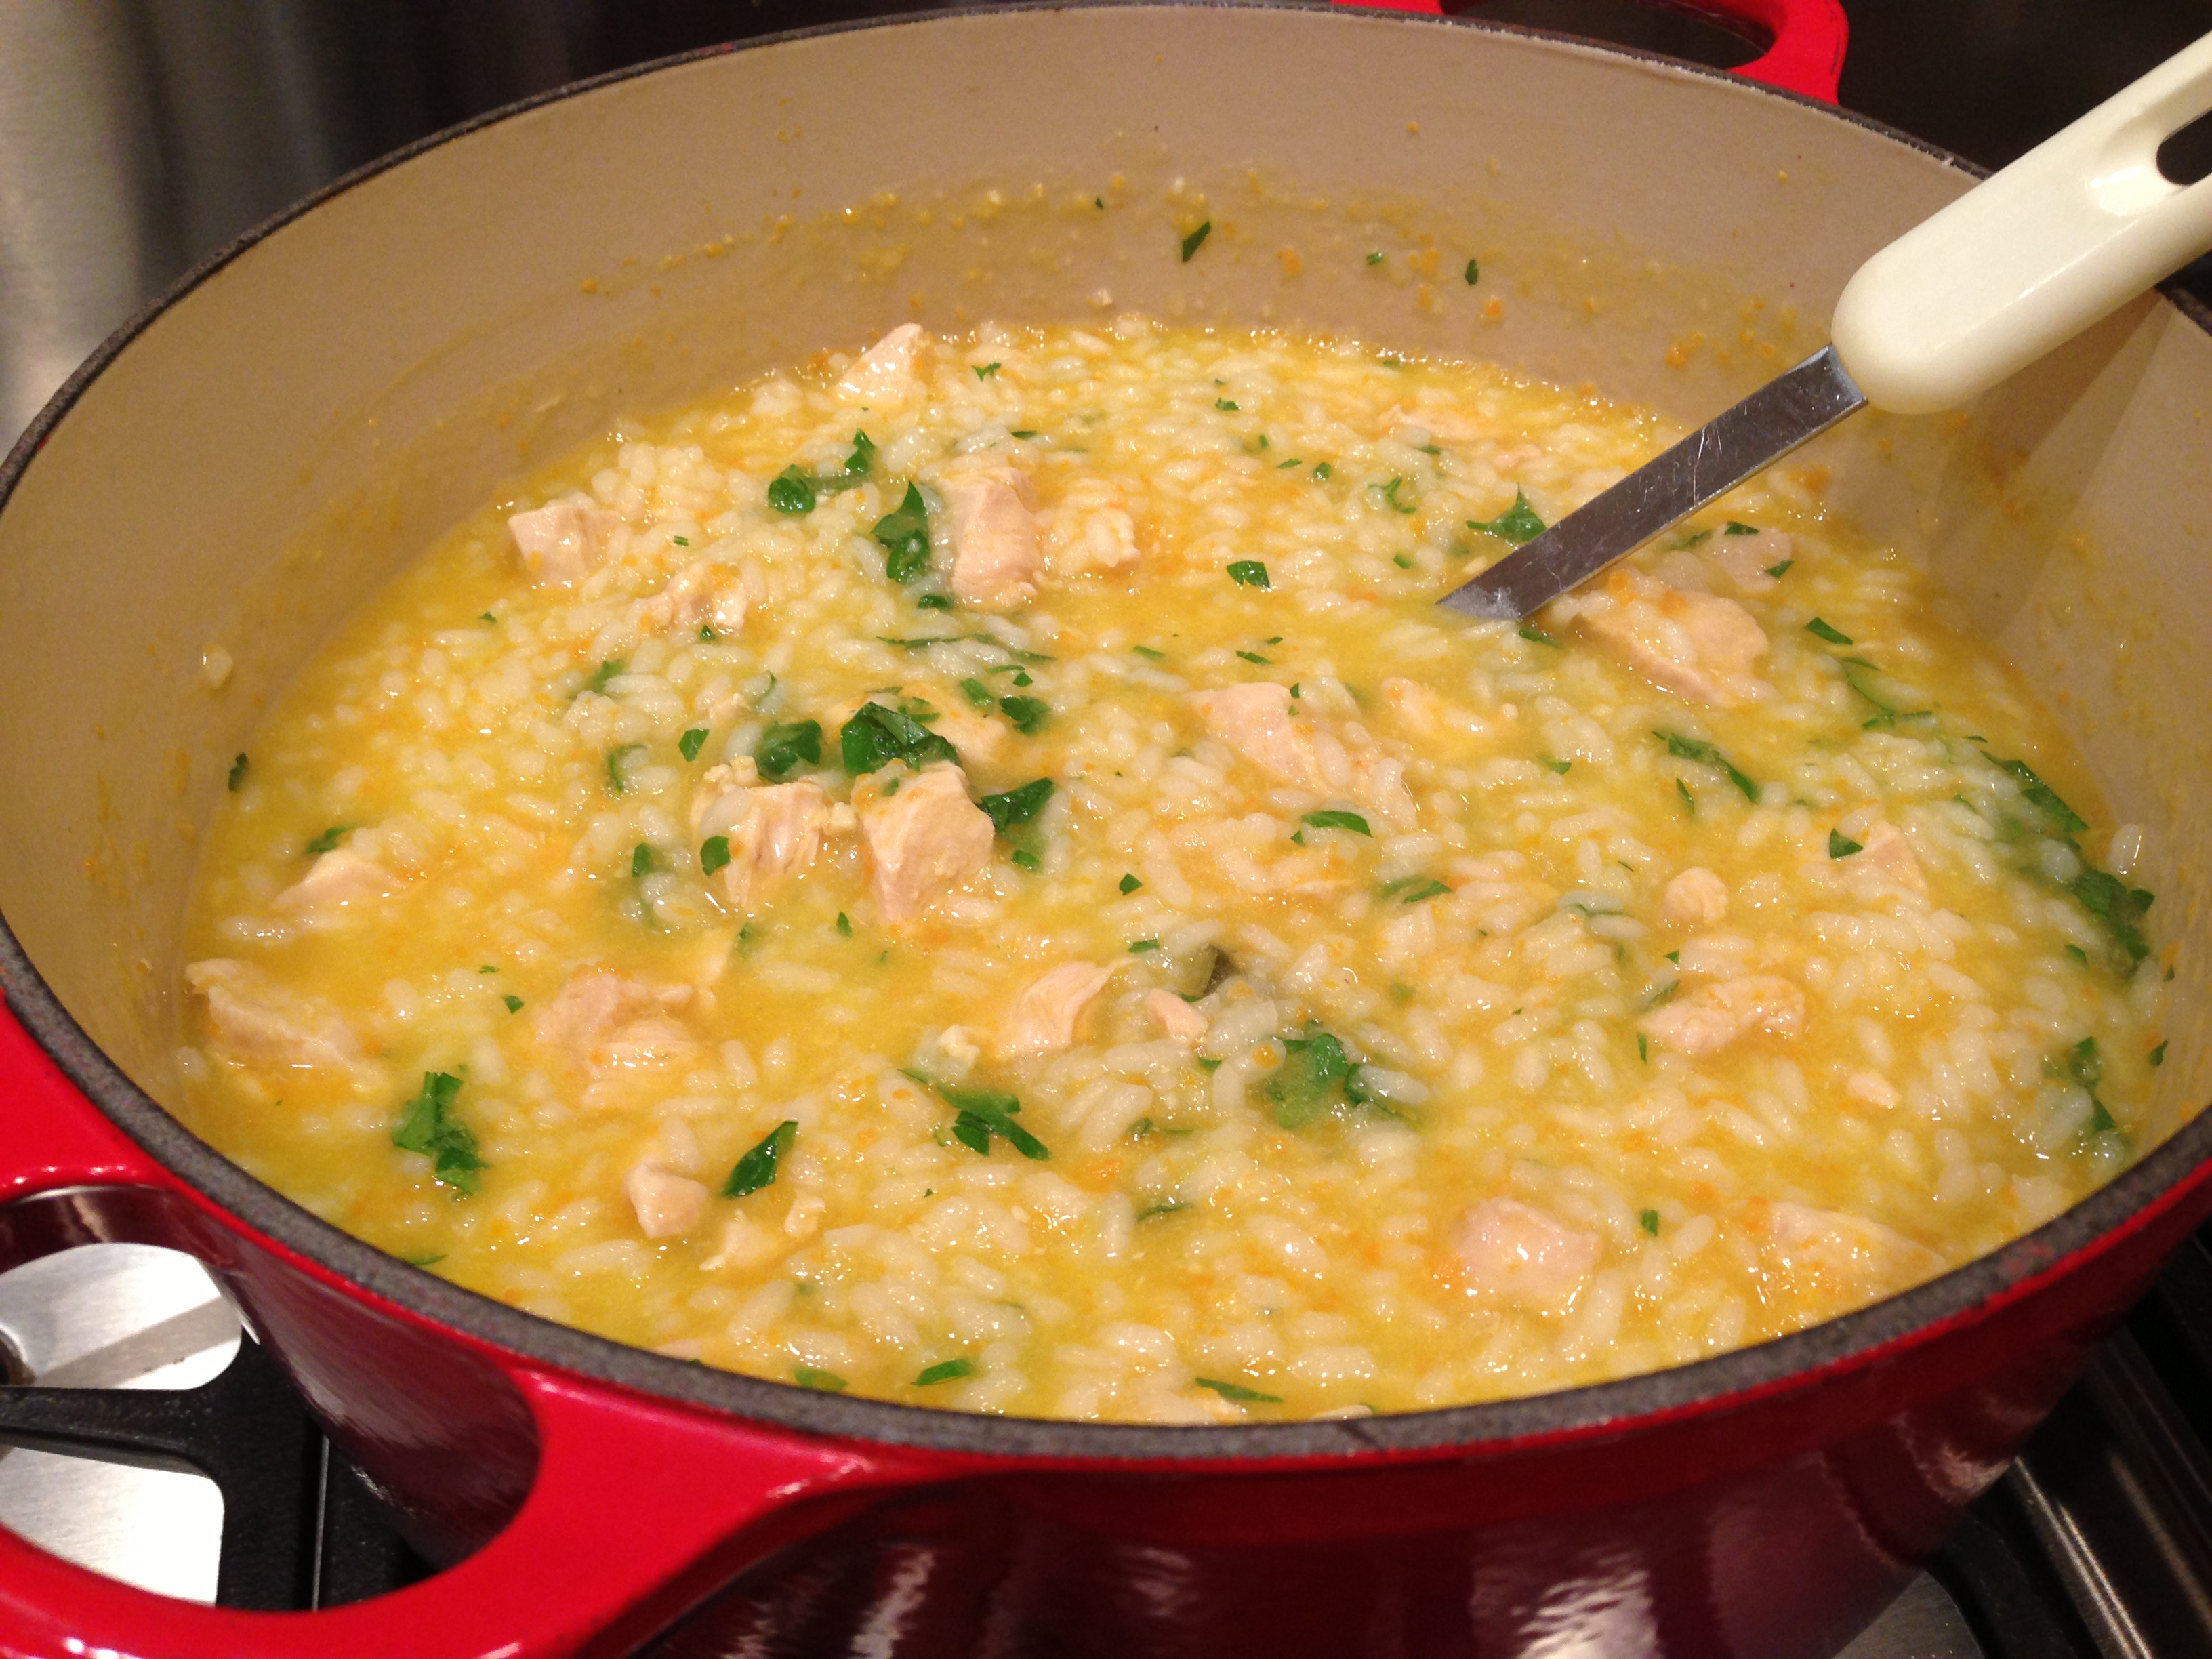
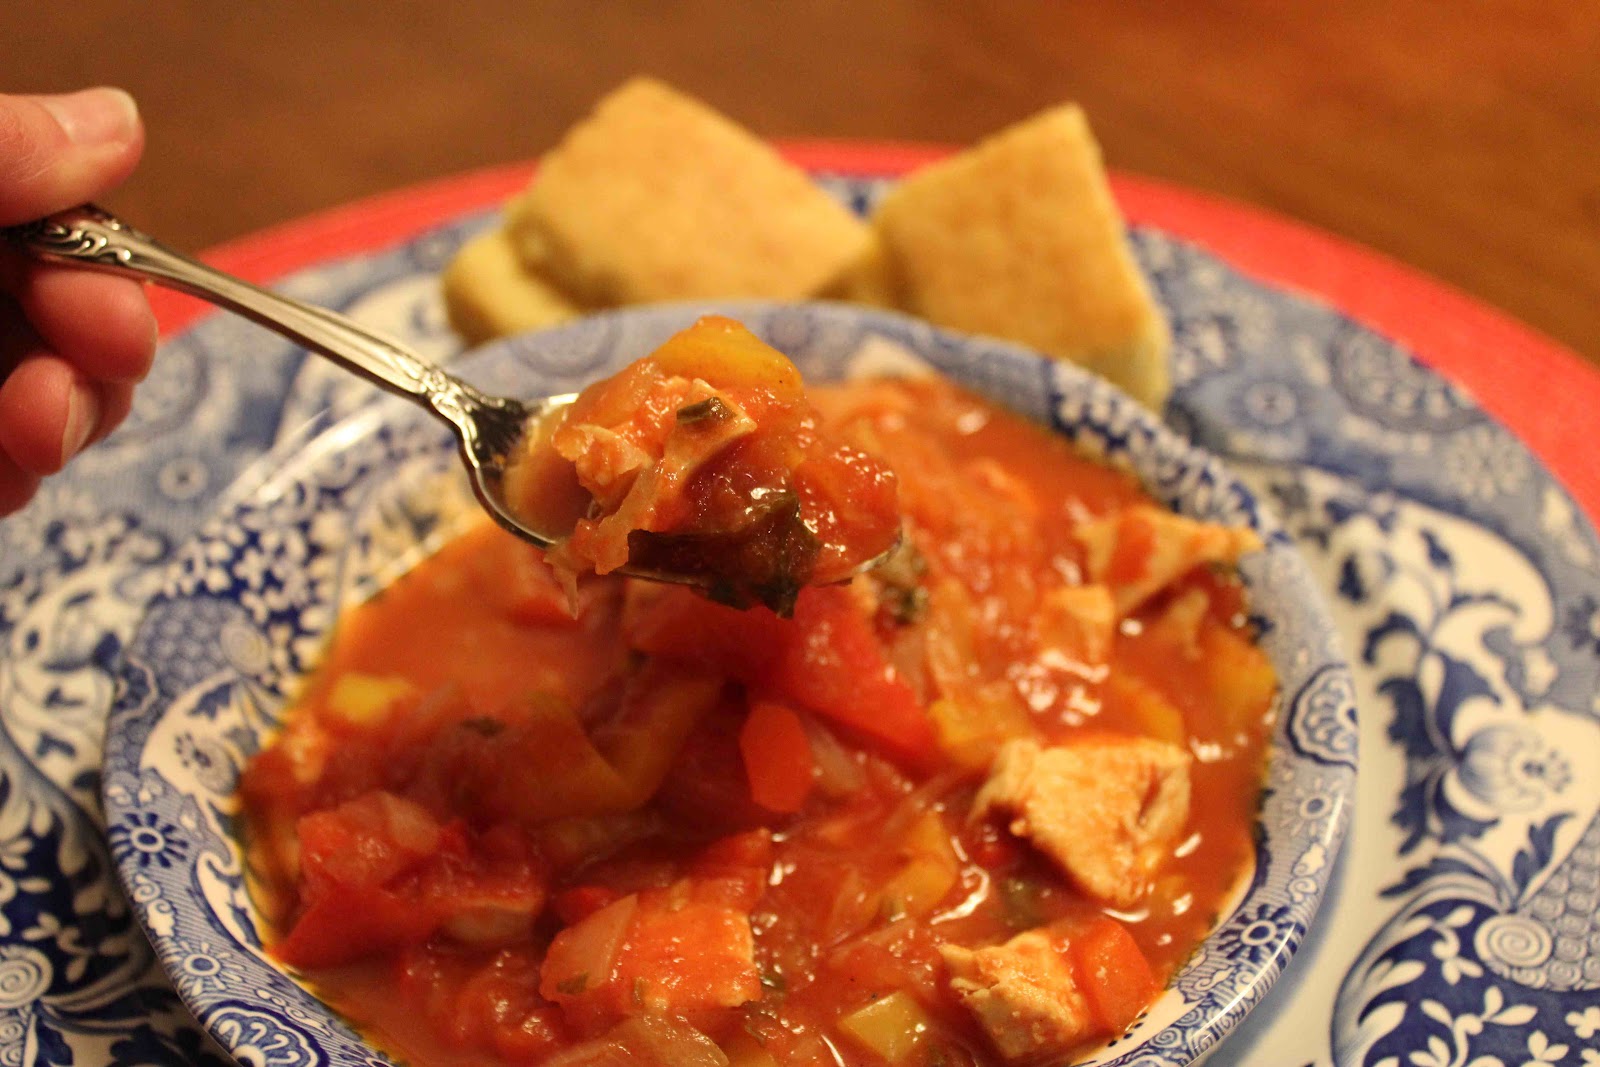
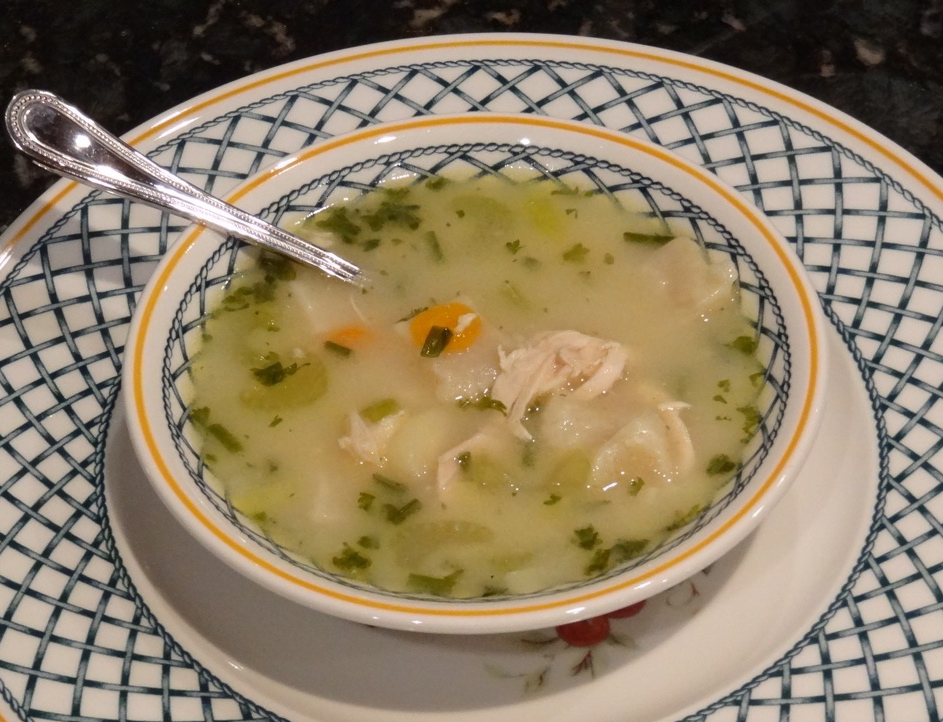
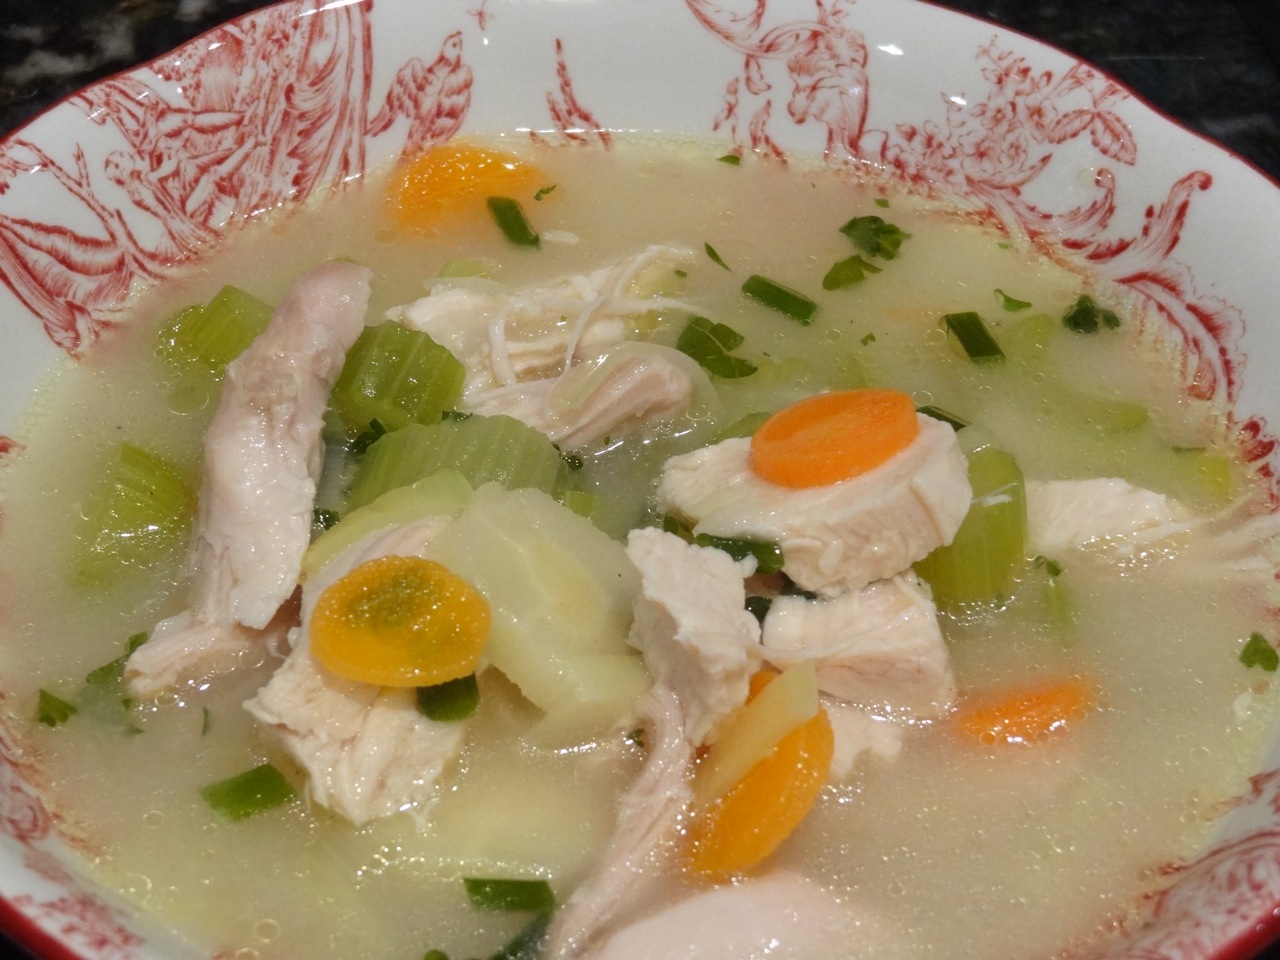
Whatever the reason, you’ve got to try this chicken and dumpling soup that is extremely delicious. My mom discovered the recipe from the latest Bon Appetit magazine, and made it for my dad a few weeks ago. He was pleasantly surprised and ate three bowls of it the first night! One week later, I visited my parent’s house, and low and behold, she made the soup again. This time I got to try it; I concur with my dad, it is awesome.
The original recipe calls for gnocchi, but my mom did not have any ricotta cheese on hand (my dad went shopping for her, and since he does not like cheese, he probably “forgot” to buy ricotta on the grocery list – haha). Dumplings make a great substitute for gnocchi, and are what we used in this soup.
As far as taste goes, I would liken this recipe to a creamier chicken noodle soup. The broth has a savory flavor from the chicken thighs and cooked vegetables. The chives and parsley are a nice addition, and the Parmesan adds a unique twist you wouldn’t expect to pair with soup. I also discovered what a parsnip is… I’m not sure how to describe the taste, but it looks like a white carrot!
The recipe below looks long and extensive, but don’t let that scare you into making chicken and dumpling soup. The instructions are detailed, and the recipe surprisingly easy.  Enjoy!

Chicken and Dumplings

Ingredients
*Dumplings
2 cups flour
1/2 cup shortening (solid Crisco)
1/2 tsp. salt
1/2 cup water

*Note below

Chicken and Gravy
10 cups low-salt chicken broth
2 pounds skinless, boneless chicken thighs
1/4 cup (1/2 stick) unsalted butter
6 Tbsp. all-purpose flour
2 celery stalks, cut crosswise into 1/4″-thick slices
1 carrot, peeled, thinly sliced
1 parsnip, peeled, cut into 1/4″
1 leek, halved lengthwise, cut crosswise into 1/4″-thick slices
1/4 cup chopped flat parsley
1/4 cup press chives
Kosher salt, freshly ground pepper
Shaved Parmesan

Directions
Dumplings
1. Mix the flour and salt. Cut the shortening into the flour until it is the size of peas. Add the water and blend.
2. On a floured board, roll out to 1/4 inch thick. Cut into 1/2 to 3/4-inch squares. Let dry for about 15 minutes.
 

Chicken and Gravy
1. Bring broth to a boil in a large saucepan. Add chicken; reduce heat to low, cover, and gently simmer until chicken is tender and cooked through, 20-30 minutes. Remove chicken; let cool slightly and shred into bite-sized pieces. Bring to broth to a boil and cook until reduced to 8 cups, about 15 minutes.
2. Meanwhile, melt buter in a small heavy saucepan over low heat. Whisk in flour until smooth and cook, whisking constantly, until roux is pale beige in color, about 15 minutes (do not brown).
3. Scape roux into simmering broth; whisk until thickened and broth coats the back of a spoon. Reduce heat to low and add vegetables. Cook until tender, about 5 minutes. Add shredded chicken and herbs. Season with salt and pepper. DO AHEAD: Can be made 2 days ahead. Chill, uncovered, until cold; cover and keep chilled. Rewarm before serving.

4. Drop dumplings into boiling soup. Cover tightly (don’t lift cover); reduce heat and simmer for 12-15 minutes, or until done.  Using a slotted spoon, transfer dumplings to bowl, dividing equally. Ladle chicken and vegetables with gravy over. Season with peppers and top with Parmesan.

Yield: 8 servings
Recipe adapted from: Bon Appetit

*Note – my mom substituted her homemade dumplings for the gnocchi since she forgot to buy ricotta cheese at the store. The original gnocchi recipe is below: 

*Gnocchi 
1 pound ricotta
1/2 cup plus 2 tablespoons all-purpose flour plus more
1 large egg, beaten to blend
1 1/4 cups finely grated Parmesan
3/4 tsp. freshly grated nutmeg
1/2 Tbsp. kosher salt
Directions
1. If using fresh ricotta that has excess liquid, you may need to drain it overnight. Line a fine-mesh strainer with cheesecloth and set it over a medium bowl. Add ricotta; cover with plastic wrap and let drain overnight in refrigerator. If using supermarket ricotta, proceed with recipe; no draining required.
2. Gently mix ricotta, 1/2 cup plus 2 tablespoons flour, egg, Parmesan, nutmeg, and salt in a large bowl just to blend (do not overwork). Form dough into a ball (it will be sticky); wrap in plastic and chill for at least 1 hour and up to 1 day.
3. Line a baking sheet with parchment paper; set aside. Place dough on a lightly floured work surface. Divide dough into 4 equal portions and cover with a clean kitchen towel. Using your hands, roll 1 portion into a 1/2″-diameter rope; cut crosswise into 1/2″-thick pieces. Lightly dust gnocchi with flour and transfer to prepared baking sheet. Repeat with remaining portions of dough. Cover gnocchi with a kitchen towel and chill until ready to cook. DO AHEAD: Can be made 2 months ahead. Freeze on sheets, then store, frozen in an airtight container.
4. Cook gnocchi in a large pot of boiling salted water, stirring occassionally, until gnocchi float to the surface, about two minutes (slightly longer if frozen).