Dallas Duo in Telluride

 
The “uno” in Dallas Duo is not in Dallas anymore! For Christmas, Matt’s aunt and uncle rented a gorgeous house in the mountains of Telluride, Colorado for our entire family of 26 people! The house is made of nothing but logs and dark stone, and is extremely warm and comortable.  It is a cold 24 degree outside, and ten times better than being in Texas! 

This week I won’t be baking. Instead Chef John, a chef who has cooked for families in Pennsylvania, New Jersey, and Colorado, will be designing and preparing our meals. Last night, he made a delicious dinner, consisting of stuffed pork loin, sour cream & horseradish mashed potaotes, and a mixed green salad with chopped red onions, carrots and bell peppers, combined in a Italian dressing.  For dessert we had a delectable southern peach cobbler.

I took a picture of the meal with my camera, but won’t be able to upload it until I return to Dallas. Stay tuned, more pictures and 5-star meals to come from Telluride!

Fantasy Fudge

This “fantasy” fudge sure lives up to its name! My husband says it’s the best fudge he’s had in his entire life! I would have to agree, nothing compares. The fudge literally melts in your mouth…it is perfect!

Making fudge is a recent tradition that came about because of Southlake Carroll Dragon football. For those of you who don’t know, Southlake is a powerhouse in Texas high school football. During my entire four years at Carroll, we only lost 1 game….by one point (14-15) to Katy at the State Championship game back in 2004!

photo courtesy of MySouthlakeNews.com

Getting back to the fudge, my mom would make this delicious treat for us to snack on at the Carroll football games based on these two factors:

  1. When it’s cold outside (the Dragons used to play at the old Texas Stadium….and it since it was a pile of concrete, it got extremely cold!)
  2. When the Dragons made the playoffs (which no doubt happens during the colder weather!)
In addition, my sister, who was an Emerald Belle, had to make homemade treats/gifts for her football player. (Each belle is paired with a football player and is in charge of making them a little “good luck” gift before each game.) My sister would decorate green and white cupcakes, make brownies, cookies, and of course make this delicious fudge for her football player.
This past weekend my dad, and my husband and I attended the state semi-final game at SMU’s Ford Stadium to watch Carroll play Dallas Skyline. It was an amazing game, and we pulled out a spectacular win in the last two minutes of the game! Of course, as tradition has it, my mom made fudge and we thoroughly enjoyed it!
My mom sent two more bags of fudge, in which the first went to Sunday’s Life Group at church, and the second went with to work on Monday for our first annual eCommerce potluck.
Our own Southlake playoff tradition as spectators may not compare to the tradition of bleached blonde hair as a football player, but it sure is a tasty one! (Yes, the football players bleach their hair if they make it to playoffs…”Blondes have more fun!”)  Enjoy!
Fantasy Fudge
Ingredients
  • 3 cups sugar
  • 3/4 cup ( 1 1/2 sticks) butter or margarine
  • 1 can ( 5 oz.) evaporated milk
  • 12 oz. Baker’s semi-sweet chocolate, chopped
  • 1 jar (7 oz.) Jet-Puffed Marshmallow Creme
  • 1 tsp. vanilla
Instructions
  1. Line a 9-inch square pan with aluminum foil. Spray foil with nonstick spray.
  2. Bring sugar, butter and milk to a rolling boil in a large saucepan on medium heat, stirring constantly. Boil for 4 minutes, or until 234 degrees F on candy thermometer, stirring constantly.
  3. Remove from heat. Add chocolate and marshmallow creme; stir until melted. Stir in vanilla.
  4. Pour into pan and cool completely.

Fantasy Fudge
Ingredients
3 cups sugar
3/4 cup ( 1 1/2 sticks) butter or margarine
1 can ( 5 oz.) evaporated milk
12 oz. Baker’s semi-sweet chocolate, chopped
1 jar (7 oz.) Jet-Puffed Marshmallow Creme
1 tsp. vanilla

Directions
1. Line a 9-inch square pan with foil.
2. Bring sugar, butter and milk to a rolling boil in a large saucepan on medium heat, stirring constantly. Boil 4 minutes, or until 234 degrees F on candy thermometer, stirring constantly.
3. Remove from heat. Add chocolate and marshmallow creme; stir until melted. Stir in nuts and vanilla.
4. Pour into pan. Cool.

Yield: 3 pounds or 40 servings, about 2 squares each

White Chocolate Oreo Truffles

Tis the season for holiday baking, and I did just that this weekend! Tomorrow is our first annual Holiday Potluck at work, and I am bringing Quick Chicken Parmesan and a variety of desserts including Neiman Marcus chocolate chip cookies, fantasy fudge, candied pecans and these truly addicting white chocolate Oreo truffles.
If you know me very well, you should know that I LOVE Oreos! I will only order ice cream, gelato and/or custard with Oreos. If I don’t get that flavor, I’m very upset. Don’t be fooled though, I may sample 3-4 flavors before ordering, but 99.999% of the time I will order cookies n’ cream.
This truffle recipe did not disappoint.  The only trouble I had was forming the balls. With only 1/2 cup of milk for a whole package of Jell-O and crushed Oreos, I found the batter was extremely thick. I had to add a little extra milk to help the truffles stay together and not crumble when rolling into balls. In addition, I had never made truffles before, so these definitely look “home-made”. They are not perfect little round balls. Instead, some truffles have more chocolate coating than others, some have too much chocolate drizzle, and some look lop-sided.  I guess it gives them character, right?  Plus, I think home-made truffles taste better than the boxed kind.
Even though no truffle looks the same, they all taste the same: delicious! They are full of Oreo flavor and are extremely moist, like you would expect from a cream-cheese filling. However, I like to think these are “healthier” since they have instant pudding mixture and skim milk! (That is probably just wishful thinking!)
My aunt Uny discovered this recipe and then shared it with my aunt Jolene, who shared it with me. Even though all three of us made the same truffle recipe over the weekend, we all had different results in terms of number of balls. I made 21 balls, Uny made 31 and Jolene made 49 balls! I guess it largely depends on how big you roll them. The original recipe calls for 42 truffles.
Enjoy!
Whisk together pudding mix and milk for 2 minutes. Add Oreo crumbs.

Shape into one-inch balls. Place in the freezer for 10 minutes.

Once balls are firm, dip them in melted white chocolate. Drizzle with melted semi-sweet chocolate.

Enjoy and see if you can keep yourself from eating more than one!


White Chocolate Oreo Truffles
Ingredients
1 package (3.9 ounce) Jell-O instant chocolate pudding
1/2 cup cold milk (more as needed)
36 Oreo cookies, finely crushed (about 3 cups)
1 package white chocolate candy coating, melted
1 semi-sweet chocolate square, melted

Directions
1. Beat pudding mix and milk for 2 minutes with a whisk (pudding will get thick). Add cookie crumbs and mix well.
2. Shape into 42 one-inch balls. Freeze the balls for 10 minutes.
3. Meanwhile, melt white chocolate according to package directions. I used the tray provided and melted the chocolate in a 250 degree oven for 12-15 minutes.
4. Dip balls into white chocolate and place in wax paper-lined pan.
5. Melt semi-sweet chocolate. I used the microwave, but be careful not to scorch the chocolate (use a very low-power setting). Drizzle truffles with semi-sweet chocolate.
6. Refrigerate balls until firm.

Yield: 42 one-inch balls (I made 21 large truffles)
Family recipe, Aunt Uny

Classic Beef Meatballs in Classic Tomato Sauce from The Meatball Shop in NYC

Why are all most decadent and unique bakeries and restaurants only in New York City? New York is home to the legendary brownie shop: Fat Witch Bakery, the famous peanut butter store: Peanut Butter & Co., the classic American dessert and cupcake store: Magnolia Bakery, and my latest discovery….The Meatball Shop!
I’ve never been to The Meatball Shop, but the next time I’m in NYC, I’m stopping by! The idea for their restaurant is brilliant. Specializing meatballs, this restaurant definitely thought outside of the box! Their menu sounds great: Meatball choices include chicken, beef, pork, vegetable, or the “special ball of the day!” In addition, you can choose to pair your meatballs from one of six sauces: classic tomato, spicy meat,  mushroom cream, pesto, parmesan cream, or special. Finally your meatballs and sauce are served “naked” with a side of Focaccia Bread, on a Brioche bun or baguette, or with a salad and veggies.
My mom recently bought The Meatball Shop Cookbook, and this weekend we made the Classic Beef Meatballs with Classic Tomato Sauce.
All I can say is “Wow!” these meatballs are great! They were extremely easy to make and you even get to mix the meat mixture with your hands! The simple part also stems from the fact that you bake the meatballs, instead of pan-frying them on the stove. Frying them on the stove requires more effort since you have to constantly roll the meatballs over to brown them on all sides.
Regarding the beef meatballs, I read that they are the top sellers at the Meatball Shop in NYC. An excerpt from the cookbook reads: “Most traditional meatball recipes call for Parmesan or pecorino cheese. While we’re big fans of these stronger cheeses, we prefer ricotta. It’s our secret weapon.  The mild and creamy consistency of this fresh cheese gives the meatballs a unique, light texture. Beef has a subtle flavor, and the ricotta is a great way to add fat and moisture to the recipe without overpowering flavor of a sharper cheese. These are quick to prep, and baking rather than frying makes this a fast comfort food even during the busiest of weeks.”
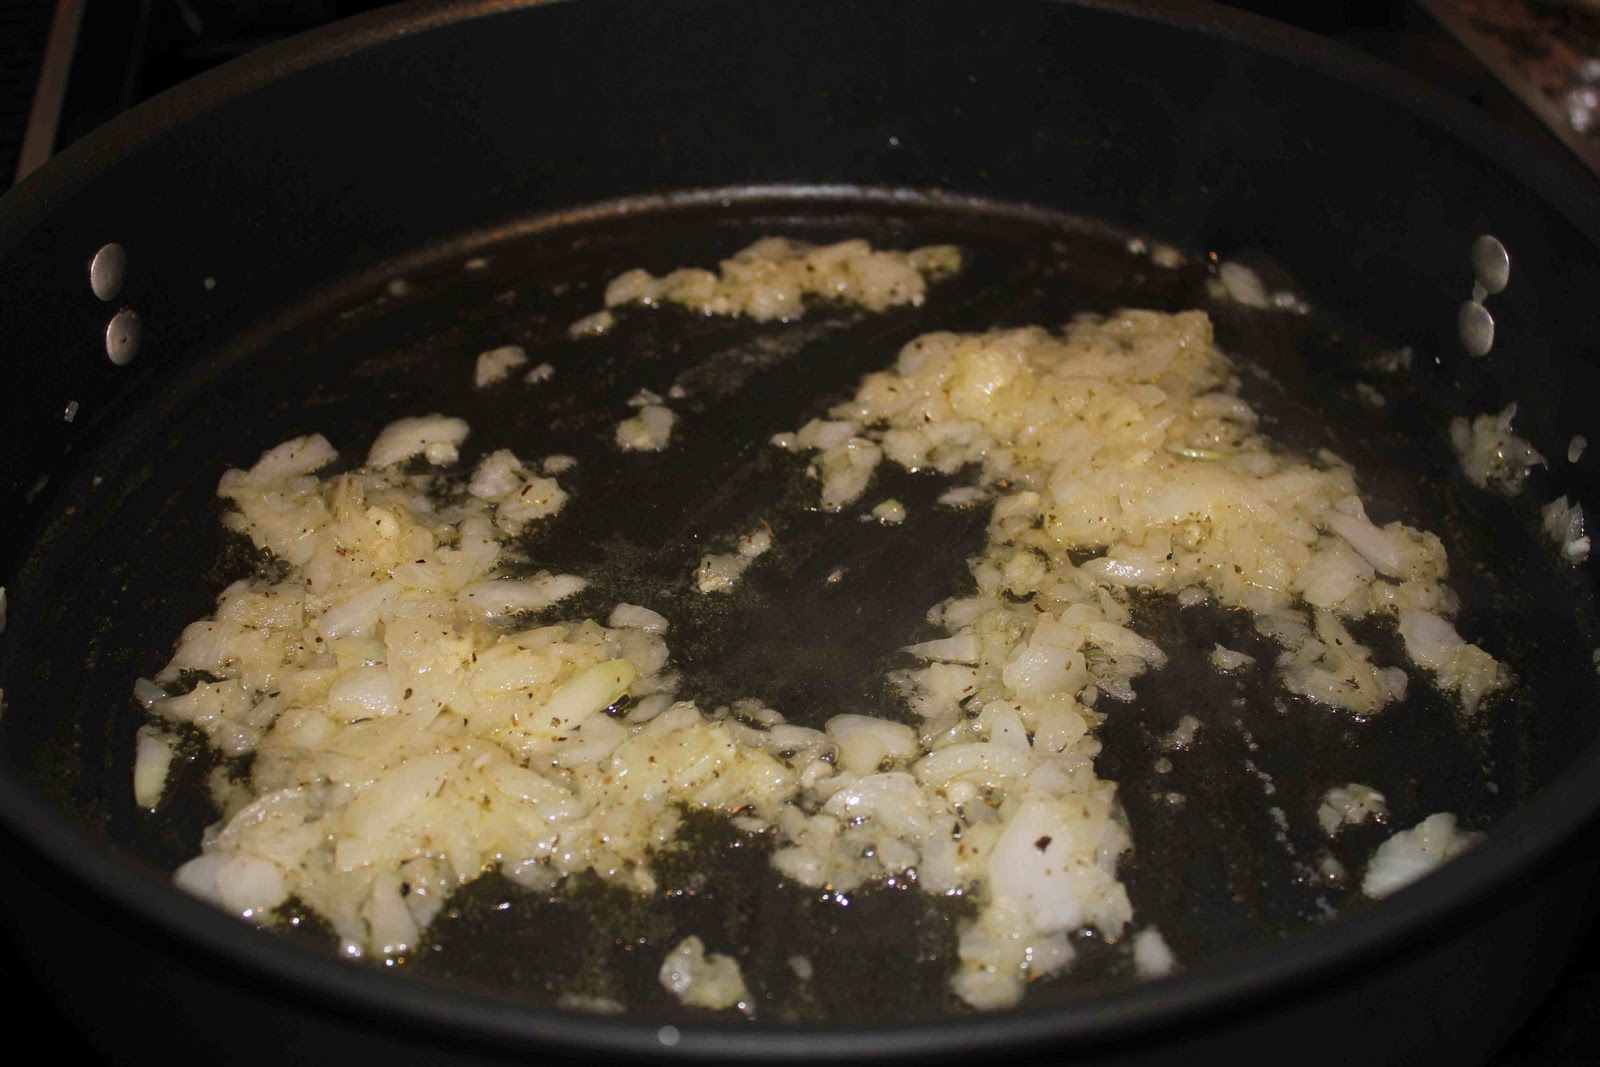
In my review of the classic tomato sauce, I was extremely impressed! Honestly, I was going to be lazy and heat up a jar of marinara sauce, but since I didn’t have a jar in my pantry, I was “forced” to make the homemade version. I’m so glad I did because it was easy and delicious. I am wary of homemade tomato sauces because I think they taste bland and are not worth the effort. Not this time….this classic tomato sauce was extremely flavorful and had a perfect blend of Italian seasonings.  According to the cookbook, “The sauce starts with “sweating” of onions (cooking them slowly, until translucent but not brown, to extract as much flavor as possible), and the flavor continues to build from a nice, long, low-heat simmering after the tomatoes are added.”
My only complaint about The Meatball Shop….they don’t have a location in Dallas!
For the Beef Meatballs
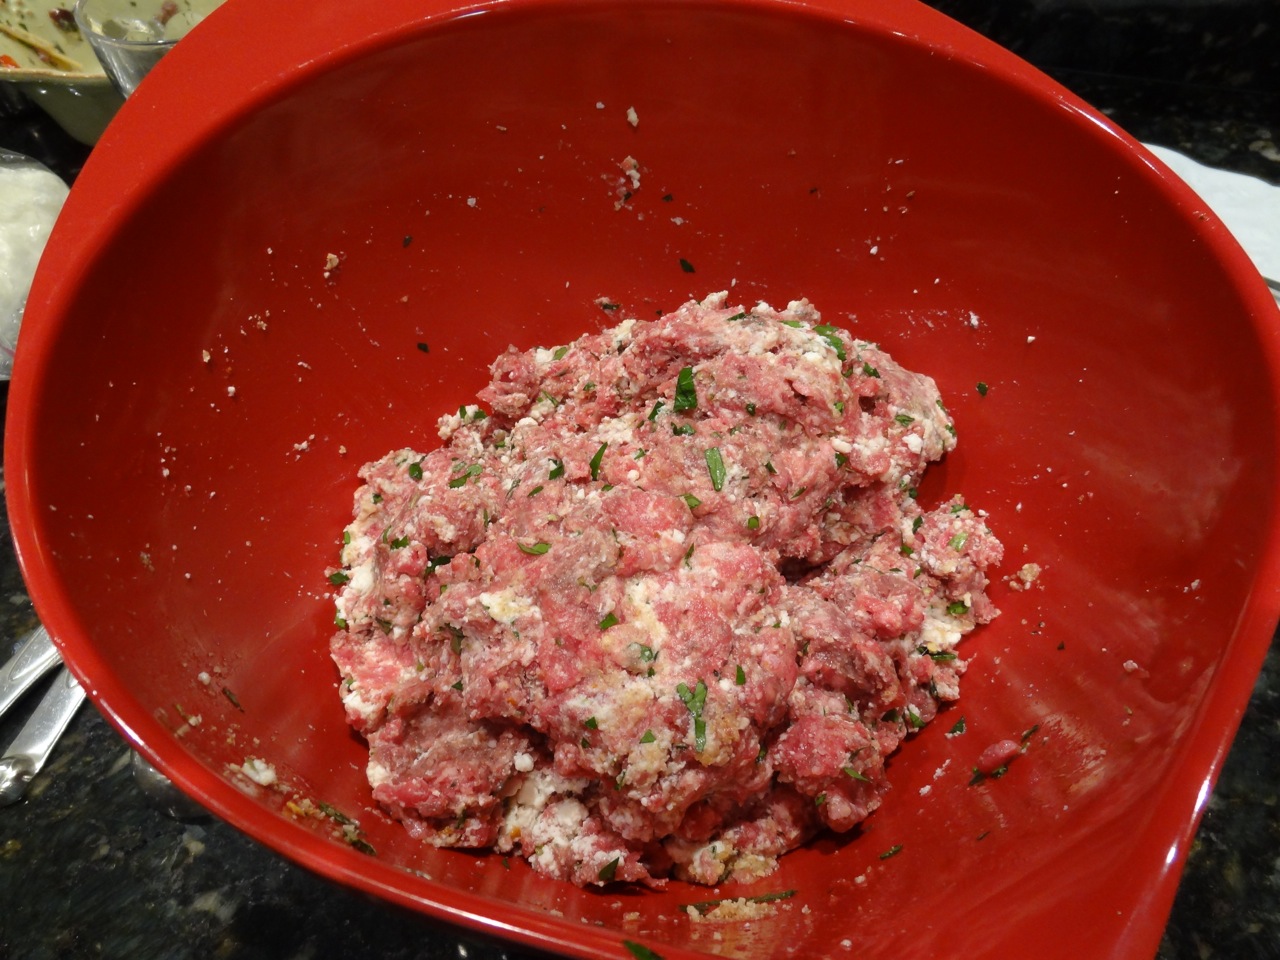
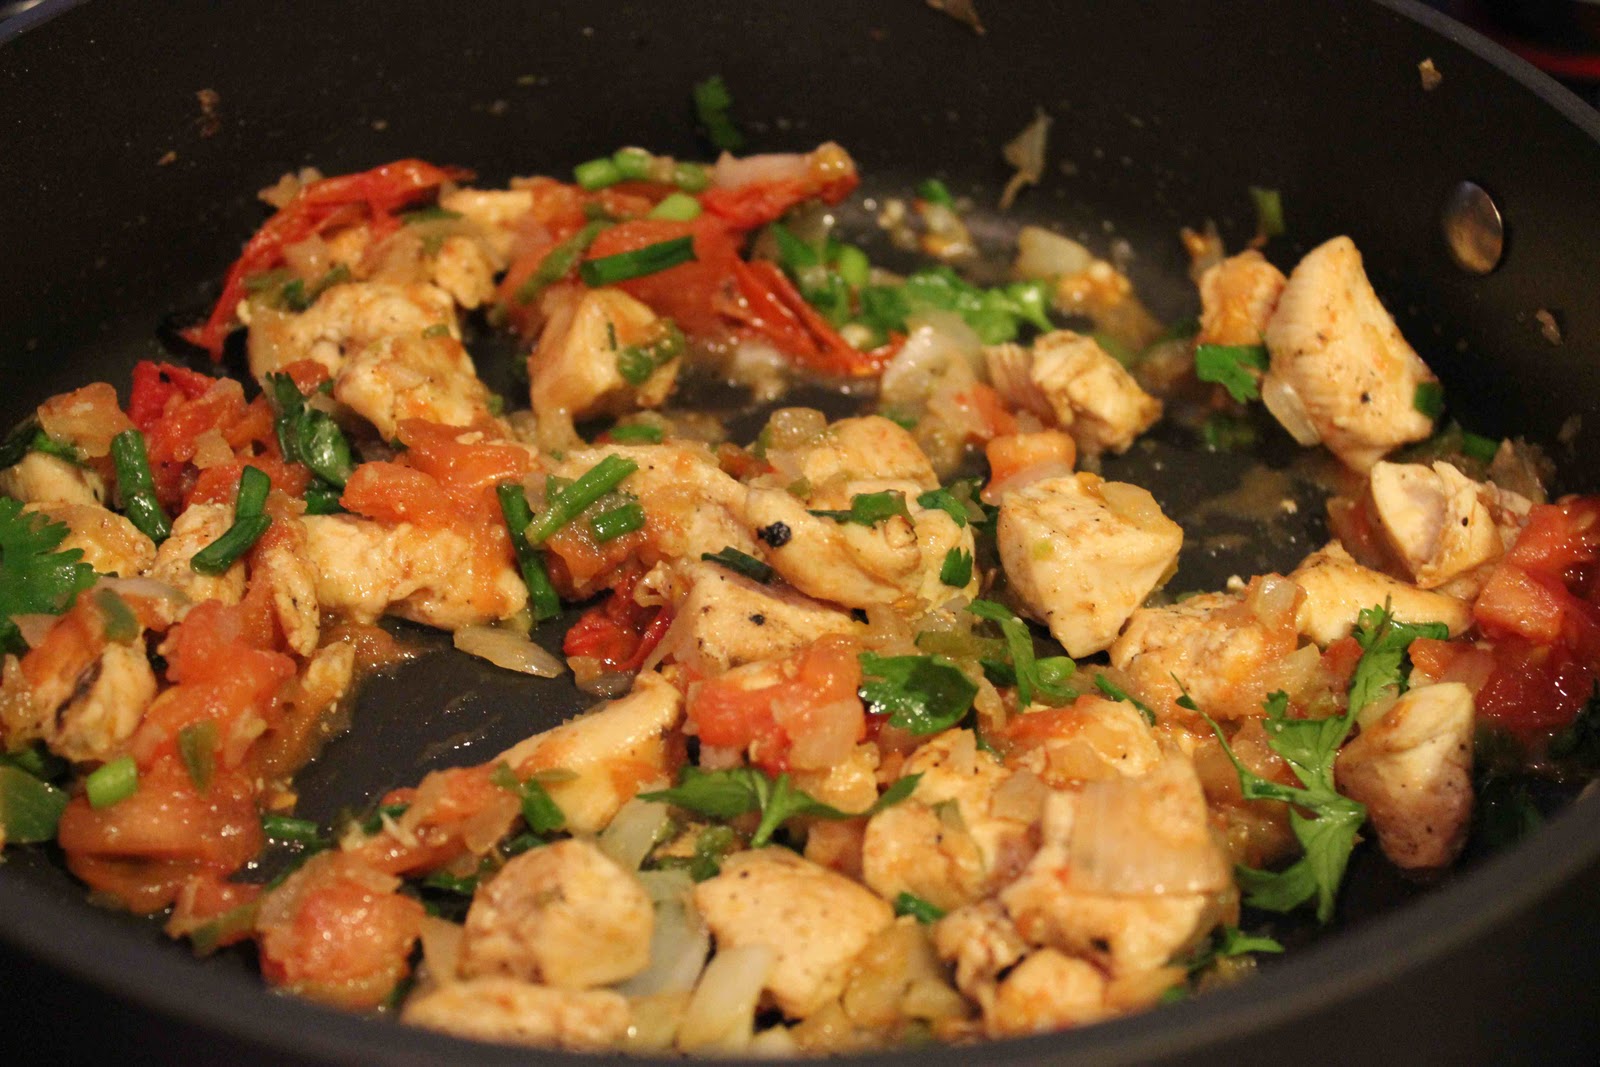
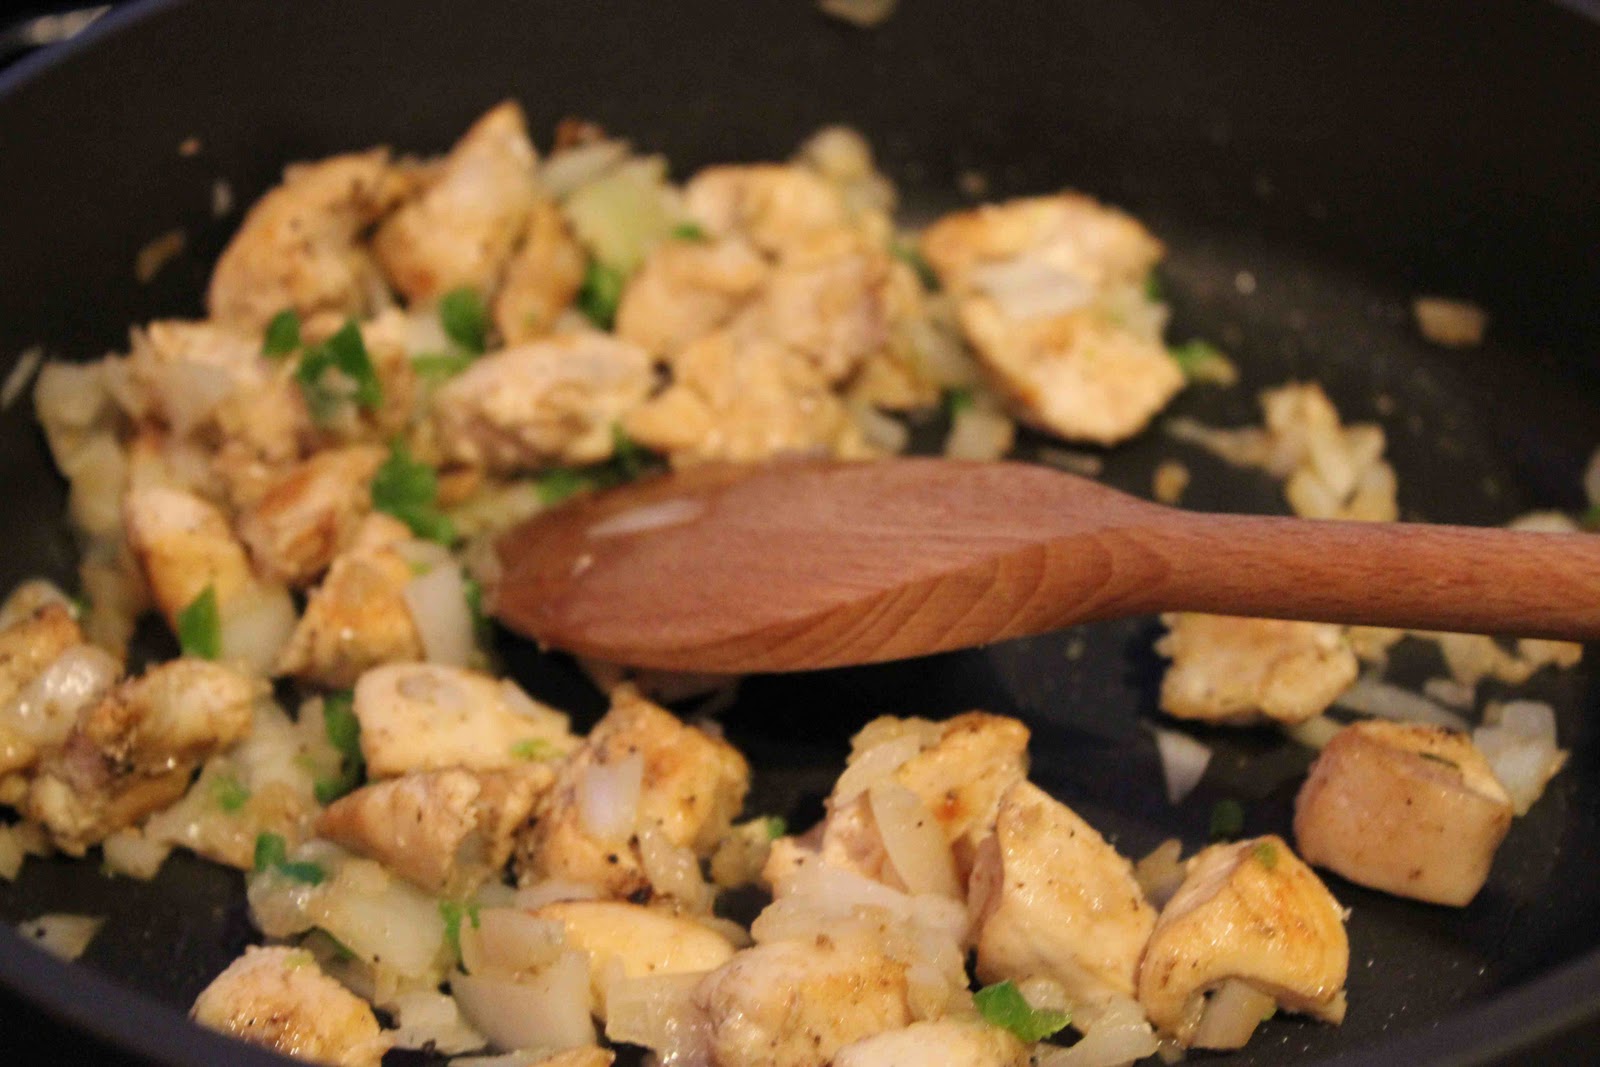
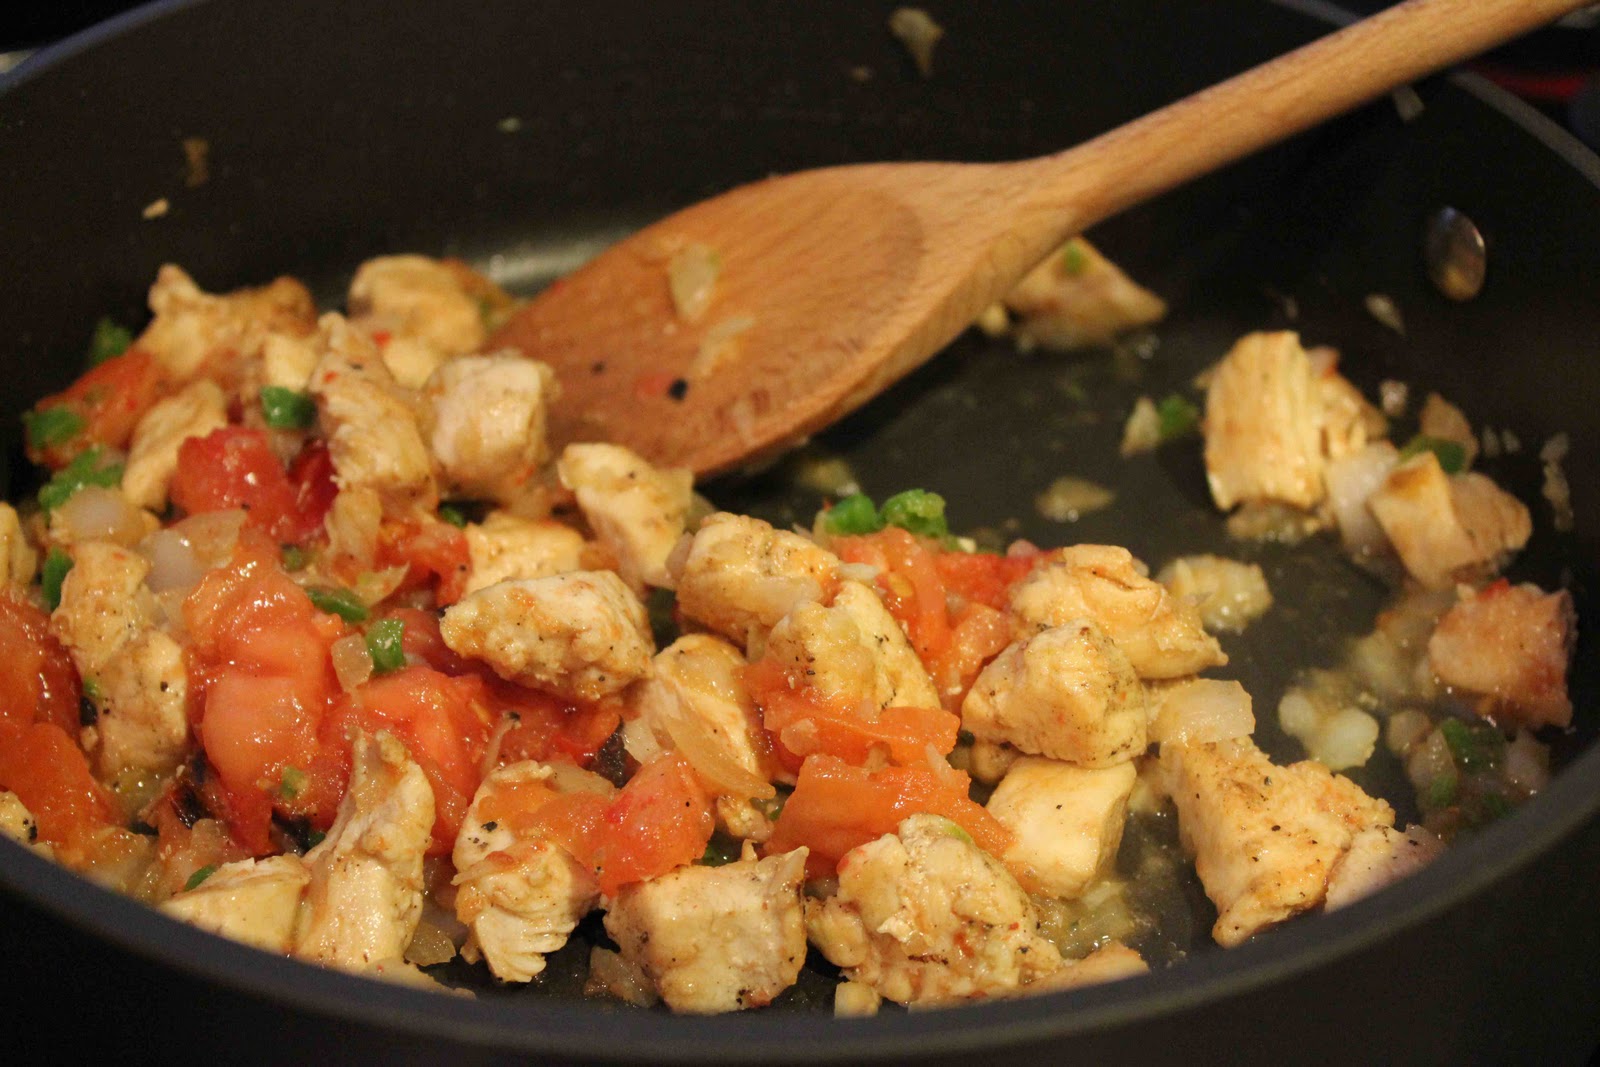
Combine ground beef, ricotta, eggs, bread crumbs, parsley, oregano, salt, red pepper flakes, and fennel in a large mixing bowl and mix by hand until incorporated.
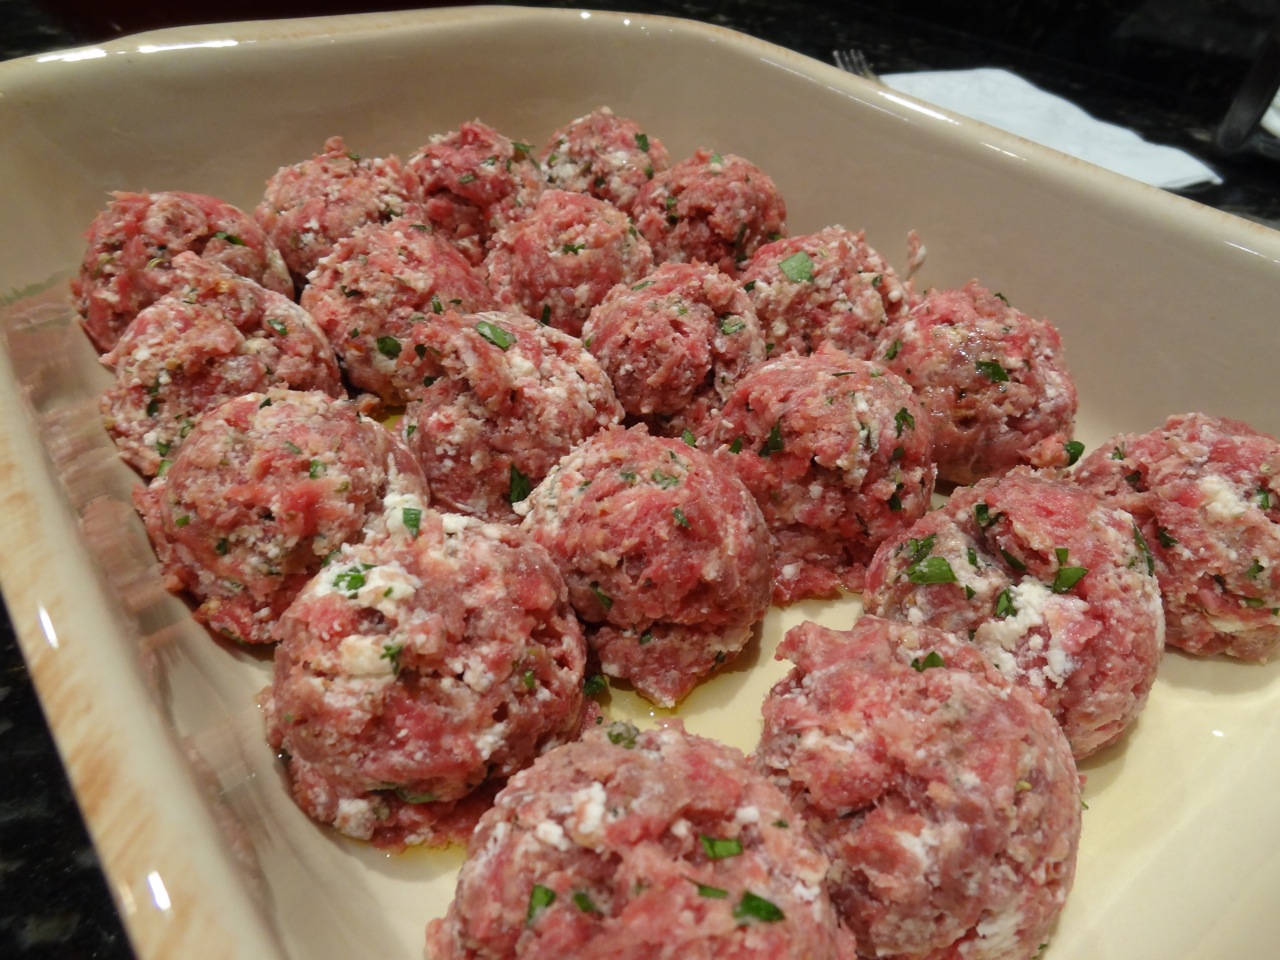
Roll mixture into golf ball sized meatballs (about 1 1/2 inches), and place into a baking dish, drizzled with olive oil.

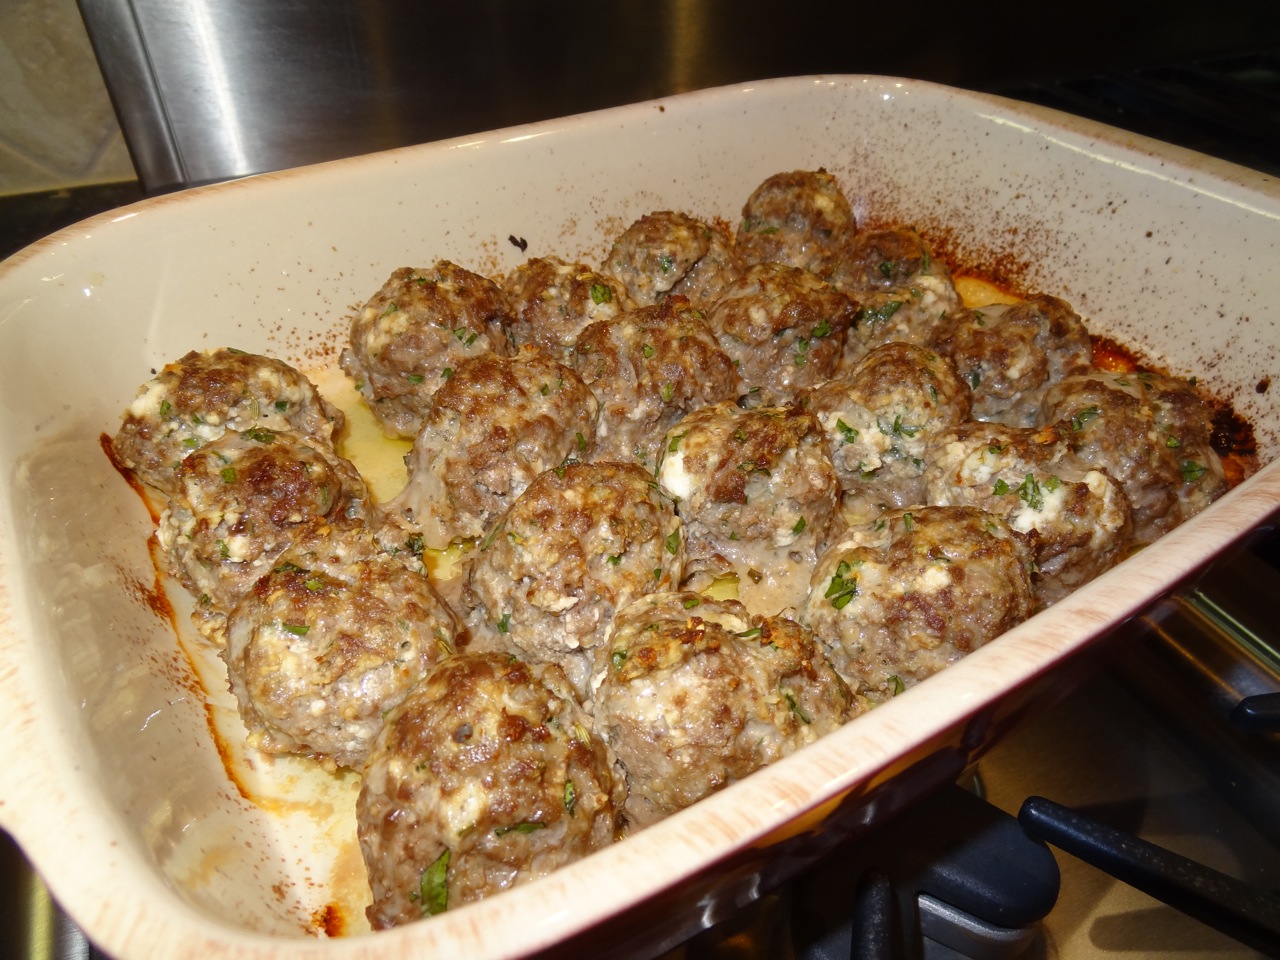
Roast meatballs in a 450 degree F oven for 20 minutes, or until meatballs are cooked through and have an internal temperature of 165 degrees F.

For the Classic Tomato Sauce:
Heat olive oil in large pot (I used a skillet) over medium heat. Add onions, bay leaf (I omitted), oregano, garlic and salt, and cook for 10 minutes, until onions are soft and translucent.

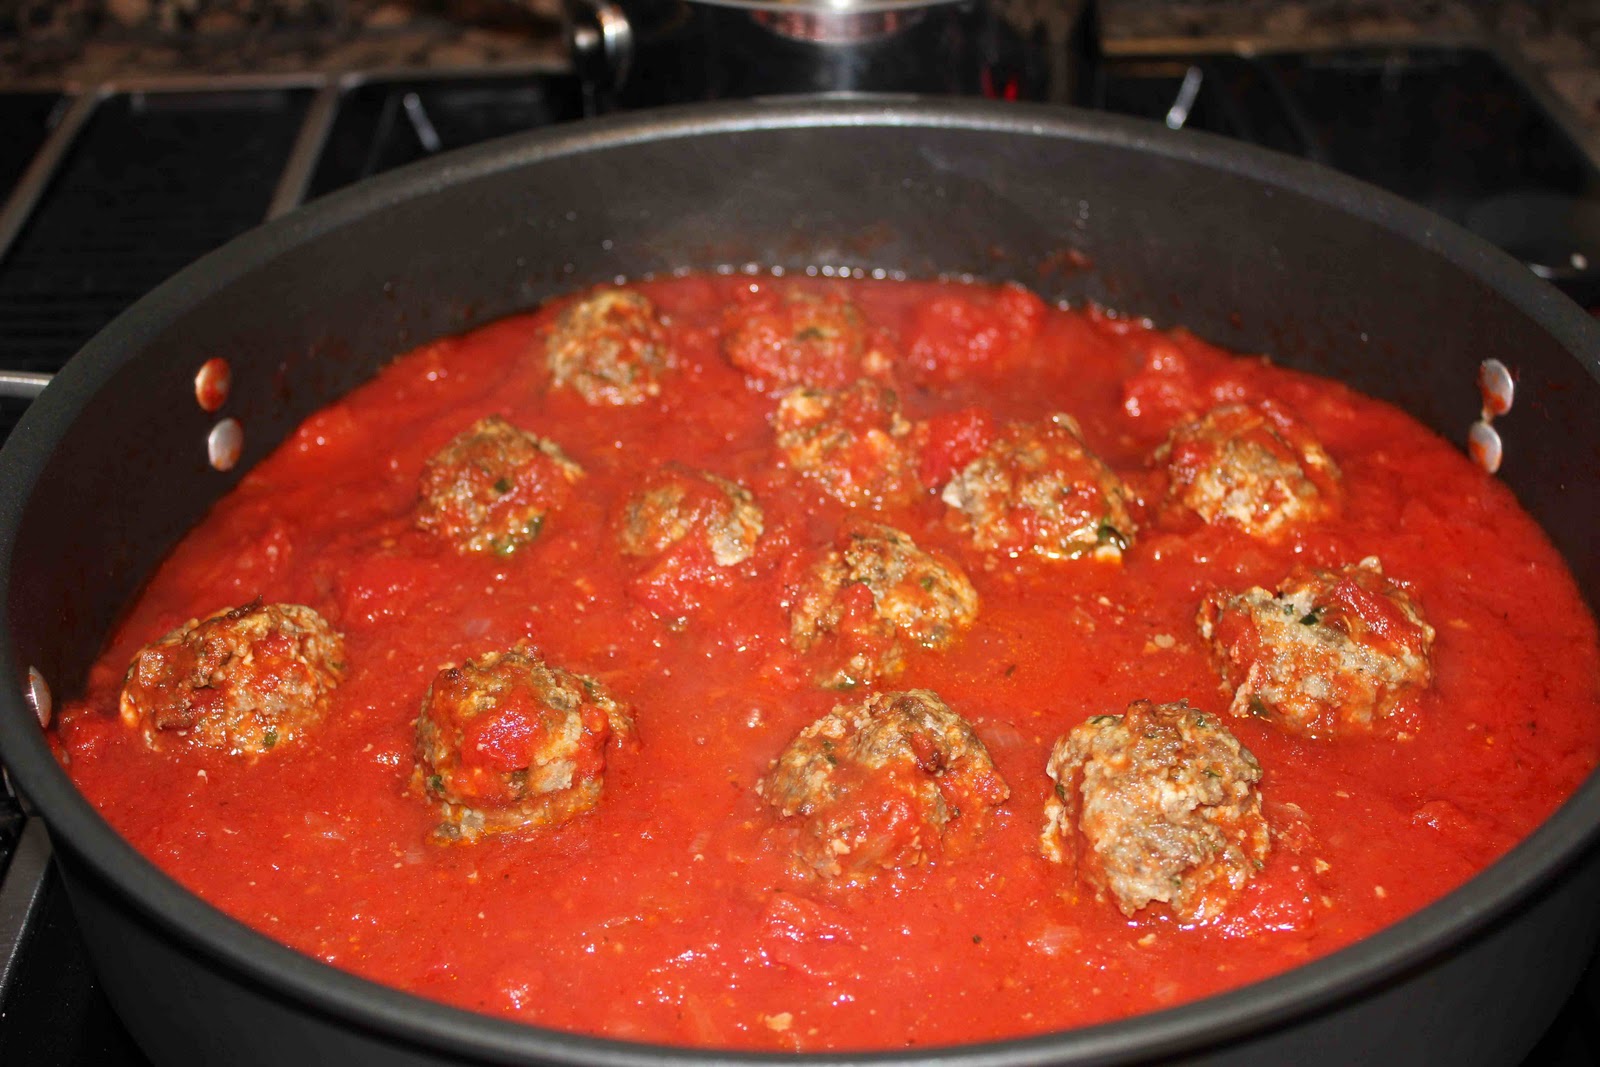
Add the tomato paste. Cook for another 5 minutes. Add tomatoes and stir until sauce boils. Lower the heat and simmer. At this point, I added the meatballs (which I made the day before and refrigerated) and simmered for the next 20-30 minutes.

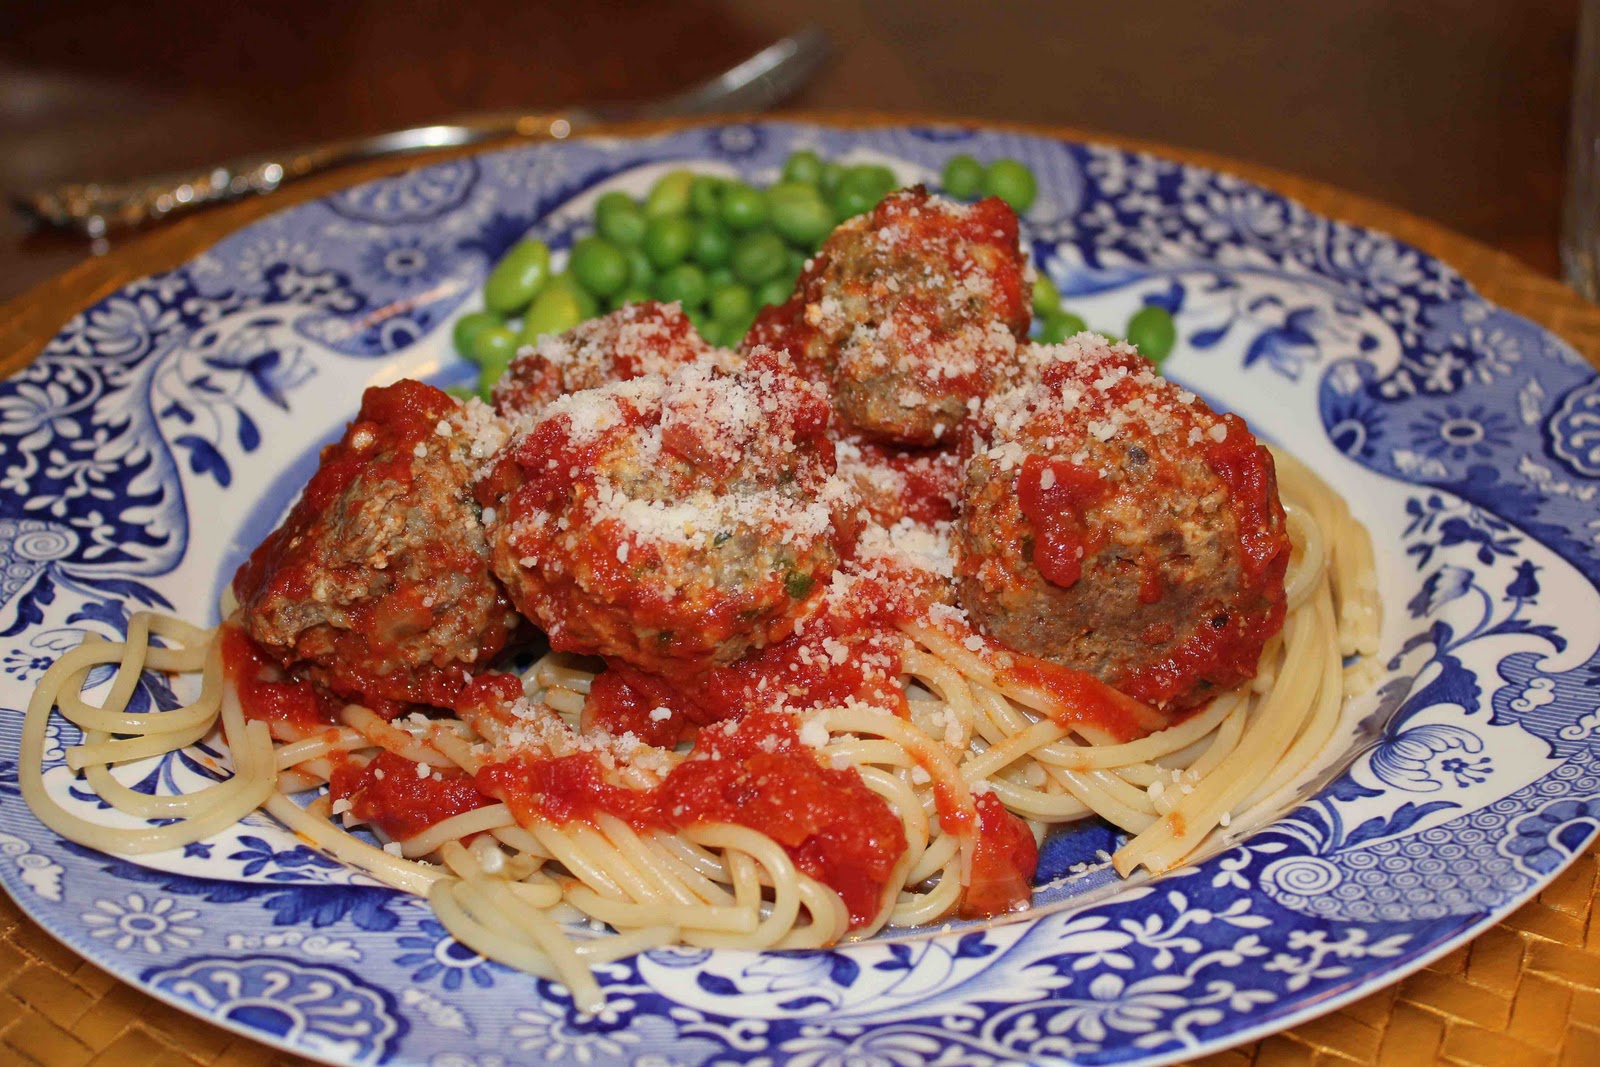
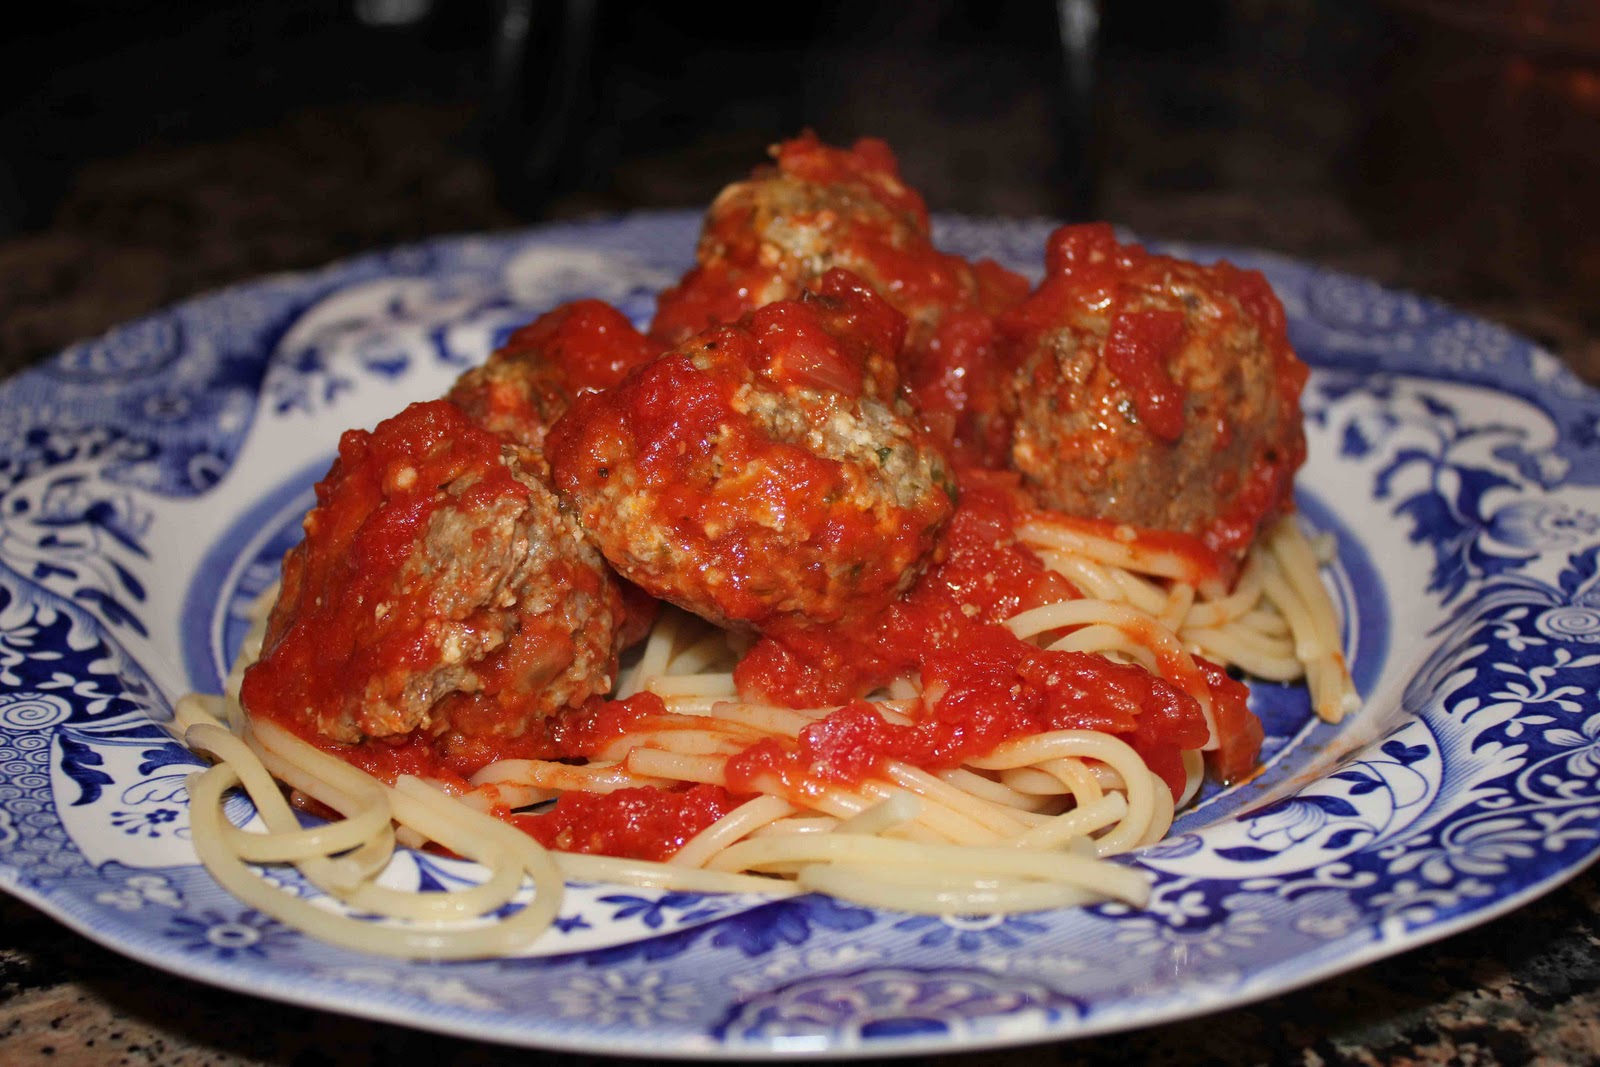
Meanwhile, cook spaghetti. Serve meatballs and tomato sauce over cooked pasta.

Sprinkle some Parmesan or Pecorino Romano cheese on top and you are good to go!

Classic Beef Meatballs and Classic Tomato Sauce

Classic Beef Meatballs
Ingredients
2 Tbsp. olive oil
2 pounds 80% lean ground beef (we used 93/7% lean)
1 cup ricotta cheese
2 large eggs
1/2 cup bread crumbs
1/4 cup chopped fresh parsley
1 Tbsp. chopped fresh oregano OR 1 tsp. dried
2 tsp. salt
1/4 tsp. crushed red pepper flakes
1/2 tsp. ground fennel
4 cups *Classic Tomato Sauce (below)

Directions
1. Combine the ground beef, ricotta, eggs, bread crumbs, parsley, oregano, salt, red pepper flakes, and fennel in a large mixing bowl and mix by hand until thoroughly incorporated.
2. Roll the mixture into round, golf-ball-sized meatballs (about 1 1/2 inches), making sure to pack the meat firmly. For a perfect sized-ball, use an ice-cream scoop, it will make this process 10x easier. Place the balls in the 9×13 inch baking dish drizzled with olive oil. Be careful to line them up snugly and in even rows vertically and horizontally to form a grid.  The meatballs should be touching one another.
3. In a preheated oven set to 450 degrees F, roast for 20 minutes, or until the meatballs are firm and cooked through. A meat thermometer inserted into the center of a meatball should read 165 degrees F.
4. While the meatball are roasting, heat the tomato sauce in a small saucepan over medium-high heat, stirring often.
5. When the meatballs are firm and fully cooked, remove from the oven and drain the excess grease from the pan. Add meatballs to sauce and simmer.

* Classic Tomato Sauce
Ingredients
1/4 cup olive oil
1 onion, finely diced
1 bay leaf
1 tsp. chopped fresh oregano or 1/3 tsp. dried
2 garlic cloves, roughly chopped
2 tsp. salt or to taste
2 Tbsp. tomato paste
2 (28-ounce cans) whole plum tomatoes, chopped with their liquid (I halved the recipe and used one 14.5 oz. can crushed tomatoes and one 14.5 oz can diced tomatoes)

Directions
1. Heat the olive oil in a large pot over medium heat. Add the onions, bay leaf, oregano, garlic and salt, and cook, stirring often, until the onions are soft and translucent, about 10 minutes.
2. Add the tomato paste and continue cooking for 5 minutes. Add the tomatoes and stir constantly until the sauce begins to boil. Lower the heat and simmer for 1 hour (I simmered for 30 minutes), stirring every 5 minutes or so to prevent the sauce on the bottom of the pot from burning. Taste and season with additional salt, if desired. Remove the bay leaf before serving.

Yield: about 2 dozen 1 1/2-inch meatballs and 7 cups sauce; 4 (1 1/2-inch) meatballs = 1 serving
Recipe from: The Meatball Shop Cookbook by Daniel Holzman and Michael Chernow with Laura Deen

Chicken & Sun-Dried Tomato Orzo

orzo
If you’re looking for something healthy AND tasty, look no further than this chicken and sun-dried tomato orzo dish. Matt and I both loved it and the dish is actually pretty simply to make!
The sun-dried tomatoes combined with Parmesan cheese pack a flavorful punch along with the Italian aroma  of the fresh marjoram and mushrooms. Serve with a side a green vegetables or salad and you’ve got a complete meal. Enjoy!
orzo 2
Chicken & Sun-Dried Tomato Orzo
Serves: 4
Adapted fro Eating Well
Ingredients
  • 8 oz orzo, preferably whole wheat
  • 1 cup water
  • 1/2 cup chopped sun-dried tomatoes, (not oil-packed), divided
  • 1 plum tomato, diced
  • 1 clove garlic, peeled
  • 3 tsp. chopped fresh marjoram, divided
  • 1 Tbs. red-wine vinegar
  • 2 tsp. plus 1 Tbsp. extra virgin olive oil, divided
  • 4 boneless, skinless chicken breasts, trimmed (1 – 1 1/4 pounds)
  • 1/4 tsp. salt
  • 1/4 tsp. freshly ground pepper
  • 8 oz. mushrooms
  • 1/2 cup finely shredded Parmesan cheese, divided
Instructions
  1. Cook orzo in a large saucepan of boiling water until just tender, 8-10 minutes or according to package directions. Drain and rinse.
  2. Meanwhile, place 1 cup water, 1/4 cup sun-dried tomatoes, plum tomato, garlic, 2 teaspoons marjoram, vinegar and 2 teaspoons oil in a blender. Blend until just a few chunks remain.
  3. Season chicken with salt and pepper on both sides. Heat remaining 1 tablespoon oil in a large skillet over medium-high heat. Add the chicken and cook, adjusting heat as necessary to prevent burning, until golden outside and no longer pink in the middle, 3-5 minutes per side. Transfer to a plate; tent with foil to keep warm.
  4. Pour the tomato sauce into the pan and bring to a boil. Measure out 1/2 cup sauce to a small bowl. Add the remaining 1/4 cup sun-dried tomatoes to the pan along with the orzo, mushrooms and 6 tablespoons of cheese. Cook, stirring, until heated through, 1-2 minutes. Divide among 4 plates.
  5. Slice the chicken. Top each portion of pasta with sliced chicken, 2 tablespoons of the reserved tomato sauce and a sprinkling of the remaining cheese and marjoram.


Thanksgiving Day Recap

I hope everyone enjoyed their Thanksgiving as much as I did! My family and I enjoyed a wonderful feast with all of our favorite dishes.  I thought this year was one of the best-tasting Thanksgiving meals!
Now that I’m married, my husband (Matt), and I rotate who we spend Thanksgiving with each year. This year, we were supposed to eat with his side of the family. Matt’s family tradition is to get together with all of his Dad’s side, including cousins, aunts, uncles, grandparents, siblings, and in-laws. Over 20 people show up every year. The host makes the turkey and dressing, while all of us bring the sides. I had originally planned on bringing Triple-Orange Ambrosial Salad and Summer Bounty Corn Casserole, until we had a change of plans due to….FOOTBALL!

My husband Matt, played football for Texas A&M in 2001 and 2002. As most of you know, A&M is leaving the Big 12 and joining the SEC next year.  That means, this year (2011) is the last year that A&M will play the University of Texas or T.U. (haha.)  Matt got a phone call Tuesday asking if he’d like to attend the last matchup between these two rivals, and of course, he said yes. Since Matt and his friends would be at the game, I decided to eat Thanksgiving with my side of the family. 
However before the big meal of the day, I ran the Dallas Turkey Trot with my sister-in-law, Leah, and my uncle-in-law, Rusty that morning. We had a blast! The only bad thing about the race was trying to maneuver between 40,000 people! Since I’m injured, I only ran the 3 mile; I usually run the 8 mile, so I was in for a little shock with the amount of people in one race. In the 8 mile, I can usually distance myself from the pack and run “alone”….not this time. Good thing I was injured and was not supposed to “race” because, had I tried, I would not have gotten very far. When I tell you that I was literally weaving through people the entire 3 miles, I am not kidding! It was crazy.  It was fun though, and Leah, Rusty and I will probably continue the tradition next year.
As I said earlier, dinner was delicious and we had a great time visiting with family. The minute Matt returned from his trip to College Station, he dug into our Thanksgiving leftovers…. I can’t blame him though….since he ate Freebirds on Thanksgiving Day rather than turkey and dressing! haha. 
My mom keeps a journal as to what our menu entails for each holiday (Thanksgiving and Christmas.)  She includes the main course, sides, desserts, who brought/made each dish, what we did or did not like, etc. It helps us decide for next year’s meal what to make. By now, our menu should be perfected after all this note-taking! Below is our Thanksgiving Menu for 2011.
Thanksgiving 2011 Menu
Karen’s Turkey and gravy 
brushed with butter to keep moist

Karen’s Cranberry Sauce 
with pineapples, oranges, pecans and mini marshmallows

Karen’s Stuffing/Dressing  
excellent…my favorite part of the meal

Green Beans  
with shallots

Frozen Cranberry Salad 
my family’s tradition

with orange sherbet and mandarin oranges

best rolls ever!

my sister’s favorite
Mashed Potatoes

Pumpkin Pie 
recipe from Libby’s 100% Pumpkin 

the only dessert my sister’s fiance likes 🙂

my Dad’s request
Here is my plate…I had another salad plate for the Triple-Orange Ambrosial Salad and my dessert! 

Even though I did not get to spend time with my extended family down in Houston, I did get a kick out of these Thanksgiving Turkey Cupcakes that my aunt Jolene and her 1st and 6th-grade granddaughters made for the holidays!

The cupcakes are chocolate with chocolate frosting. They used an Oreo to hold the turkey’s feathers, which were made out of candy corn. A malt ball was used for the head, and a half of a candy corn was used as the beak. So cute!

Amish Broccoli Bake

Well, Thanksgiving Day is nearly upon us, if you’re like me, you are searching cookbooks, blogs, and old family recipes in order to decide what to make or bring on Thursday.  A few months ago (more like six months ago,) I visited my aunt in Houston and we made this delicious Amish Broccoli Bake, which I think, would be the perfect side dish to the turkey and dressing you’re about to eat.
Nothing compares to the homemade goodness of the rich and creamy taste and texture of this delicious Amish vegetable casserole. I’m not sure what an “Amish” dish is, but this one was great.  The herb stuffing mix added a punch of flavor combined with the freshly grated Cheddar cheese, and creaminess from the soups and mayonnaise.
I grew up hating all vegetables, including broccoli. My mom would always tell me, “I know kids your age who love broccoli, especially when drizzled or dipped in Cheddar cheese.” Either my mom was not very convincing, or I was very picky, but I for sure was not going to eat that!  It wasn’t until college (just a few years ago,) that I actually started enjoying veggies.  I hear your taste buds change every seven years, but I think my main motivation was the fact that I was eating crummy dorm foods which consistent entirely of pizza, quesadillas, and sandwiches…not too healthy if you ask me. Because I realized I had a “deficiency” of anything healthy in my diet, I would go out of my way to try vegetables, including raw carrots and snow peas at lunch. I soon discovered that I actually like vegetables, especially when they are in some sort of sauce, like the way Pei Wei prepares their signature dishes. Apparently my taste buds have changed, because I now LOVE broccoli, mushrooms, green beans, peppers, and onions (I used to hate that stuff!)
Enjoy and maybe this recipe will make veggie lovers out all those picky eaters.
Place half of the broccoli and half of the cheese and stuffing mix in the casserole dish.

Pour half of the butter and half of the soup mixture over stuffing. Repeat layers one more time.

Bake for 35 to 40 minutes in a 350 degree oven.


Amish Broccoli Bake
Ingredients
1 (10-3/4-ounce) can cream of mushroom soup
1 cup mayonnaise
1/2 cup chopped onion
1/2 tsp salt
1/4 tsp black pepper
1 (10-ounce) packages frozen chopped broccoli, thawed
1 cup shredded Cheddar cheese
1 (6-ounce) box herbed stuffing mix
1/4 cup (1/2 stick) butter, melted and divided

Directions
1. Preheat oven to 350 degrees F. Coat a 3-quart casserole dish with cooking spray.
2. In a medium bowl, combine soup, mayonnaise, onion, salt and pepper; mix well.
3. Place half the broccoli in the casserole dish. Sprinkle with half the cheese and half the stuffing mix. Pour half the butter and half the soup mixture over stuffing. Repeat layers one more time.
4. Bake 35 to 40 minutes, or until hot in center.

Yield: 8
Mr. Food

Neiman Marcus Mandarin Orange Souffle Salad

Neiman Marcus….oh how I love thee.  I love their clothes, I love their shoes, and I love their food! Some of my favorite recipes are their famous $250 Neiman Marcus Chocolate Chip Cookies, followed by NM popovers,  NM Chicken SaladNM Turkey Meatloaf, and NM Gooey Butter Cake (yet to be blogged.) All of these recipes come from the Neiman Marcus Cookbook by Kevin Garvin with John Harrisson, including these Mandarin Orange Souffle Salads!
Since I was a little kid, we would shop, and then eat at the Neiman Marcus cafe on the third floor, across from the children’s clothing and home decor section. I would order a kids hamburger and snack on popovers until my food arrived. Now that I’m older (and a little more refined,) I’ll order the “Mandarin Orange Souffle,” which includes NM classic chicken salad, seasonal fruit with poppyseed dressing and a muffin of the day.  Mmmmmm, so good!
This excerpt from the author of the Neiman Marcus Cookbook will give you a better idea of the history behind this souffle: “This classic is the single-best food item at Neiman Marcus. It’s not actually a traditional baked souffle made with eggs, but a light and airy gelatin salad. Whenever I meet with our new chefs around the country, I tell them that no matter what else they add to their menu, this item will always be one of their best-selling items. Years ago, this dish would be changed to reflect the seasons, but the mandarin flavor remained the favorite, and it is still the number one “ladies lunch” item throughout the country.”
Enjoy!
Sprinkle unflavored gelatin over orange juice. Stir to combine and let sit.
Meanwhile, bring to a simmer orange juice, sugar and egg yolks.
Pour custard into smaller bowl and place in ice bath to cool.

Whisk heavy cream until soft peaks from. Fold into custard mixture.

Place three to four mandarin orange sections into individual plastic, fluted dessert molds.

Pour souffle mixture into molds. Refrigerate for at least 4 hours, preferably overnight, or until firm.

Unmold carefully and garnish with mandarin orange sections.

Mandarin Orange Souffle Salad
Ingredients
1 1/4 cups orange juice (preferably from concentrate, thawed and diluted)
1 Tbsp. (1 envelope) unflavored gelatin
1 cup sugar
2 large egg yolks
1 1/2 Tbsp fresh lemon juice
1 cup heavy cream
1/2 cup canned mandarin orange sections (4-ounce) can

Directions
1. Pour 1/4 cup of the orange juice into a small bowl, sprinkle gelatin over, and stir to dissolve. Set aside and let the gelatin soften. Prepare an ice bath in a large bowl.
2. Pour the remaining orange juice into a small, heavy-bottomed saucepan and stir in the sugar and egg yolks. Over medium heat, gradually bring the mixture to a simmer, stirring constantly until the mixture begins to steam and is slightly thickened. Do not allow the mixture to boil.
3. Add the softened gelatin mixture (which will have a rubbery texture) and the lemon juice. Stir until incorporated and then transfer the “custard” to a clean mixing bowl; sit the bowl in the ice bath to cool. While custard is cooling, stir it occasionally.
4. Using a wire whisk or an electric whisk, whip the heavy cream until soft peaks form. With a spatula, gently fold some of the whipped cream into the cooled custard mixture to “loosen” it, then add the rest of the cream mixture and fold in until fully incorporated.
5. Place three or four of the mandarin orange sections in the bottom a six individual 5-ounce fluted plastic dessert molds and then fill the mold with the orange souffle mixture.  Cover with plastic wrap. Transfer to the refrigerator and chill for at least 4 hours, and preferably overnight, until firm.

*Chef’s Note: In the Neiman Marcus kitchens, this dish is referred to as the “O-ring,” owing to the fluted individual round molds used for the souffles. These molds are available at kitchen stores, but alternatively, you can use 6-ounce plain molds or ramekins, or coffee cups, in which case, use a sharp pairing knife to carefully unmold the souffles.

Yield: 6
Neiman Marcus Cookbook by Kevin Garvin with John Harrisson

Chicken Tacos with Charred Tomatoes

If you are looking for a flavorful and healthy meal, you’ve found the perfect one: Chicken Tacos with Charred Tomatoes. With less than 300 calories and only 9 grams of fat, you’re on the fast-track for either losing weight or staying fit! I found this recipe while browsing though Eating Well. I love their website. I can find healthy meals relating to just chicken, pasta, beef, desserts, and more. I can also find meals for two, meals in under 30 minutes, or meals on a budget. 
Tacos are one of Matt and my favorite dinner items. We love the spicy, Mexican-flavored spices, and I am a huge fan of Central Market’s flour tortillas and in-house, fresh pico de gallo.  Centered on this “taco/spicy” flavored-theme, I found Eating Well’s recipe for Chicken Tacos with Charred Tomatoes.  
I love how fresh and organic this dish is! Nothing is “bottled” or in a package. The chicken is fresh, as are the plum tomatoes, jalapeno pepper, cilantro, scallions, and onions. There is no chicken broth; instead the juices come from freshly squeezed limes and plump tomatoes. The cilantro and jalapeno pepper provide a spicy “kick,” and the chicken provides for the healthy amount of protein you need. Roll up this chicken mixture in a warmed corn tortilla, or as I mentioned before, a freshly made Central Market flour tortilla. 
Enjoy!


Chicken Tacos with Charred Tomatoes
Ingredients
2 plum tomatoes, cored
8 ounces boneless, skinless chicken breasts, trimmed of fat
1/4 tsp salt
1/8 tsp freshly ground pepper
2 tsp canola oil, divided
1/2 cup finely chopped white onion
1 clove garlic, minced
1 small jalapeno pepper, seeded and minced
2 tsp lime juice, plus lime wedges for garnish
2 tsp chopped fresh cilantro
2 scallions, chopped
6 small corn tortillas (I used flour tortillas), heated

Directions
1. Heat a medium skillet over high heat until very hot. Add tomatoes and cook, turning occasionaly with tongs, until charred on all sides, 8 to 10 minutes. Transfer to a plate to cool slightly. Cut the tomatoes in half crosswise; squeeze to discard seeds. Remove cores and chop the remaining pulp and skin.
2. Cut chicken into 1-inch chunks; sprinkle with salt and pepper. Add 1 teaspoon oil to the pan and heat over high heat until very hot. Add the chicken and cook, stirring occasionally, until it is browned and no longer pink in the middle, 3 to 5 minutes. Transfer to a plate.
3. Reduce the heat to medium and add the remaining 1 teaspoon oil. Add onion and cook, stirring, until softened, about 2 minutes. Add garlic and jalapeno and cook, stirring, until fragrant, about 30 seconds. Add lime juice, the chicken and tomatoes. Cook, stirring, until heated through, 1 to 2 minutes. Stir in cilantro and scallions. Divide the chicken mixture among tortillas. Serve with lime wedges.

Nutrition per serving:
297 calories; 9 g fat; 63 mg cholesterol; 27 g carbohydrate; 0 g sugar; 27 g protein; 2 g fiber; 415 mg sodium; 463 mg potassium.

Yield: 2 servings
Eating Well

Panko-Crusted Chicken with Mustard-Maple Pan Sauce

I love Panko crumbs! I love the crunch, I love the flavor, I love the ease of cooking with panko, and I love how I always have these staple ingredients in my pantry. Normally I make panko chicken or shrimp with egg, flour and a little salt and pepper.  In this new recipe, the addition of parsley and Dijon mustard takes plain ‘ole panko chicken to a whole new level! The flavors were outstanding. The panko chicken looks the same as my old recipe, but my husband even commented that it tasted better than usual! 
Bon Appetit is where I found this recipe. I must admit, I did not like the mustard maple pan sauce. In my opinion, it had a weird flavor and was too watery (that could be my fault, having not boiled the sauce long enough.) If you think the combination of mustard, maple syrup, and chicken broth sounds good, then by all means try it…
The “chicken” part of Panko-Crusted Chicken with Mustard-Maple Pan Sauce is excellent! Let me know what you think; I definitely plan on making it again. I served the chicken with brown rice, green beans, biscuits and fruit.  Enjoy!

Panko-Crusted Chicken with Mustard-Maple Pan Sauce
Ingredients
2 (8-ounce) skinless, boneless chicken breast halves, cut crosswise in half
1 large eg
1 Tbsp finely chopped fresh Italian parsley
2 tsp plus 2 Tbsp Dijon mustard
1 cup panko (Japanese breadcrumbs)
2 Tbsp olive oil
1 cup low-salt chicken broth
3 Tbsp pure maple syrup
2 Tbsp plus 1 tsp coarse-grained mustard
1 Tbsp chilled unsalted butter

Directions
1. Using a meat mallet or rolling pin, pound chicken in resealable plastic bag to 1/3-to 1/2-inch thickness. Whisk egg, parsely, and 2 teaspoons Dijon mustard in large bowl. Place chicken in egg mixture; turn to coat. Sprinkle chicken with salt and pepper. Dip each piece in panko; turn to coat.
2. Heat oil in large nonstick skillet over medium-high heat. Add chicken; cook until brown and cooked through, about 4 minutes per side.
3. Meanwhile, whisk broth, syrup, coarse-grained mustard, and remaining 2 tablespoons Dijon mustard in glass measuring cup.
4. Transfer chicken to plates. Add broth mixture to skillet; boil until reduced to 3/4 cup, stirring occasionally, about 4 minutes. Add butter; whisk until melted. Spoon sauce alongside chicken.

Calories: 390 
Fat: 15.3g
Cholesterol: 158mg
Carbohydrates 21g
Total Sugars: 9.3g
Fiber: 0.5g
Protein: 39.3g
Yield: 2 servings