Blackened Salmon

For those of you who didn’t know, I am now am the contributing writer for the Resident Recipe section of our monthly neighborhood magazine. With the permission of my neighbors, I will share with you their recipe and the article I submitted to the magazine.

This blackened salmon recipe appeared in our April 2012 magazine issue and was submitted by Sue, who states: “This is a family recipe and I like to serve it when all my family is over for dinner. I came up with this recipe after having Blackened Salmon at a local seafood restaurant. Their version was so delicious, I went home and was able to duplicate it in my kitchen.”
Sue’s salmon looks absolutely gorgeous, wouldn’t you agree? It tasted just as incredible as it looked…she gave me a bite to sample! I hope you enjoy. 🙂

Blackened Salmon
Ingredients
1 large Salmon filet, about 2 pounds
Cooking spray
Olive oil
Black pepper
Paprika
Garlic, minced
Parsley flakes, dried
Directions
1. Preheat the oven to 375 degrees F.  Spray an 8″x 11″ inch pan with cooking spray.
2. Wash and dry salmon and place in pan.
3. Lightly pour olive oil over the filet. Sprinkle a generous amount of each of he above seasonings over the top of the filet.
4. Bake salmon for 20-25 minutes or until done. Serve with rice or your favorite potato dish and a green salad, for a quick and easy meal.
Yield: 4-6 servings
Recipe from: Sue

Marinated Salmon with Mango-Kiwi Relish

Marinated Salmon with Mango-Kiwi Relish
Springtime has definitely arrived here in Dallas and with the warmer weather, I don’t know about you, but I’ve been craving light, healthy dishes like this salmon recipe.

I was on my own for dinner tonight since Matt went to A&M with a bunch of buddies to watch a “fight’n Texas Aggie” baseball game (sorry, the Aggie is coming out of me right now). Even though I miss him when he’s gone, I enjoy cooking healthy and “girly” meals for myself.  In addition, I try and cook as much fish as I can get my hands on, for these three reasons:

    1. Matt is not a huge fan of fish
    2. I can eat healthy without Matt complaining 🙂
    3. Fish is A LOT cheaper when you are buying for one person (especially Sea Bass, which can cost anywhere between $22-$28/pound.)

I found this marinated salmon with mango-kiwi relish recipe from Cooking Light, and boy is it good! I loved the sweet-salty marinade and unique fruit filled sauce, which made this recipe really stand out. In addition, it was quick, easy, and perfect. Including prep time, in 15-20 minutes you can have a meal on your table and ready to eat.

No need to worry about calories with this one, with only 321 calories and 36.8g protein, you’ll be fully satisfied and on your way to losing weight! Plus, you’ll get a healthy dose of omega-3 fatty acids from the salmon.

So here’s to my newest springtime favorite… enjoy and serve over mixed greens, steamed couscous, on toasted sourdough bread for a fish sandwich, or as you please.

Mango-Kiwi relish
Chop mango, kiwi, red onion, and cilantro. Toss with 1/4 cup orange juice.

 Heat the grill or (in my case) a large skillet with nonstick cooking spray. Add salmon and cook for 5 minutes on each side, or until fish flakes easily when tested with a fork.

Marinated salmon with mango-kiwi relish
Top salmon with relish and serve immediately.

Marinated Salmon with Mango-Kiwi Relish
Serves: 4
Recipe adapted from: Cooking Light
Ingredients
  • 1 Tbsp. honey
  • 2 tsp. low-sodium soy sauce
  • 1 tsp. olive oil
  • 1/4 tsp. black pepper
  • 4 (6-ounce) salmon fillets (about 1 inch thick)
  • cooking spray
  • 1/2 cup diced peeled mango
  • 1/2 cup cubed peeled kiwi
  • 1/4 cup diced red onion
  • 1/4 cup chopped fresh cilantro
  • 1/4 cup fresh orange juice
Instructions
  1. TO PREPARE SALMON, combine first 4 ingredients in a large zip-top plastic bag. Add fish to bag; seal. Marinate 10 minutes, turning occasionally.
  2. While fish marinates, heat grill pan or large nonstick skillet over medium-high heat. Remove fish from bag, discarding marinade. Coat pan with cooking spray. Add fish, and cook for 5 minutes on each side, or until fish flakes easily when tested with a fork.
  3. WHILE FISH COOKS, PREPARE THE RELISH. Combine mango and the remaining ingredients. Serve over fish.
Calories: 321 Fat: 13.8g Carbohydrates: 10.9g Sodium: 128mg Fiber: 1.3g Protein: 36.8g

Essence of Orange Muffins

You would think these essence of orange muffins would be overly sweet, but they’re not…they’re rich and delicious au natural, and you won’t need to butter them. The orange juice and zest adds both a tart and sweet flavor simultaneously, while the orange zest makes these cakey muffins delightful.


My mom made these orange muffins at the beginning of fall, and I’ve been holding off posting them since they are the perfect spring recipe…light and luscious! Depending on what’s in season, feel free to add a cup of fruit: peaches and raspberries in the spring; cranberries in the fall!


We made a combination of Texas-size muffins and mini muffins. I like the look of the Texas ones, but you can eat more with the mini muffins…maybe not technically, but it feels like it!
As quoted by the author of Pastry Queen, Rebecca Rather these “are best when warm and fresh, but can be cooled and then frozen up to two weeks. Defrost them at room temperature. Just before you are ready to eat them, warm them in a 325 degree F. oven for 5-7 minutes.” Enjoy!


Essence of Orange Muffins

MUFFINS

1 cup whole milk (if you want to be healthy, use skim or low-fat milk)
1/2 cup freshly squeezed orange juice
1/2 cup sour cream
2 large eggs
1 cup (2 sticks) unsalted butter, melted and slightly cooled
3 1/2 cups all purpose flour
1 cup sugar
1 1/2 Tbsp. baking powder
1/2 tsp. salt
Zest of 1 orange, preferably organic

GLAZE
1/4 cup freshly squeezed orange juice
1 1/2 cups powdered sugar
1 tsp. grated orange zest, preferably organic

TO MAKE THE MUFFINS: 
1. Preheat the oven to to 350 degrees F. Grease 8 Texas-size (3 1/2 inches in diameter and 2 inches deep) muffin cups with butter or cooking spray or line them with muffin wrappers.
2. Whisk together the milk, orange juice, sour cream, eggs, and butter in a medium mixing bowl.
3. Combine the flour, sugar, baking powder, and salt in a large bowl. Pour the milk mixture into the dry ingredients and stir just until the flour is incorporated. Gently fold the orange zest into the batter.
4. Spoon the batter into the muffin pan, filing each cup just to the top. Bake the muffins for about 25 minutes, until they are golden brown around the edges and a toothpick inserted into the center comes out clean.
5. Cool the muffins in the pans for about 5 minutes, then transfer them to a cooling rack and glaze. (This would be a great time to eat them, too.)

TO MAKE THE GLAZE:
1. Combine the orange juice, powdered sugar, and zest in a medium bowl. Spread the mixture on top of each muffin. Serve warm or at room temperature.

Yield: 8 Texas-size muffins
Recipe from: The Pastry Queen by Rebecca Rather with Alison Oresman

Lemon Chicken

Here’s a healthy chicken recipe that my mom and I made a while ago for a “girls night”dinner while my dad and husband, Matt, were at a baseball game. The chicken is less than 200 calories, has only 6 grams of fat, and packs 27 grams of protein.

Dried tarragon, dijon mustard, olive oil and lemon juice create a delicious combination of flavors in this quick and easy poultry dish. The lemon juice can be a little tart, but is very refreshing, especially if you make this dish in the spring or summer. Serve the chicken over rice, pasta or potatoes, and drizzle with extra sauce. Enjoy!

Pound chicken into thin cutlets and place in a shallow glass baking pan.

Whisk together the olive oil, mustard, lemon juice, and tarragon

Pour mixture over chicken.

Bake for 40-45 minutes at 350 degrees F.


Serve over rice and drizzle with remaining sauce.


Lemon Chicken
Ingredients
1 pound boneless, skinless chicken breasts
2 Tbsp olive oil
3 Tbsp Dijon mustard
3 Tbsp fresh squeezed lemon juice
1 tsp dried tarragon, basil or oregano

Directions
1.  Wash the chicken and pat dry with paper towels.  Put the chicken between sheets of wax paper and pound with mallet or rolling pin until even thickness.  Place chicken in a shallow glass-baking pan.
2.  Preheat the oven to 350 degrees F.  In a small bowl, whisk together the olive oil, mustard, lemon juice, and tarragon (or basil or oregano).  Pour it over chicken and bake uncovered 40 to 45 minutes.
3.  Slice the cooked chicken on the diagonal and serve one chicken breast or 4 ounces per person.  Serve over pasta, rice, or potatoes and spoon some of the sauce over each serving.

Yield:  4 servings
Recipe from: Best Bites From the Wellness Kitchen  by the Seretean Wellness Center at Oklahoma State University

Nutritional Information
Calories: 175
Protein:  27 g
Carbohydrate: 1 g
Total Fat: 6 g
Saturated Fat: 1 g
Cholesterol: 65 mg
Fiber: 1 g
Sodium: 115 g

Cranberry Orange Scones

Afternoon tea and scones may be popular with the British, but it doesn’t mean that we Americans shouldn’t enjoy them too!  Here’s a great cranberry orange scone recipe I’d like to share with you from one of my favorite chefs, Ina Garten: The Barefoot Contessa.
My mom, sister, and I have been making these scones for years.  I didn’t mention my dad or husband in the last sentence, because they don’t like these…. they say they’re too “girly” and they don’t like dried fruit.  So ladies, this is a recipe for you and primarily your girlfriends. Don’t bother the guys with this one, save the cocoa brownies with browned butter and walnuts for them!
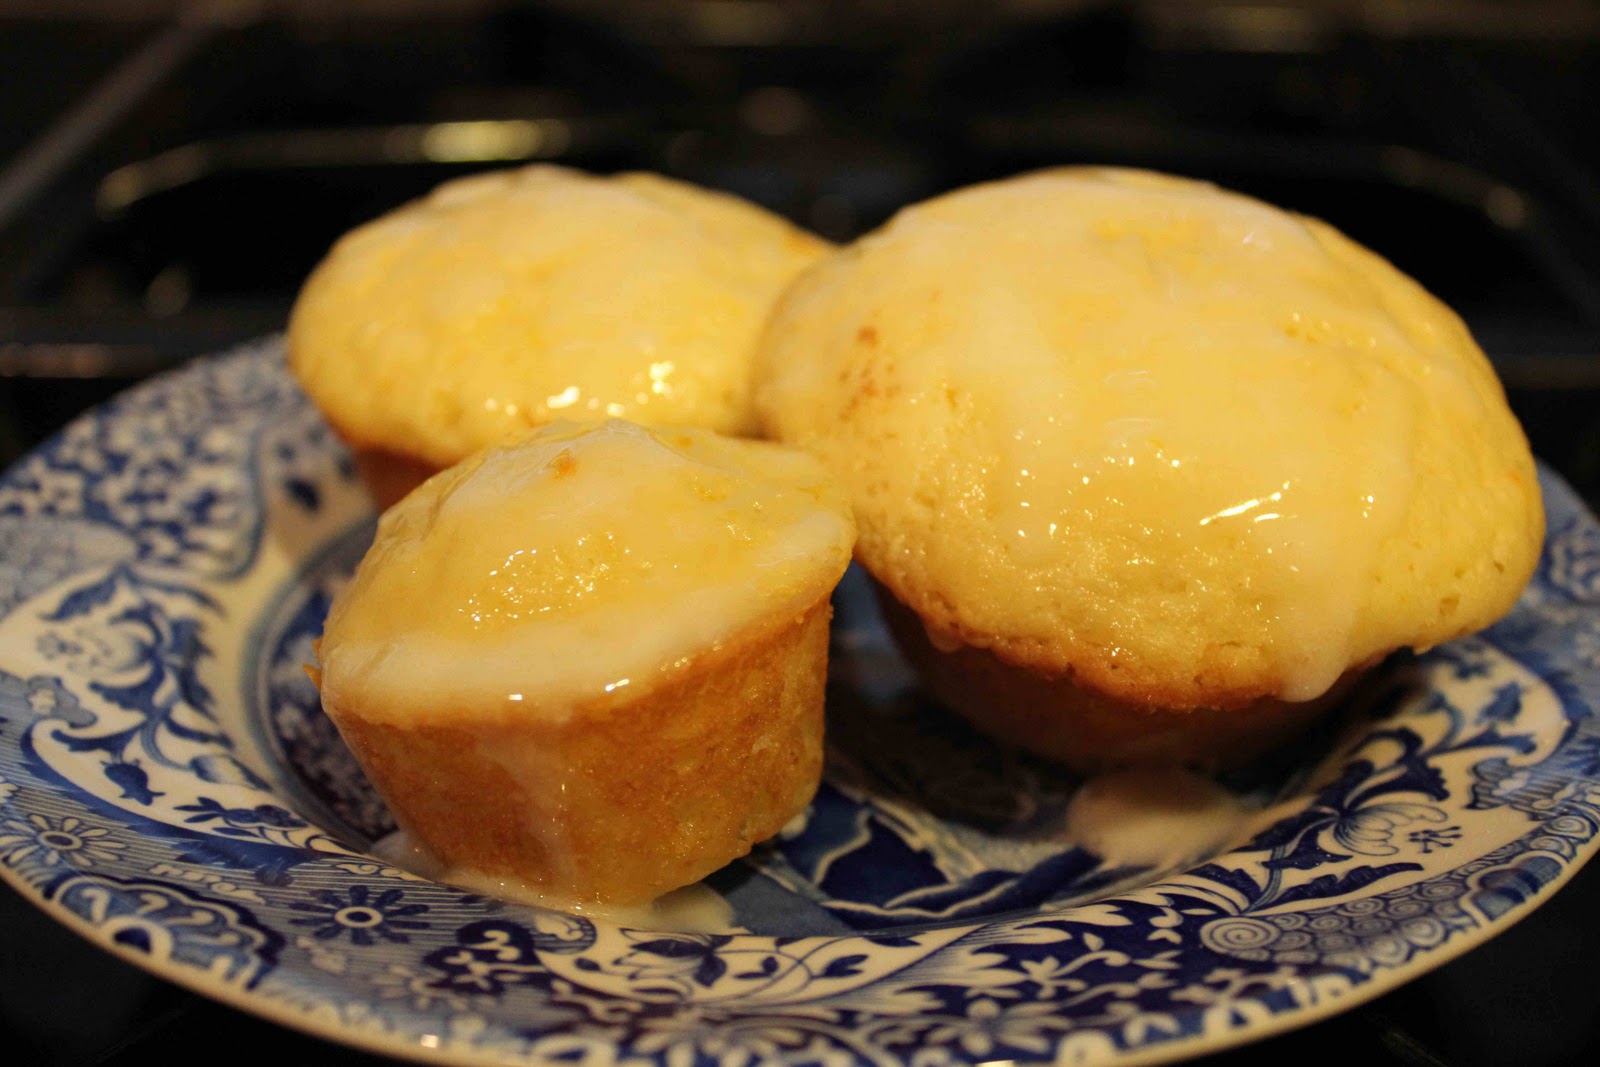
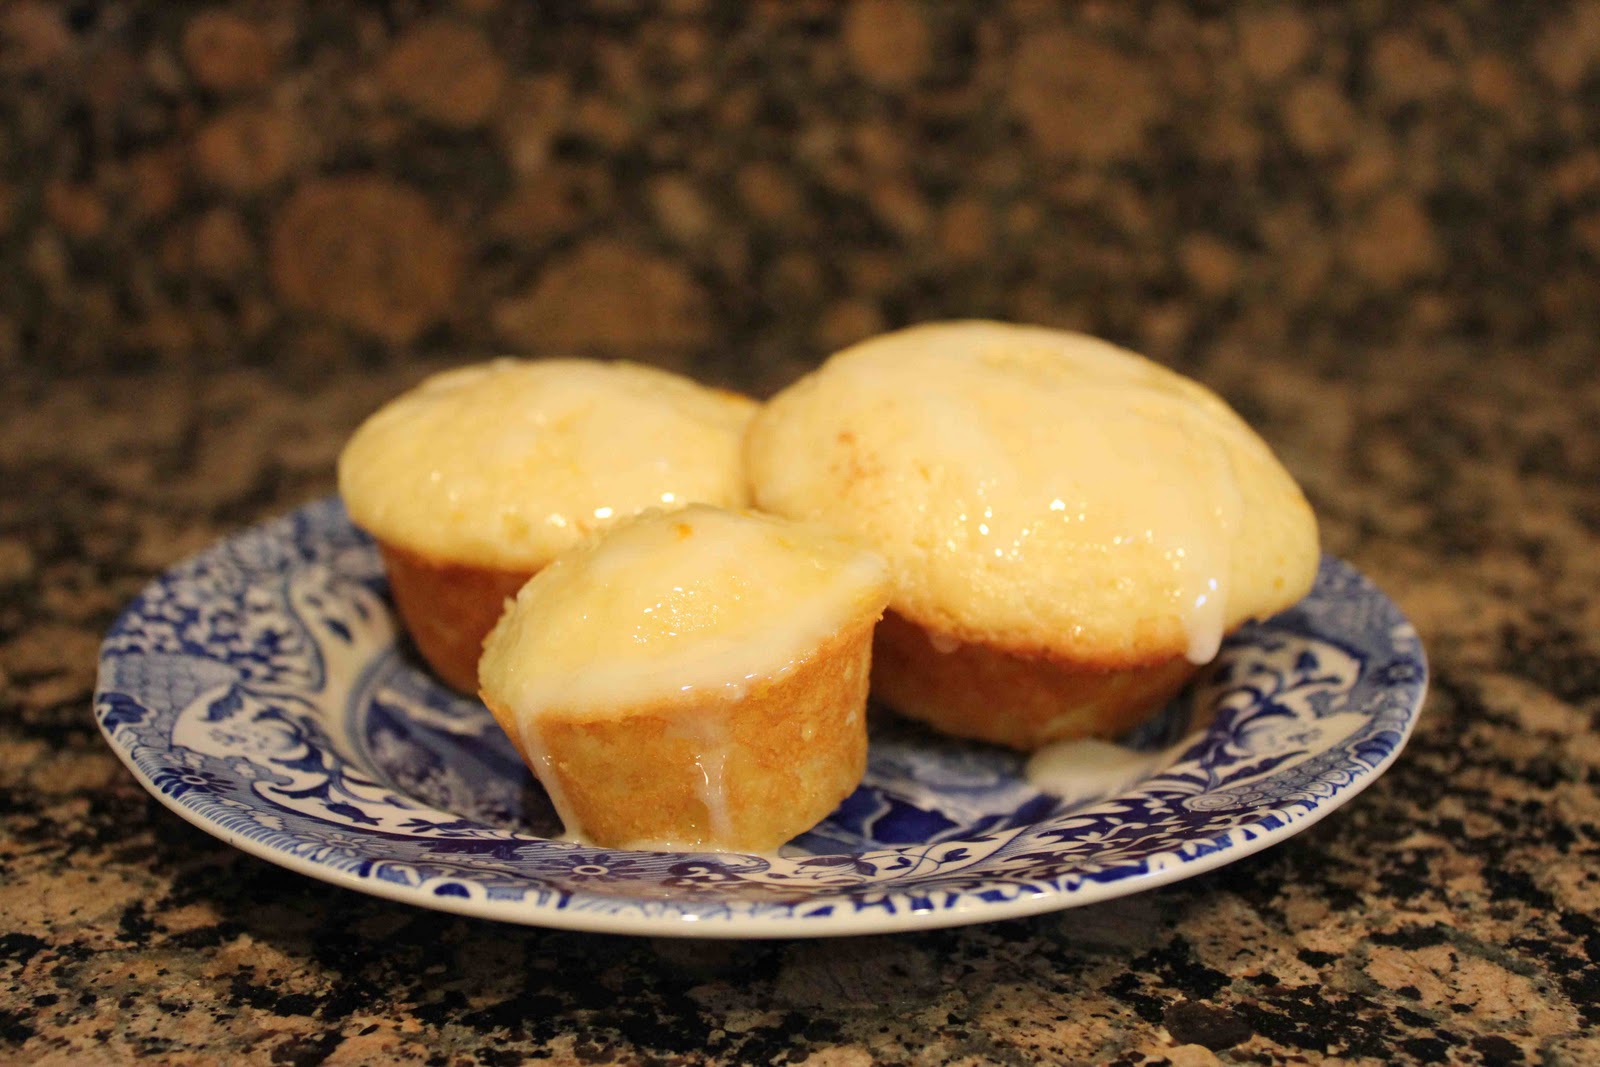
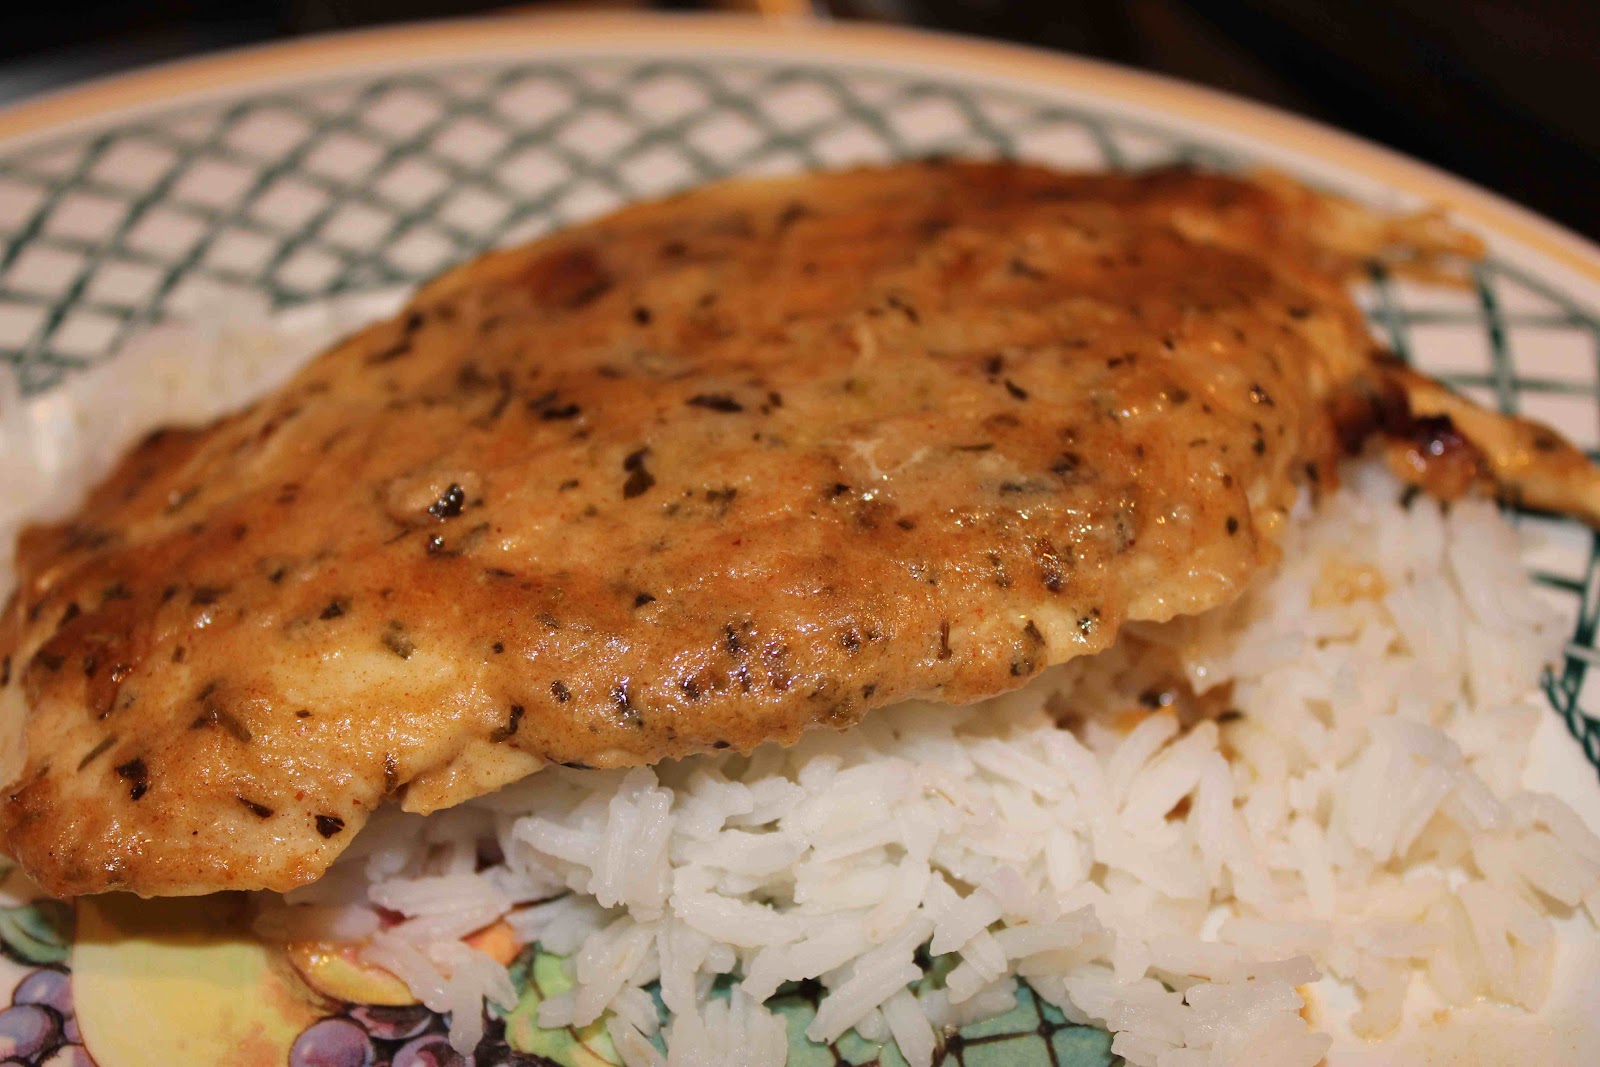
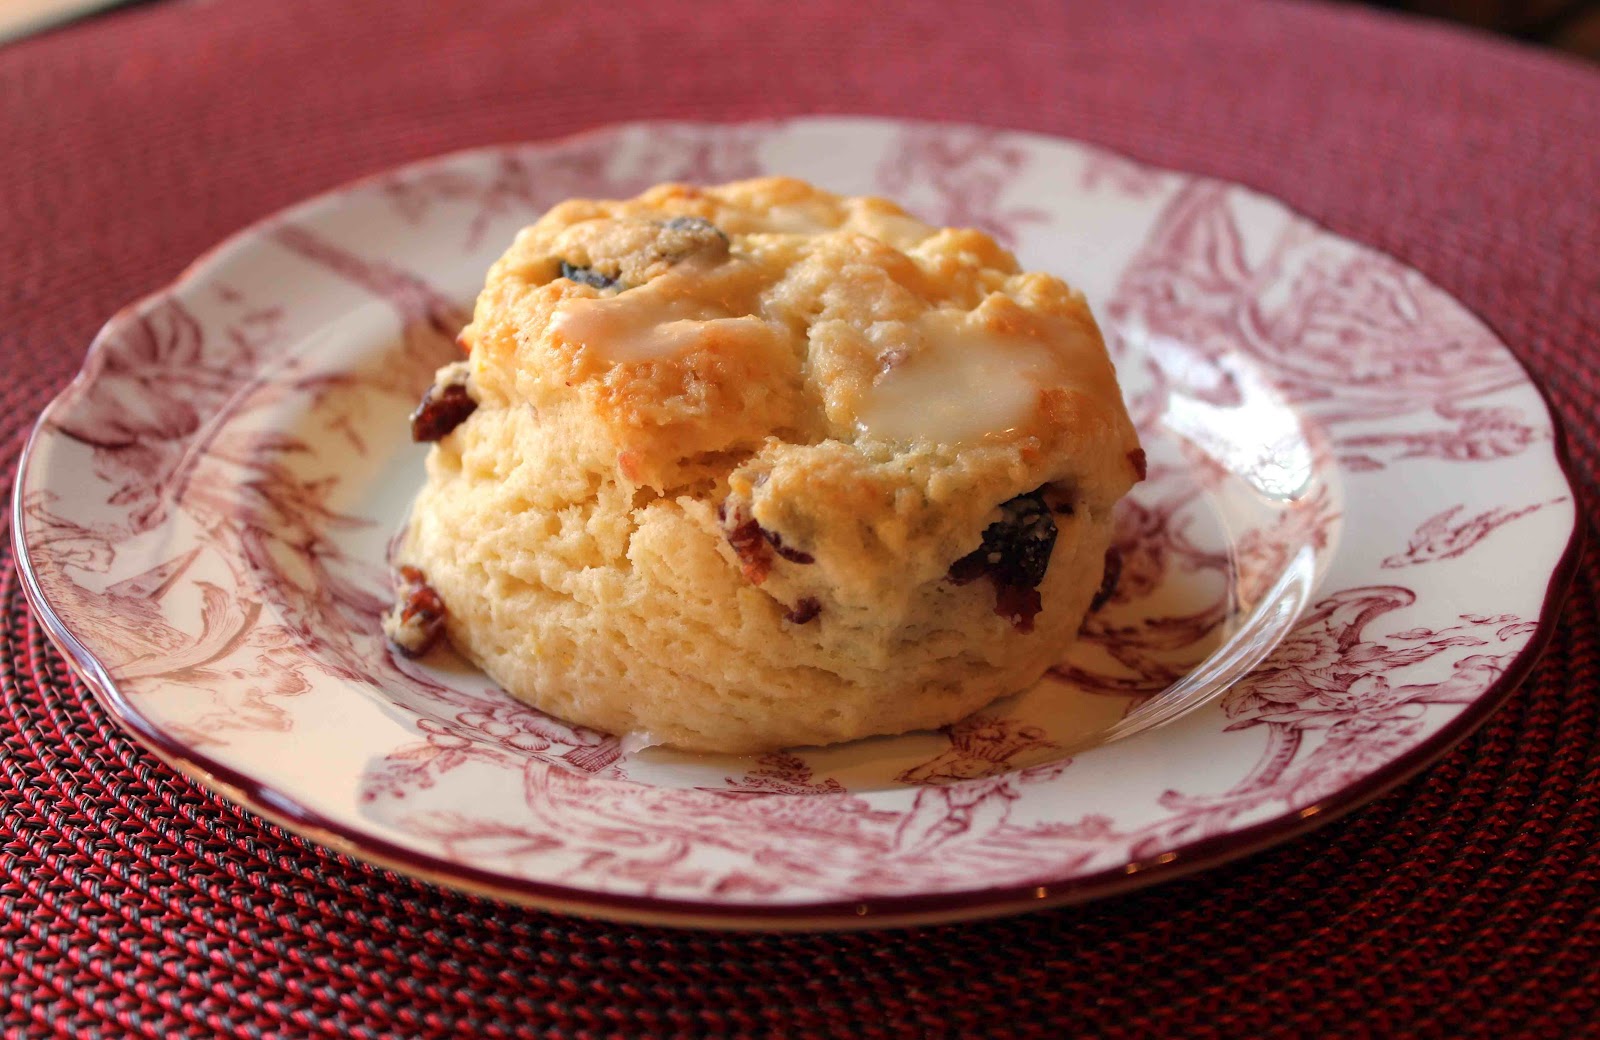
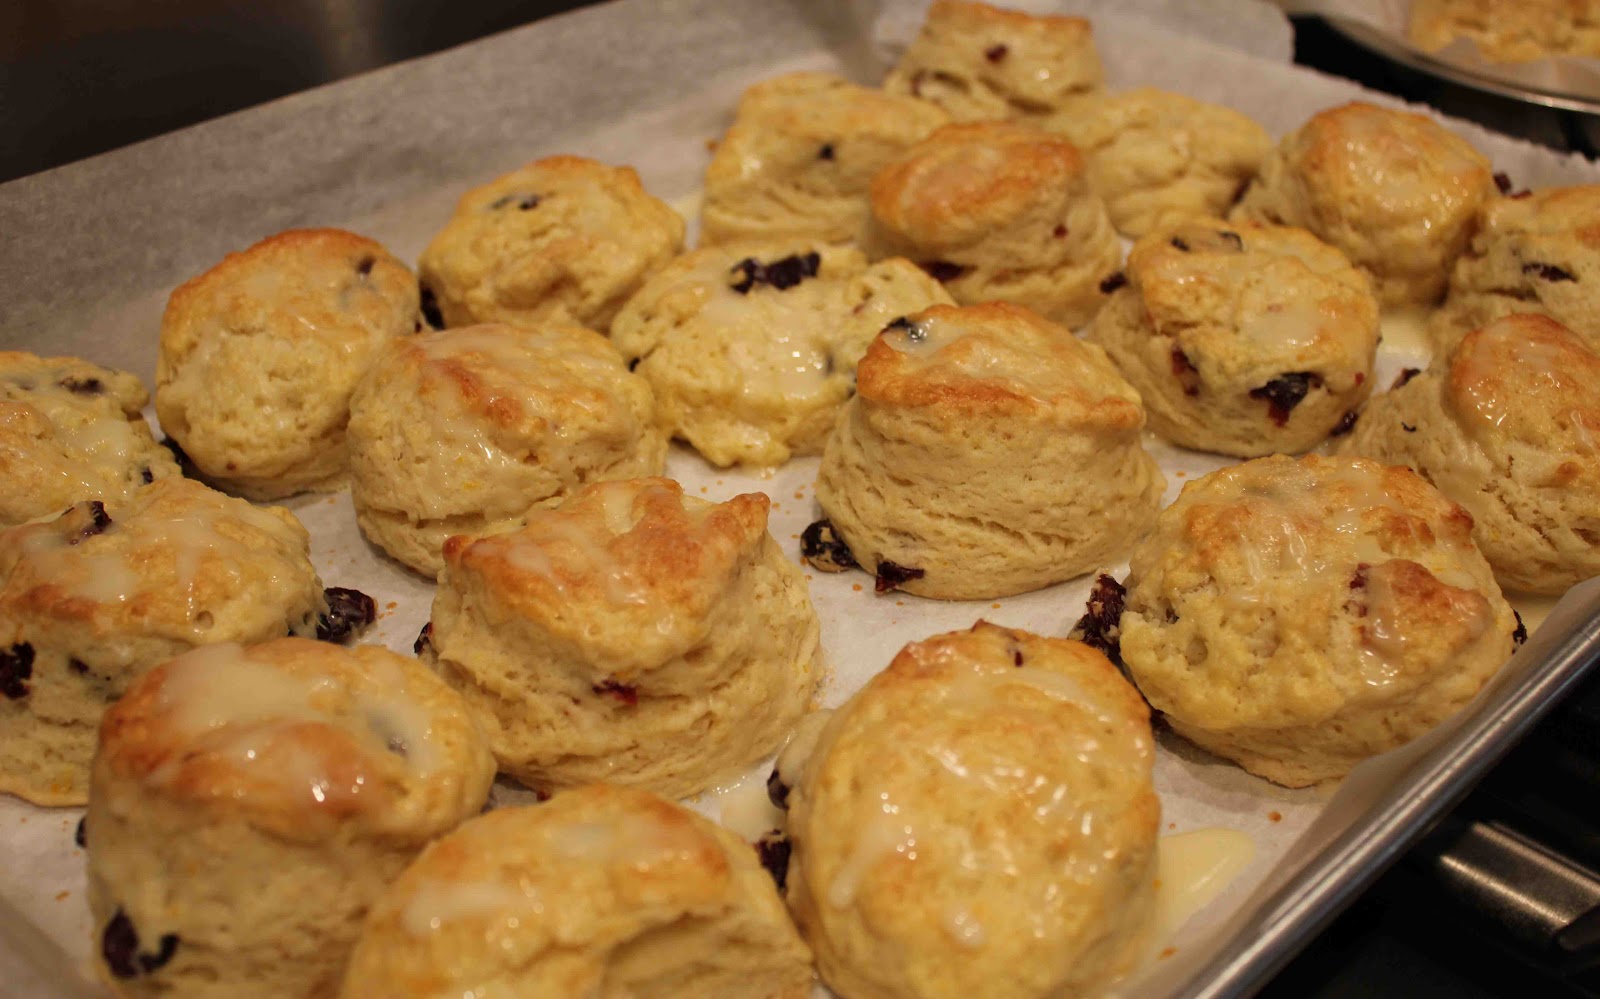
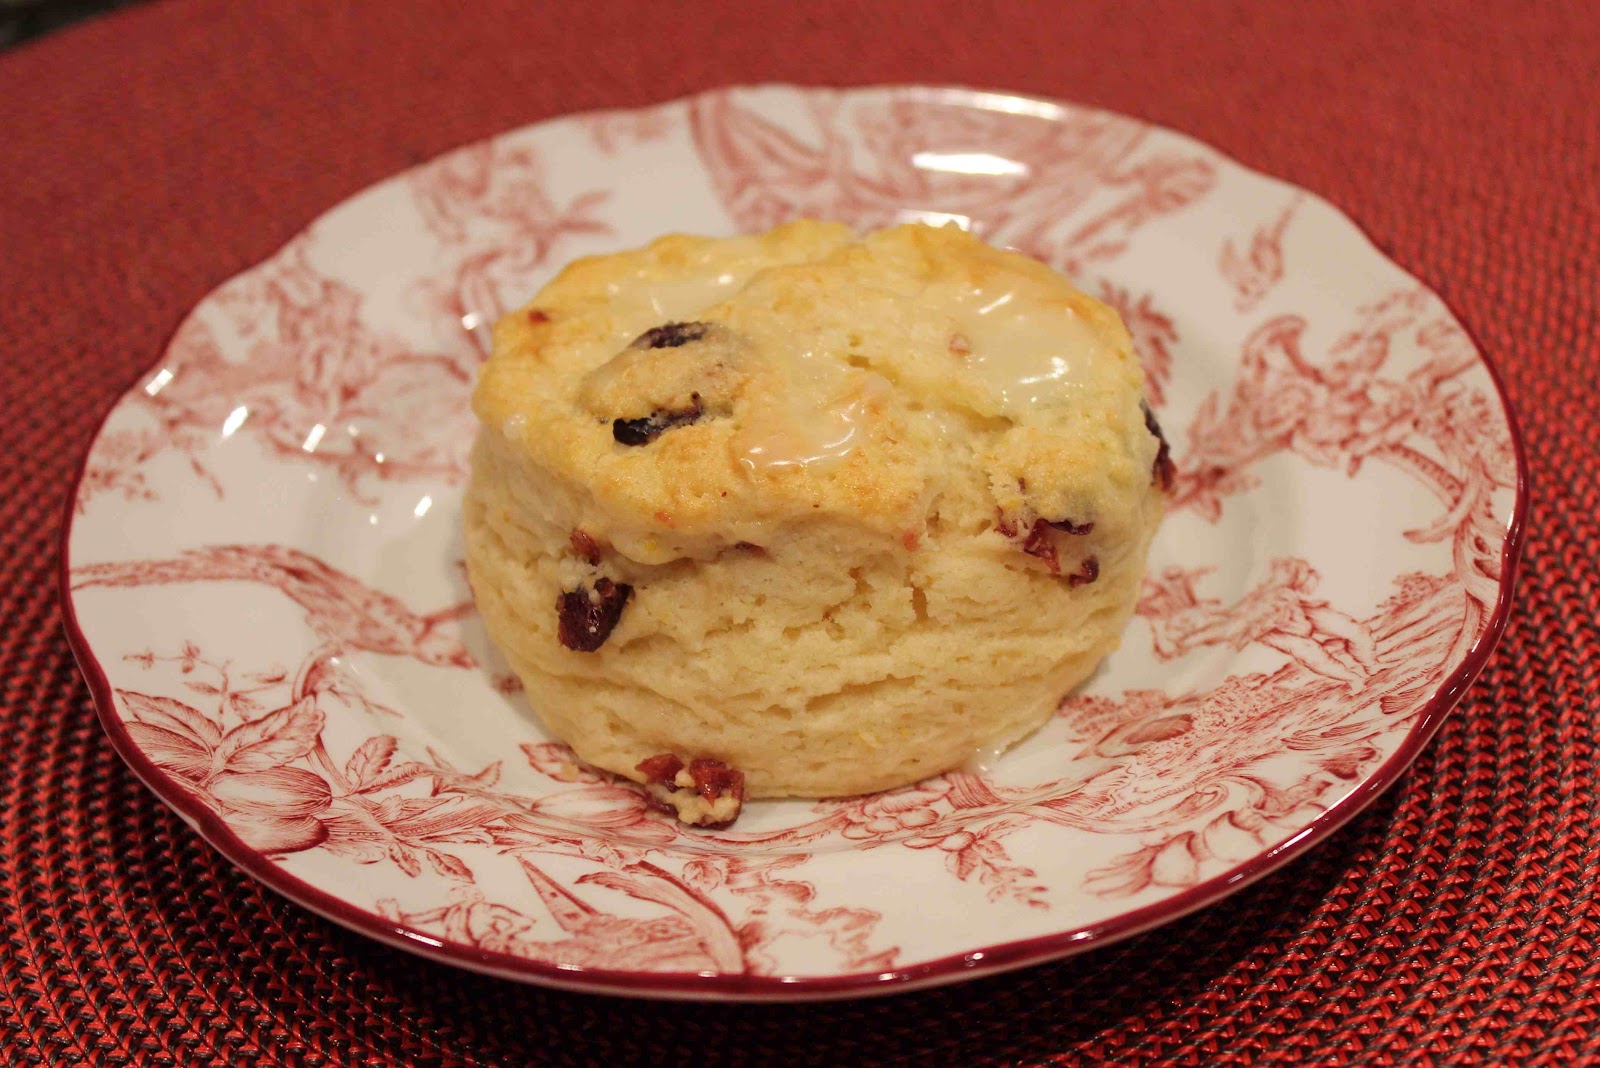
For those of you who have never eaten a scone, it’s like eating a sweet biscuit. They are flakey, buttery and the orange zest and dried cranberries result in the perfect combination of flavors in this quick bread. Don’t forget to drizzle some of the orange glaze on top! Enjoy.

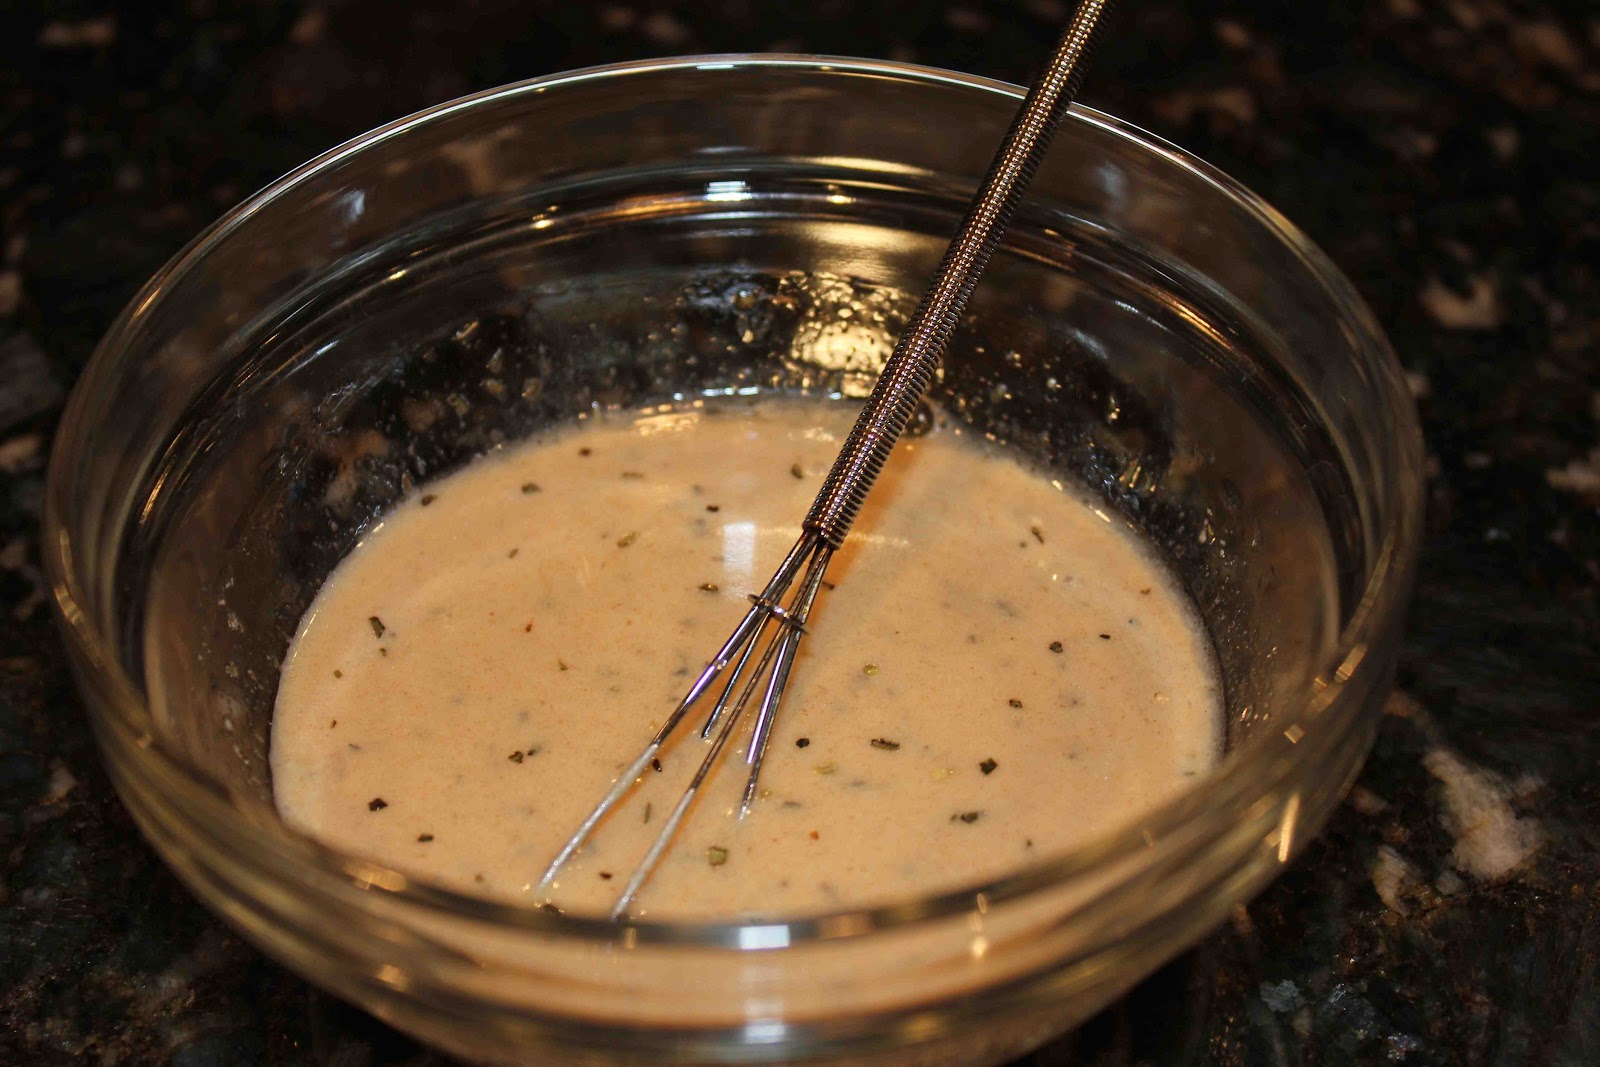
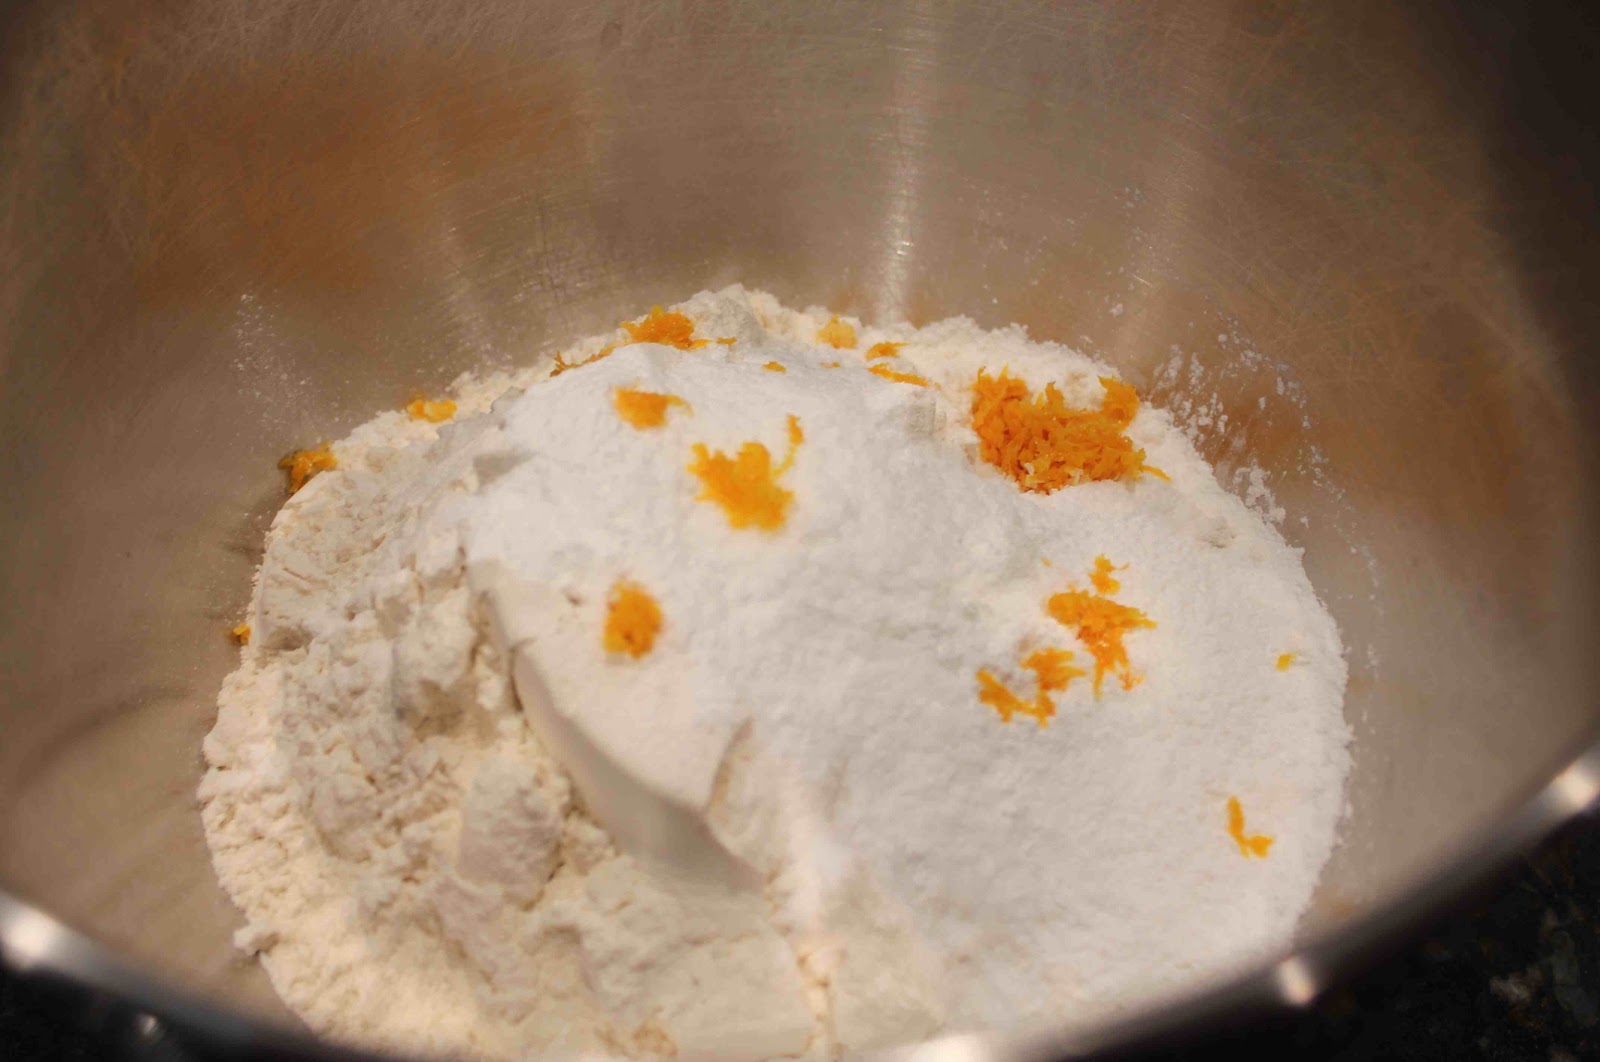
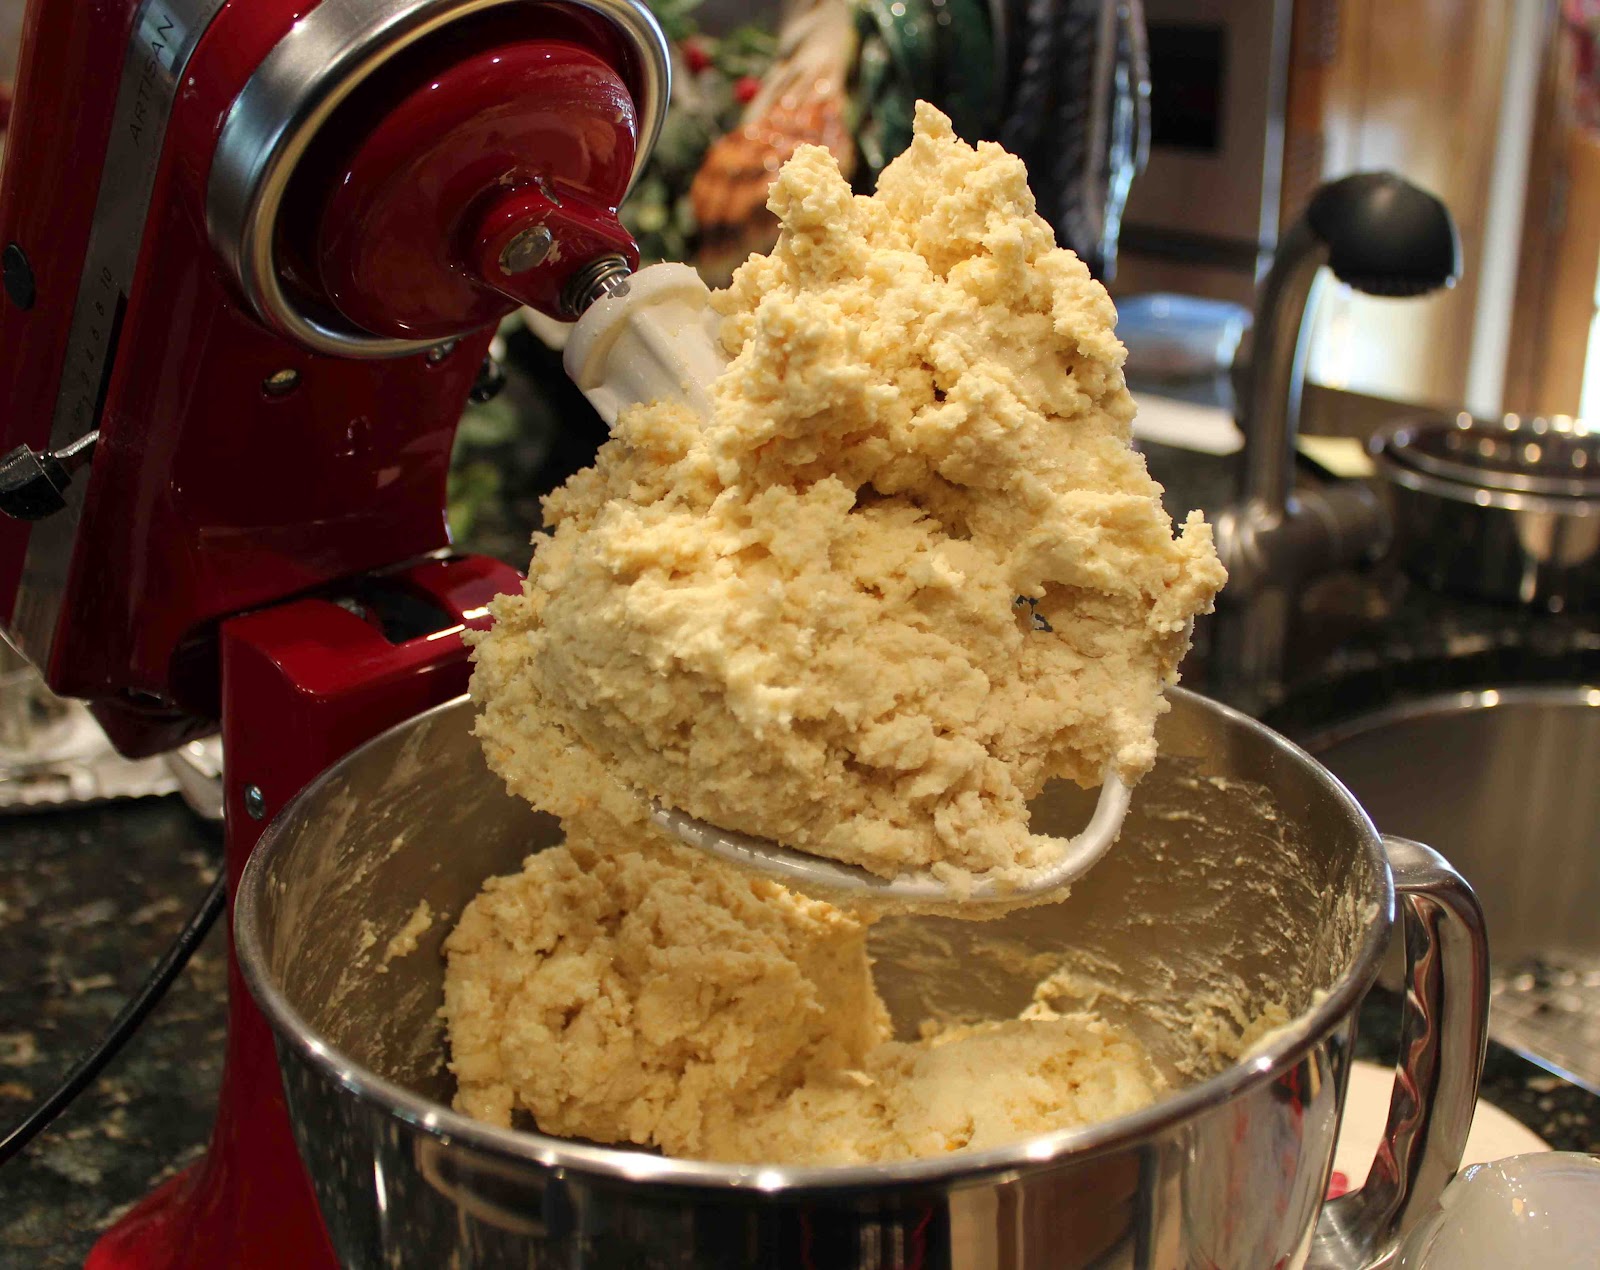
Mix flour, sugar, powder, salt and orange zest.

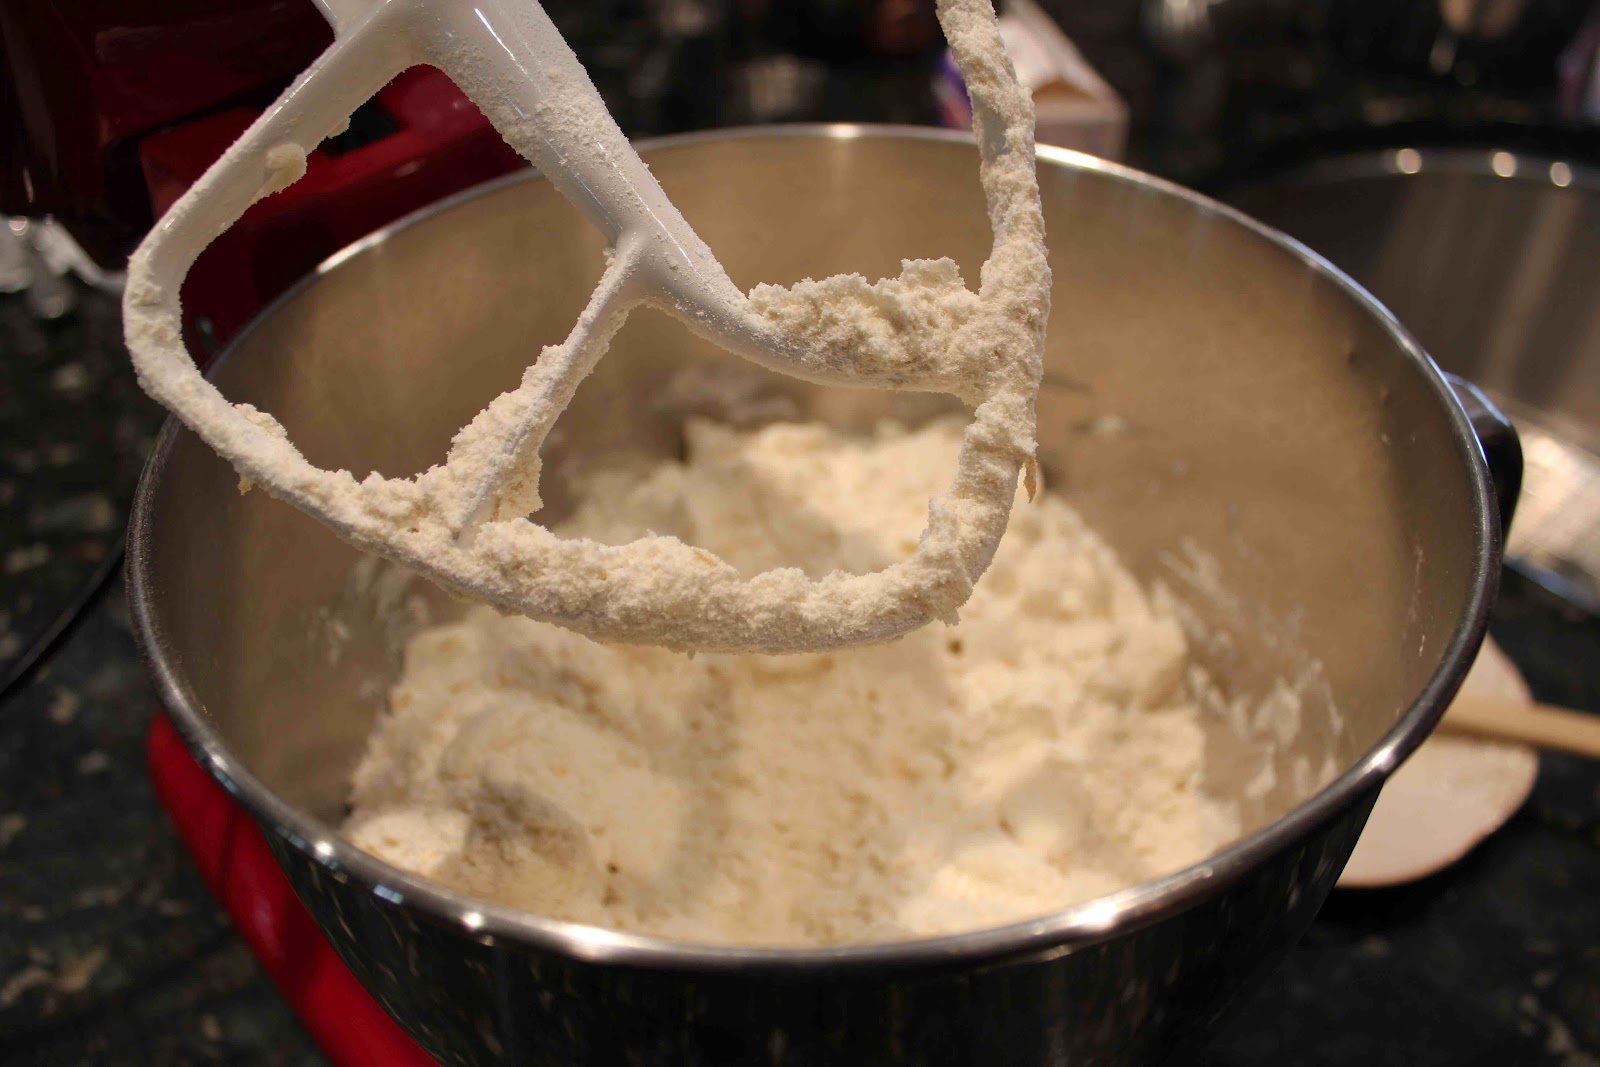
Add the cold butter and mix until the size of peas.

Combine the eggs and heavy cream.

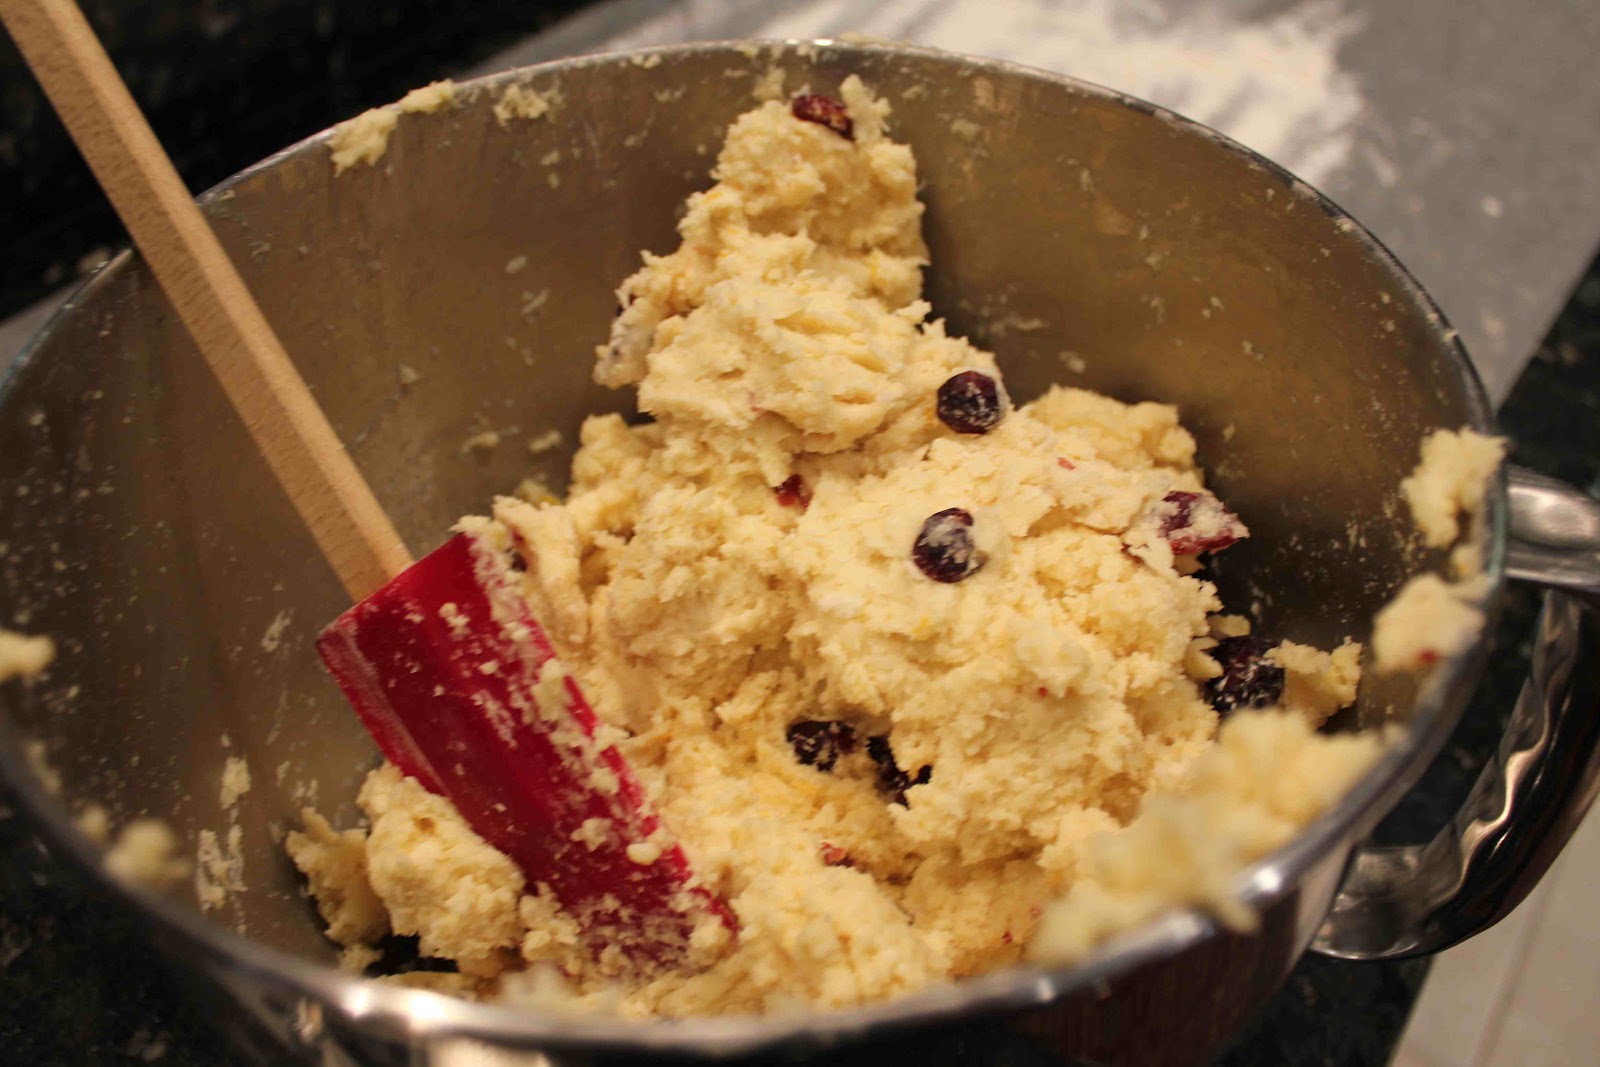
Fole in the dried cranberries.

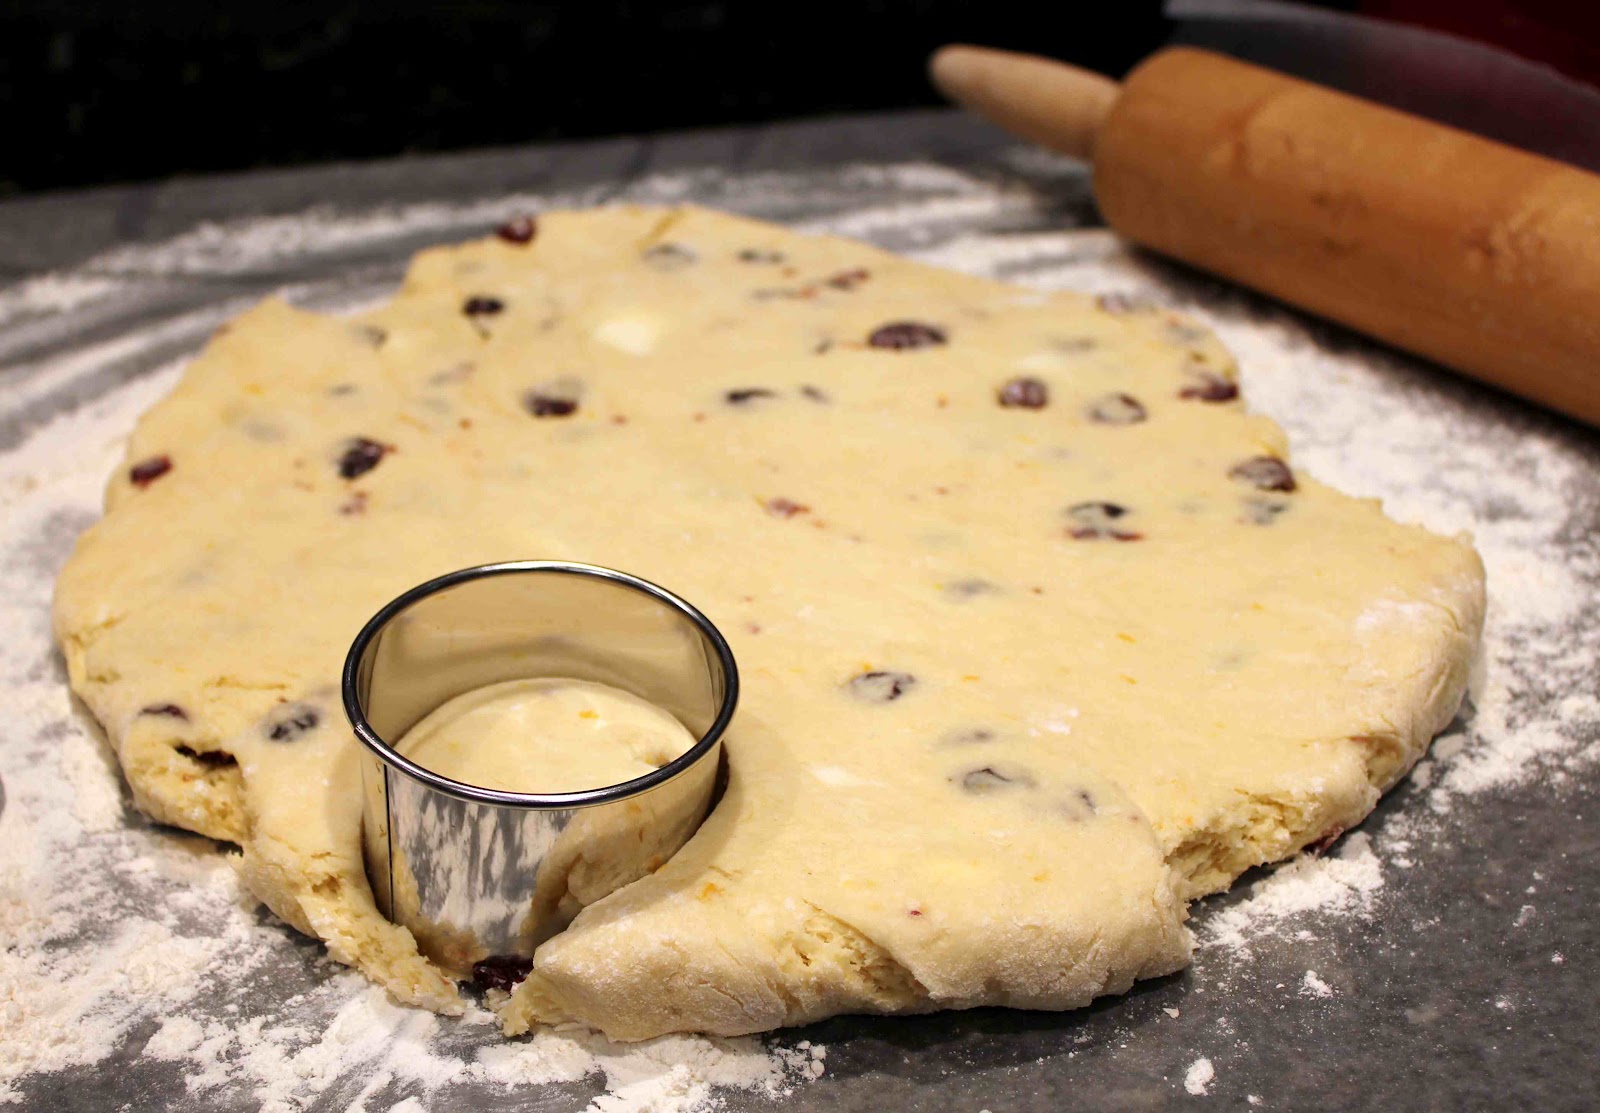
Knead dough and roll to 3/4-inch thick. Cut circles of dough with a biscuit cutter.

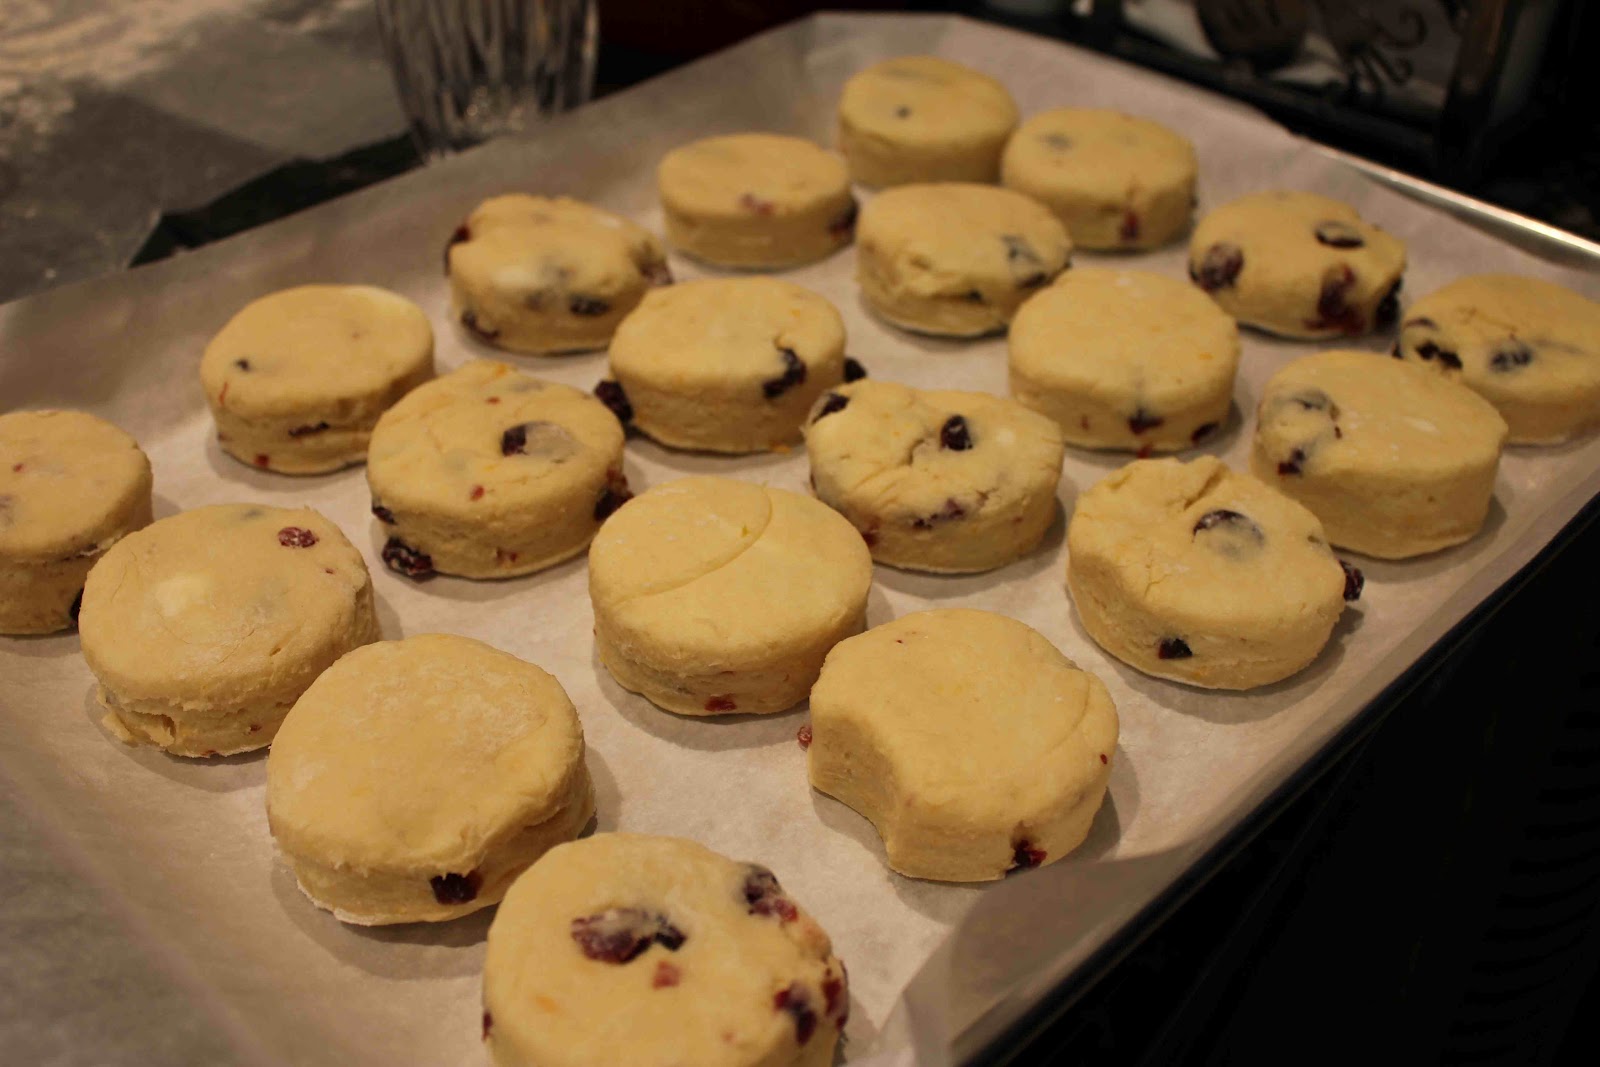
Place cut out dough on parchment-lined baking sheet.

Brush tops with egg wash and sprinkle with sugar.

Bake for 20-25 minutes in a 400 degree F oven. Cool for 15 minutes and drizzle with orange glaze.

Eat up!


Cranberry Orange Scones
Ingredients
4 cups plus 1/4 cup all-purpose flour
1/4 cup
2 Tbsp. baking powder
2 tsp. kosher salt
1 Tbsp. grated orange zest
3/4 pound cold unsalted butter, diced
4 extra-large eggs, lightly beaten
1 cup cold heavy cream
1 cup dried cranberries
1 egg beaten with 2 Tbsp. water or milk for egg wash
1/2 cup confectioners’ sugar, plus 2 Tbsp.
4 tsp. freshly squeezed orange juice

Directions
1. Preheat oven to 400 degrees F.
2. In the bowl of an electric mixer fitted with a paddle attachment, mix 4 cups of flour, 1/4 cup sugar, the baking powder, salt and orange zest. Add the cold butter and mix at the lowest speed until the butter is the size of peas.
3. Combine the eggs and heavy cream and, with the mixer on low speed, slowly pour into the flour and butter mixture. Mix until just blended. The dough will look lumpy!
4. Combine the dried cranberries and 1/4 cup of flour, add to the dough, and mix on low speed until blended.
5. Dump the dough onto a well-floured surface and knead it into a ball. Flour your hands and a rolling pin and roll the dough 3/4 -inch thick. You should see small bits of butter in the dough. Keep moving the dough on the floured board so it doesn’t stick. Flour a 3-inch round plain or fluted cutter and cut circles of dough.
6. Place the scones on a baking sheet lined with parchment paper. Collect scraps neatly, roll them out, and cut more circles.
7. Brush the tops of the scones with egg wash, sprinkle with sugar, and bake for 20-25 minutes, until the tops are browned and the insides are fully baked. The scones will be firm to the touch. Allow the scones to cool for 15 minutes and then whisk together the confectioners’ sugar and orange juice, and drizzle over the scones.

Yield: 14-16 Scones
Recipe from: Barefoot Contessa

Five-Spice-Glazed Salmon with Sesame Green Beans

Here’s a tasty meal you can enjoy in minutes! Chinese five-spice powder, honey, and soy sauce create quite a glaze for this simple salmon dish. Broiling the green beans and salmon on the same baking sheet is genius and allows for faster kitchen cleanup. It’s an excellent meal to prepare for entertaining. As far as taste, the green beans were crisp yet tender, while the salmon had a rich, warm and spicy-sweet flavor from the exotic Chinese five-spice powder. Did I mention this dish was healthy? Salmon supposedly speeds up your metabolism and is loaded with lots of good Omega-3 fatty acids.
 
Enjoy!
Five-Spice-Glazed Salmon with Sesame Green Beans
Ingredients
1/4 cup honey
4 tsp. reduced sodium-soy sauce
1 1/2 tsp. five-spice powder
2 large clove garlic, minced
4 (6 ounce) skin-on salmon fillets (preferably wild), pin bones and scales removed
Nonstick cooking spray
1 lb. slender green beans, trimmed
2 tsp. canola oil
1 tsp. Asian sesame oil
Kosher salt and freshly ground black pepper
2 Tbsp. toasted sesame seeds
1 tsp. lemon juice
Directions
1. In a small bowl, whisk the honey, soy sauce, five-spice powder, and garlic. Put the salmon skin down on a large plate and pour the honey mixture over it. Flip the fillets so they are skin side up. Let the fish marinate for 15 minutes at room temperature.
2. Position a rack 6 inches from the broiler and heat the broiler on high. Line a rimmed baking sheet with foil and coat with cooking spray.
3. In a large bowl, toss the green beans with the canola and sesame oils. Arrange the beans on one half of the prepared baking sheet and season with salt and pepper. Arrange the salmon skin side down on the other half of the baking sheet. Brush the salmon with any remaining marinade from the plate.
4. Broil the salmon and green beans for 3 minutes. Remove the pan from the oven, toss the green beans with tongs, and reposition the salmon pieces as needed so that they cook evenly. Continue to broil until the salmon is just cooked through and the beans are crisp-tender, 2-3 minutes. Toss the green beans with the sesame seeds and lemon juice and serve.
Yield: 4
Nutritional Information: Calories: 400 | Fat: 18g | Protein: 41g | Carbohydrates: 18g | Sodium: 320mg | Cholesterol: 105mg | Fiber: 3g

Fresh Fruit Tart

I apologize for not blogging in what feels like forever. Between birthdays, family get togethers and just day-to-day work, I put Dallas Duo on the back burner, and I’m sorry! 😦
My birthday was last Saturday and mom made this gorgeous and delicious tasting fruit tart. I normally request Mrs. Kelm’s chocolate cake (it’s a classic), carrot cake or Oreo cheesecake, but I was in the mood for fresh fruit since the weather in Dallas has been so warm….it feels like Spring already!
This was a new recipe for us to make from The Barefoot Contessa, one of my favorite Food Network Chefs. The tart was light, creamy, sweet, and semi-healthy with all the fruit. My mother-in-law said the filling tasted like cheesecake.
In less than 2 weeks, we’ll officially be introduced to Spring, so bookmark this recipe so you can try it! Enjoy!
Combine sugar, graham cracker crumbs and butter and bake for 10 minutes in a 350 degree oven.

Prepare filling and refrigerate until cold.

Pour filling into baked and cooled tart shell.

Layer with fresh fruit.

Drizzle raspberry jelly (thinned with hot water) as a glaze and dig in!


Fresh Fruit Tart
Ingredients
For the Crust:
2 cups graham cracker crumbs (approx. 14 whole crackers crushed)
1/3 cup sugar
1/4 lb (1 stick) butter

For the filling: 
6 extra large egg yolks
3/4 cup sugar
3 Tbsp. cornstarch
2 cups whole milk
2 Tbsp.unsalted butter
1 tsp. vanilla extract
2 Tbsp. heavy cream
1 tsp. Cognac or Brandy (we omitted)
Fresh strawberries, blueberries and raspberries
Apricot or raspberry jelly, for the glaze

Directions
1. For the Crust: Preheat the oven to 350 degrees. Combine the graham crackers, sugar, and butter in a small bowl and mix well a wood spoon. Lightly press the mixture into an 11-inch tart pan with removable sides. Bake for 10 minutes and set aside to cool.
2. For the Filling: In the bowl of an electric mixture using a paddle attachment on medium-high speed, beat egg yolks and sugar until mixture is pale yellow and falls back into the bowl in a ribbon (about 3 minutes).
3. On low speed, beat in cornstarch.
4. Bring mik to a boil in a large saucepan and, with the mixer on low, slowly pour it into the egg mixture. Then pour mixture back into the saucepan.
5. Cook over medium heat, stirring constantly with a whisk or wooden spoon, until mixture is thick, bringing mixture slowly to a boil.
6. Once mixture is to a boil, cook for 2-3 minutes longer. Remove from heat and mix in butter, vanilla, cream and Cognac (optional).
7. Strain into storage container. Place plastic wrap on top of the pastry cream and refrigerate until cold.

Assembly
1. Fill tart shell with pastry cream.
2. Add seasonal fruit.
3. Optional: Brush with glaze (melted apricot or raspberry jelly thinned out with hot tap water) to make it look shiny and pretty!

Recipe adapted from The Barefoot Contessa

Chicken Chili

Here’s an extremely healthy chili recipe from Ina Garten (aka – Barefoot Contessa) that I strongly recommend. It is loaded with chunks of white meat chicken for lean protein, contains tons of Vitamin C from the red & yellow bell peppers, and packs quite a bit of heat with the chili powder, cayenne pepper and red pepper flakes in the seasonings.
Ina Garten states from Barefoot Contessa Parties! that “We had been making traditional chili at Barefoot Contessa for almost 20 years. I decided to update it with chicken to make it lighter, and it’s even more popular than our regular chili.”
I can definitely see why… my husband even ate two bowls of it. Serve with perfect corn bread and enjoy!
Saute onions in olive oil until translucent, 10-15 minutes. Add garlic and cook for 1 minute.

Add peppers and spices and cook for 1 minute.

Process tomatoes and add to the pot with basil. Bring to a boil and simmer for 30 minutes, uncovered. Add diced chicken and simmer for another 20 minutes.

Serve warm with corn bread and toppings of choice including shredded cheese, onions, or sour cream.


Chicken Chili
Ingredients
8 cups yellow onions (6 onions)
1/4 cup good olive oil, plus extra for chicken
1/4 cup minced garlic (8 cloves)
4 red bell peppers, cored, seeded and large-diced
4 yellow bell peppers, cored, seeded and large-diced
2 teaspoons chili powder
2 teaspoons ground cumin
1/2 teaspoon dried red pepper flakes, or to taste
1/2 teaspoon cayenne pepper, or to taste
4 teaspoons kosher salt, plus more for chicken
4 (28-ounce) cans whole peeled plum tomatoes in puree, undrained
1/2 cup minced fresh basil leaves
8 split chicken breasts, bone in skin on
Freshly ground black pepper

Directions
1. Cook the onions in the oil over medium-low heat for 10-15 minutes, until translucent. Add the garlic and cook for 1 more minute. Add the bell peppers, chili powder, cumin, red pepper flakes, cayenne, and salt. Cook for 1 minute.
2. Crush the tomatoes by hand or in batches in a food processor fitted with a steel blade (pulse 6 to 8 times). Add to the pot with the basil. Bring to a boil, then reduce the heat and simmer, uncovered, for 30 minutes.
3. Preheat the oven to 350 degrees F.
4. Rub the chicken breasts with olive oil and place them on a baking sheet. Sprinkle generously with salt and pepper. Roast the chicken for 35-40 minutes, just until cooked. Let cool slightly.
5. Separate meat from the bones and skin and cut it into 3/4-inch chunks. Add to the chili and simmer, uncovered, for another 20 minutes. Serve with toppings of choice (onions, corn chips, grated cheddar, sour cream), or refrigerate and reheat gently before serving.

Yield: 12 servings
Recipe from Barefoot Contessa Parties!

Peanut Butter Chocolate Chunk Cookies

These are probably some of the best peanut butter cookies out there…at least, that’s what I’ve seemed to glean from the people who ate them.


Last Sunday we had small groups at church and of course, I signed up to bring dessert. Lucky for me (and my guests), I was able to try a new peanut butter cookie recipe that my sister recommended, from Ina Garten’s cookbook – Barefoot Contessa Parties!


For those you who don’t know, Ina Garten (also known as Barefoot Contessa) is one of my favorite chefs on Food Network. Some of my favorite recipes come from her cookbooks since they are simple, delicious, and slightly fancy. I also like Ina because she seems so motherly & sweet, and reminds me of my aunt Jolene who is kind, caring, generous, and also a wonderful cook.


These peanut butter chocolate chunk cookies are Ina’s favorite variation of the old Barefoot Contessa chocolate chunk cookie recipe. They have the combination of flavors in a Reese’s Peanut Buttter Cup…yum! They are moist on the inside while slightly crisp on the outside, and the larger chocolate chunk pieces seem to just melt in your mouth.


All my friends at church seemed to love these, especially the guys who were eating anywhere between 3 and 5 cookies. On Monday, I took the remaining cookies to work where my coworkers also raved how delicious they were. The next day upon returning to work, the cookies were gone!


Look’s like I’ll be making this recipe sometime in the near future. Enjoy.


Peanut Butter Chocolate Chunk Cookies
Ingredients
1/2 pound (2 sticks) unsalted butter
1 1/2 cups light brown sugar, packed
3/4 cup granulated sugar
2 extra-large eggs at room temperature
2 tsp. pure vanilla extract
1 cup good smooth peanut butter
2 1/2 cups all-purpose flour
1 tsp. baking powder
1 tsp. kosher salt
1 pound (16 ounces) good semisweet chocolate chunks

Directions
1. Preheat the oven to 350 degrees F.
2. In the bowl of an electric mixer fitted with the paddle attachment, cream the butter and sugars until light and fluffy. Add the eggs, one a a time. Add the vanilla and peanut butter, and mix.
3. Sift together the flour, baking powder, and salt and add to the batter, mixing only until combined. Fold in the chocolate chunks.
4. Drop the dough on a baking sheet lined with parchment paper, using either a 1 3/4-inch ice cream scoop or a rounded tablespoon. Dampen your hands, flatten the dough lightly, then press the tines of a wet fork in both directions.
5. Bake for exactly 17 minutes (the cookies will seem underdone). Do not over bake. Remove from the oven and let cool slightly on the pan, then transfer to a wire rack and let cool completely.

Yield: 36-40 cookies
Recipe from: Barefoot Contessa Parties!

Homemade Granola Bars


Earlier this week, my sister made these healthy homemade granola bars for her and her fiancé. I have not had the chance to bake these bars yet, but I have full intentions of doing so this weekend.
 
My sister said these granola bars were delicious. The rolled oats, whole wheat flour, and wheat germ make them healthy, while the brown sugar, honey, and chocolate & peanut butter chips make them sweet.  What an excellent snack I look forward to eating soon!

Homemade Granola Bars

Ingredients
2 cups rolled oats
1 cup whole wheat flour
1/2 cup chocolate chips (can substitute dried fruits for the chocolate and peanut butter chips)
1/2 cup peanut butter chips
1/2 cup brown sugar
1/2 cup wheat germ
1 tsp. cinnamon
1/2 tsp. salt
1 egg, beaten
1/2 cup honey
1/2 cup canola oil
2 tsp. vanilla extract
Directions
1. Preheat oven to 350 degrees F. Line a 9 x 13-inch baking pan with foil and spray with cooking spray.
2. Mix the dry ingredients in a large bowl. In a small bowl, mix together the wet ingredients. Pour the wet mixture into the dry and mix well (it’s easiest to just use your hands). Pat the mixture out into the foil-lined pan.
3. Bake for about 15-20 minutes if you want chewy granola bars or for 20-25 minutes for crunchy granola bars. When the edges start to brown, remove from the oven and let cool for a couple of minutes. Use a pizza roller to slice bars. Finish cooling completely before removing from the pan or they will break apart.
Recipe from Buns in My Oven