Perfect Corn Bread

Here is my mom’s classic corn bread recipe that she has made in our family for years.  We’ve made it in dressing for Thanksgiving, as a side for Taco Soup, or just by itself, dipped in milk (I remember as a kid my sister dipping her cornbread in a huge, round, glass of skim milk.  She loved it!).

Over spring break, my sister and I made my mom’s Perfect corn bread as a side to go with our Grilled Shrimp and Green Bean Salad.  It was delicious.  Unlike the skillet cornbread recipe, which can get a little greasy around the edges due to the melted shortening, this corn bread is crispy on top, and warm and soft on the inside.  The name says it all, “Perfect” Corn Bread.  In addition, it has just a touch of sweetness from the 1/4 cup of sugar.  Enjoy!!


Perfect Corn Bread
Serves: 12-16
Recipe adapted from: Better Homes and Garden Cookbook
Ingredients
  • 1 cup sifted flour
  • 1/4 cup sugar
  • 4  tsp. baking powder
  • 3/4 tsp. salt
  • 1 cup yellow cornmeal
  • 2 eggs
  • 1 cup milk
  • 1/4 cup shortening (vegetable oil)
Instructions
  1. Mix first five ingredients (flour through cornmeal).  Add eggs, milk, and shortening. Beat until smooth.
  2. Bake for 20-25 minutes in a 425 degree oven in a greased 9 x 9 x 2-inch pan.  Be aware that a glass pan conducts more heat than a metal pan, so adjust your baking time accordingly.

Coconut Chocolate Chip Bars

I LOVE THESE BARS!!!  My mom, my husband, Matt, Matt’s friend, Adam, and my in-laws would agree as well!  My mom and I made these last night for the men in our family who went to a Texas Rangers baseball game (6-0 Go Rangers!)  While at the game, my husband and dad texted me, “What are ya’ll making for dessert?”  My mom and I felt obligated at this point, thus we tore out the cookbooks to find something sweet to bake.
Here is what we found:  Coconut Chocolate Chip Bars from The Sono Baking Company Cookbook by John Barricelli.  This recipe is a take on the traditional magic cookie bar.  It features two distinct layers: the base, which consists of a brown sugar shortbread cookie-like crust, and the top layer, a rich, chewy oatmeal-coconut-chocolate-chip cookie.  Yummy!
This is the “real” way to make magic bars.  I almost feel like now I’d be cheating if I made magic bars with sweetened condensed milk.  These coconut chocolate chip bars were sweet, and had a caramel flavor to it since there is only brown sugar, not white (granulated) sugar.
Enjoy these tonight!  They are sure to waste your “weight watchers” points for the day.  I know I had one for breakfast, one for an afternoon snack, and one for dinner for dessert.  My sister-in-law had one for breakfast too!  My husband’s friend, Adam, said these were some of the best bars he put in his mouth.  Don’t worry Adam, now your wife can have the recipe and make you these!
To Make the Crust:  Cream the butter, brown sugar, and salt on medium speed until fluffy.

Add the vanilla extract and flour, and mix on low until the flour is absorbed.

Press the crumbs into a buttered 9 x 13-inch baking pan.  Bake in a 350 degree F oven for 10 to 12 minutes, rotating the pan halfway through baking time.

To Make Filling:  Meanwhile, whisk together the light brown sugar, salt, eggs, and vanilla.  Whisk in the flour.  Fold in the oats, coconut, nuts and chocolate chips.

Pour filling over crust, and bake in a 350 degree F oven for 20 to 25 minutes, rotating the pan two-thirds of the way through baking time.

Remove from oven and let cool completely before cutting into bars.

Serve and try and see if you can just eat one!

Coconut Chocolate Chip Bars
Ingredients
Crust:
10 Tbsp (1 stick plus 2 Tbsp) unsalted butter, at room temperature
1/2 cup plus 2 Tbsp light brown sugar
1/4 tsp coarse salt
2 tsp pure vanilla extract
1 3/4 cup all-purpose flour

Filling:
1 1/2 cups light brown sugar
1/2 tsp coarse salt
3 large eggs, at room temperature
1 Tbsp pure vanilla extract
2 Tbsp all-purpose flour
1 1/2 cups sweetened shredded coconut
6 Tbsp old-fashioned rolled oats (not instant)
1 1/2 cups macadamia nuts, coarsely chopped (we used pecans)
1 cup semisweet chocolate chips (we used chocolate chunks)

Directions
1.  Set the oven rack in the middle position.  Preheat the oven to 350 degrees F.  Butter a 9 x 13-inch baking dish; set aside.
2.  To make the crust:  In a bowl of a standing mixer fitted with the paddle attachment, beat the butter with the brown sugar and salt on medium speed until light and fluffy, about 3 minutes, scraping down the sides of the bowl halfway through.  Beat in the vanilla.  With the mixer on low speed, beat in the flour until absorbed.
3.  Press the dough over the bottom of the prepared baking dish.  Set on a baking sheet and bake, rotating the sheet about halfway through the cooking time, until the crust turns an even blond color and is cooked through and crisp, 10 to 12 minutes.  Remove the baking dish from the oven.  Do not turn off the oven.
4.  To make the filling:  In a large bowl, whisk the brown sugar with the salt.  Add the eggs and vanilla and whisk to blend.  Whisk in the flour.  Fold in the coconut, oats, and nuts.  Spread the filling over the crust.  Sprinkle with the chocolate chips (we mixed the chocolate chunks in with the batter instead).
5.  Bake, rotating the pan about two-thirds of the way through the baking time, until the filling is set to a soft, chewy, cookie-like texture, 20 to 25 minutes.  Let cool completely in the pan on a wire rack.  Cut into bars approximately 2 1/4 by 2 1/2 inches.

Yield:  about 20 bars
The Sono Baking Company Cookbook by John Barricelli

Collins Chocolate Cake with Chocolate Buttercream Frosting

This may throw you off your weight watcher’s diet compared to the salad I posted yesterday!

Here is another dessert my sister made for a freshman Oklahoma State cross country runner for his 19th birthday.  The freshman runner loved this cake and quotes, “It was the best cake I ever had!”  The chocolate cake recipe is from the Peach Tree Cookbook by Cynthia Collins Pedregon, and the chocolate buttercream frosting is from The Perfect Cake by Susan G. Purdy.

My sister made a two-layer cake and decorated the top with colored sprinkles.  The cake was extremely rich with chocolate flavor, and was very moist.  It took her a week and sifting through over ten cookbooks to finally decide on this recipe!!

Half of the cake was gone in a matter of minutes, complements of the seven people eating on it.  By day two, the cake had disappeared.  Enjoy!

Collins Chocolate Cake
Ingredients
4 ounces unsweetened baking chocolate
1 cup butter or margarine
1 cup brewed coffee
2 cups sugar
2/3 cup buttermilk
1 tsp baking soda
2 eggs
1/2 tsp cinnamon
2 tsp vanilla
2 cups flour
Directions
1.  Preheat oven to 350 degrees F. 
2.  In  large saucepan, combine chocolate, butter, or margarine, and coffee.  Heat, stirring constantly, until chocolate and butter are melted.  Add sugar and continue cooking over low heat until sugar is dissolved.
3.  Combine buttermilk, soda, eggs, cinnamon and vanilla.  Stir into chocolate mixture.
4.  Stir in flour, blending well.  Pour into 9 x 13-inch pan that has been greased and floured.  Bake for 30 minutes or until toothpick inserted in center comes out clean.  Frost with Chocolate Buttercream Frosting (see below)
Serves:  12
The Peach Tree Family Cookbook by Cynthia Collins Pedregon
Chocolate Buttercream Frosting
Ingredients
1/2 cup unsalted butter (1 stick; 110 g), softened but not melted
1 large egg yolk (optional)
Pinch of salt
1 tsp vanilla extract
4 to 4 1/2 cups sifted confectioners’ sugar (16 ounces; 454 g)
5 or 6 tablespoons heavy cream or milk, or as needed
4 to 6 ounces melted semisweet chocolate
Directions
1.  In an electric mixer or food processor, cream the butter until soft, then beat in the egg yolk if using it, the salt, and the vanilla.  With the mixer on low speed or pulsing the processor, add about 1/4 cup of the sugar.  Beat in the 4 to 6 ounces of melted and cooled semisweet chocolate.  Alternately add cream and remaining sugar, blending smooth between additions.  (Use only as much cream as necessary to reach spreading consistency).  Scrape down sides of bowl.  Add more cream if too stiff, chill to harden if too soft.
Quantity: About 2 1/2 cups, to fill and frost an 8- or 9-inch 2 -layer cake.
The Perfect Cake by Susan G. Purdy

Field Salad with Snow Peas, Grapes, and Feta

As most of you all know, I love Feta cheese!  I don’t know a single recipe with Feta that I don’t like.  Here is a recipe for a Field Salad with snow peas, grapes, and feta.  It comes from Cooking Light:  Cooking Through the Seasons cookbook, and is very healthy, as the cookbook name suggests.

My mom and I decided to make this salad for our Sunday afternoon meal of steak, baked potatoes, and fruit.  This Field Salad was colorful, flavorful, and the dressing was delicious with just a touch of orange juice.  The snow peas add that “crunch” you need in a salad, but if you are not a big fan of those vegetables, I would recommend substituting a red onion for that tart and crunchy taste to contrast with the sweet, juicy grape halves.  I think you could even add a handful of toasted pecans.  Yum yum!

We all loved this salad, and vowed to make it very soon again.  Enjoy!

Field Salad with Snow Peas, Grapes, and Feta
Ingredients
5 Tbsp white wine vinegar
5 Tbsp fresh orange juice
2 Tbsp extra virgin olive oil
2 1/2 tsp sugar
1/2 tsp salt
1/4 tsp freshly ground black pepper
8 cups gourmet salad greens
2 cups snow peas, trimmed and cut lengthwise into thin strips
2 cups seedless red grapes, halved
1/2 cup (2 ounces)  crumbled feta cheese
Directions
1.  Combine first 6 ingredients in small bowl; stir well with a whisk.  Combine remaining ingredients in a large bowl.  Drizzle dressing over salad; toss well.
Yield:  6 servings
Cooking Light: Cooking Through the Seasons
Nutrition
Calories: 151
Fat:  7.9g
Protein:  4.3g
Carbohydrate:  18.6g
Fiber:  3g
Cholesterol:  11mg
Iron:  2mg
Sodium:  354mg
Calcium:  123mg

Basic Yellow Cake with Chocolate Frosting

The yellow cake is a 19th century classic that is the basis for many of today’s recipes.  It is light, moist, and full of vanilla flavorings.  This basic cake is easy to remember (1 cup butter, 2 cups sugar, 3 cups flour, 4 eggs), simple to prepare, and foolproof, thus it was one of the first cakes taught to beginning bakers.  We got this recipe out of The Perfect Cake by Susan G. Purdy.

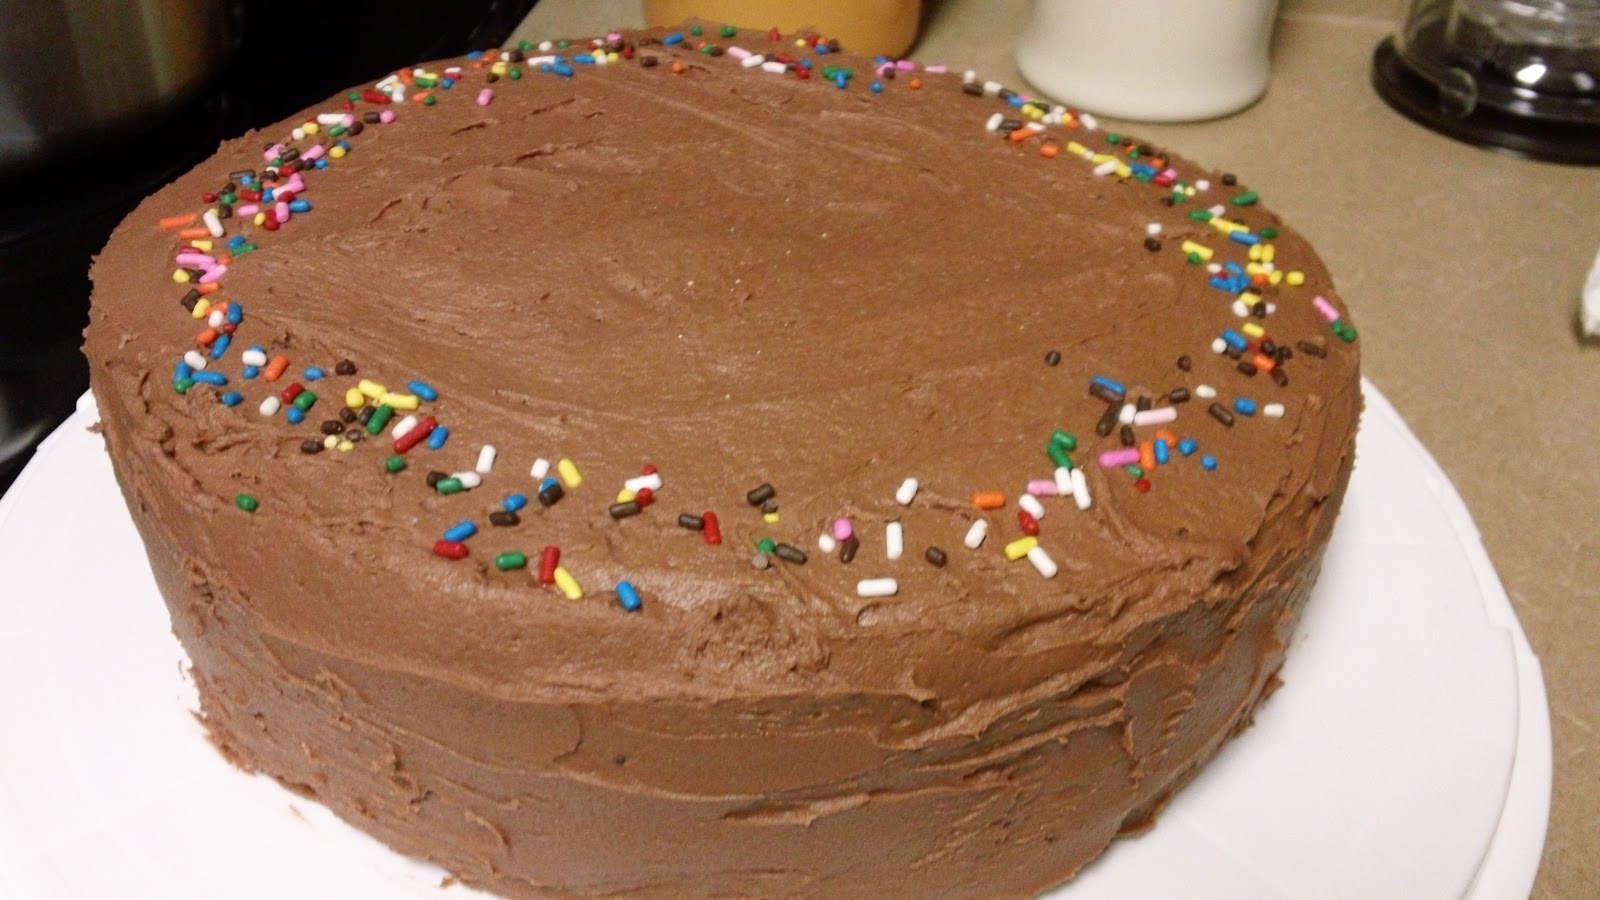
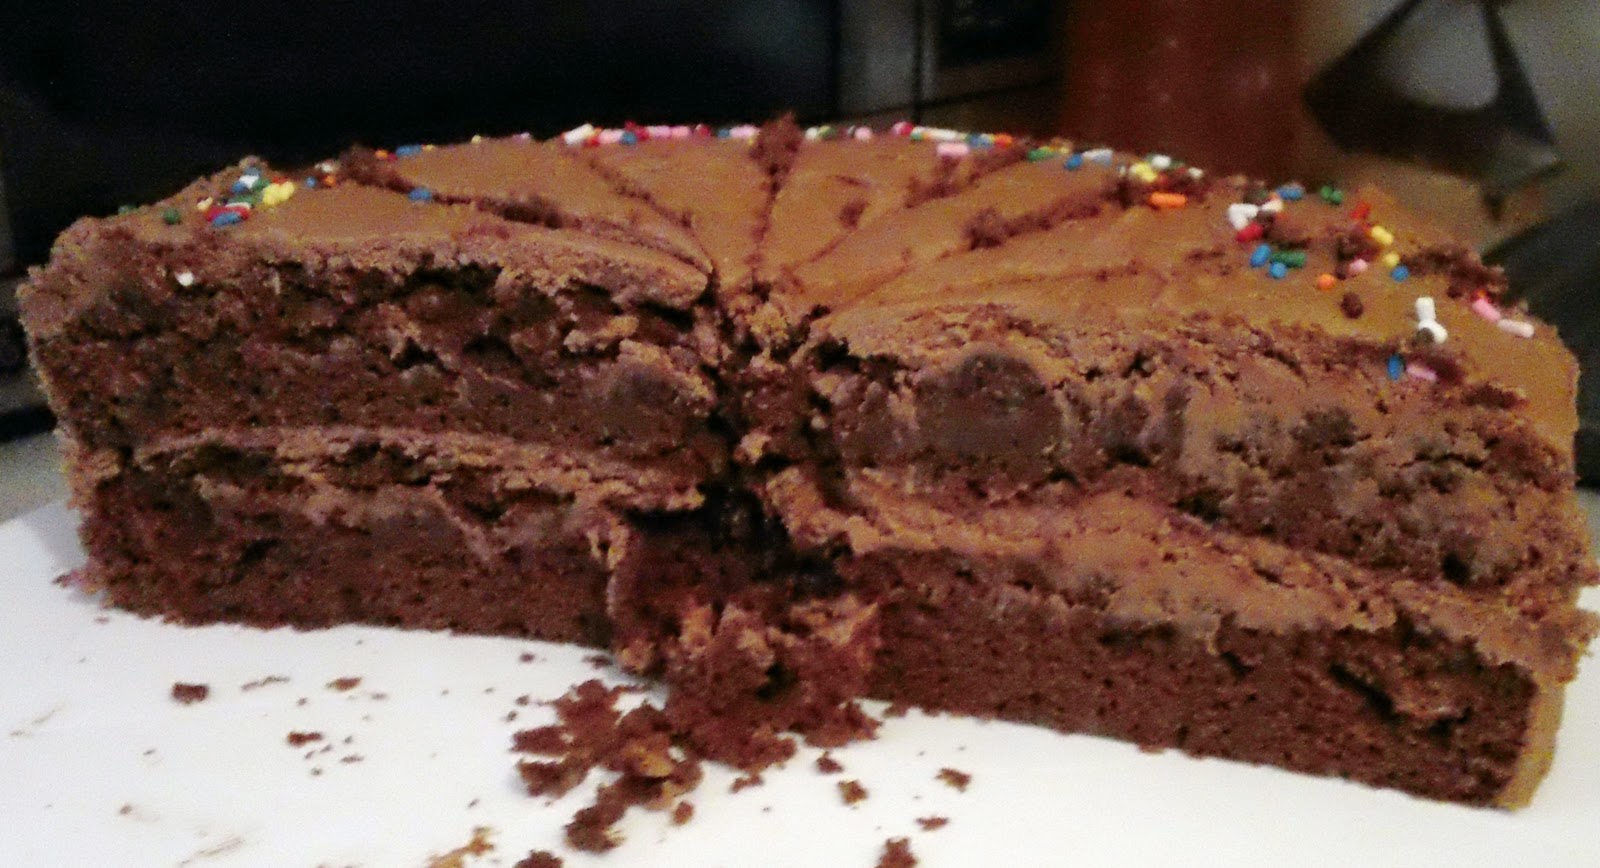
My husband is a huge fan of yellow cake, so of course he loved it.  One time he bought a yellow cake mix at the store with chocolate frosting from a jar (yuck) and had me make a yellow cake and chocolate frosting the “easy” way.  I personally HATE cake mixes, unless you do something to it, like the Gooey Butter Cake (Neiman Marcus Cake) or Cherry Pineapple Pecan Cobbler, also known as Dump Cake.  Plain old cake mix by itself is dry, flavorless, and dry…do I have to repeat myself?  Dry!! The chocolate frosting in a can is too sweet, too thick, and not creamy.  After making that awful cake, I really had no desire to ever eat a yellow cake again… until we tried this recipe.  My mom made it, and it was the exact opposite of the box mix you buy at the store.  Flavorful, moist, buttery, and a touch of vanilla are words that describe this homemade yellow cake.

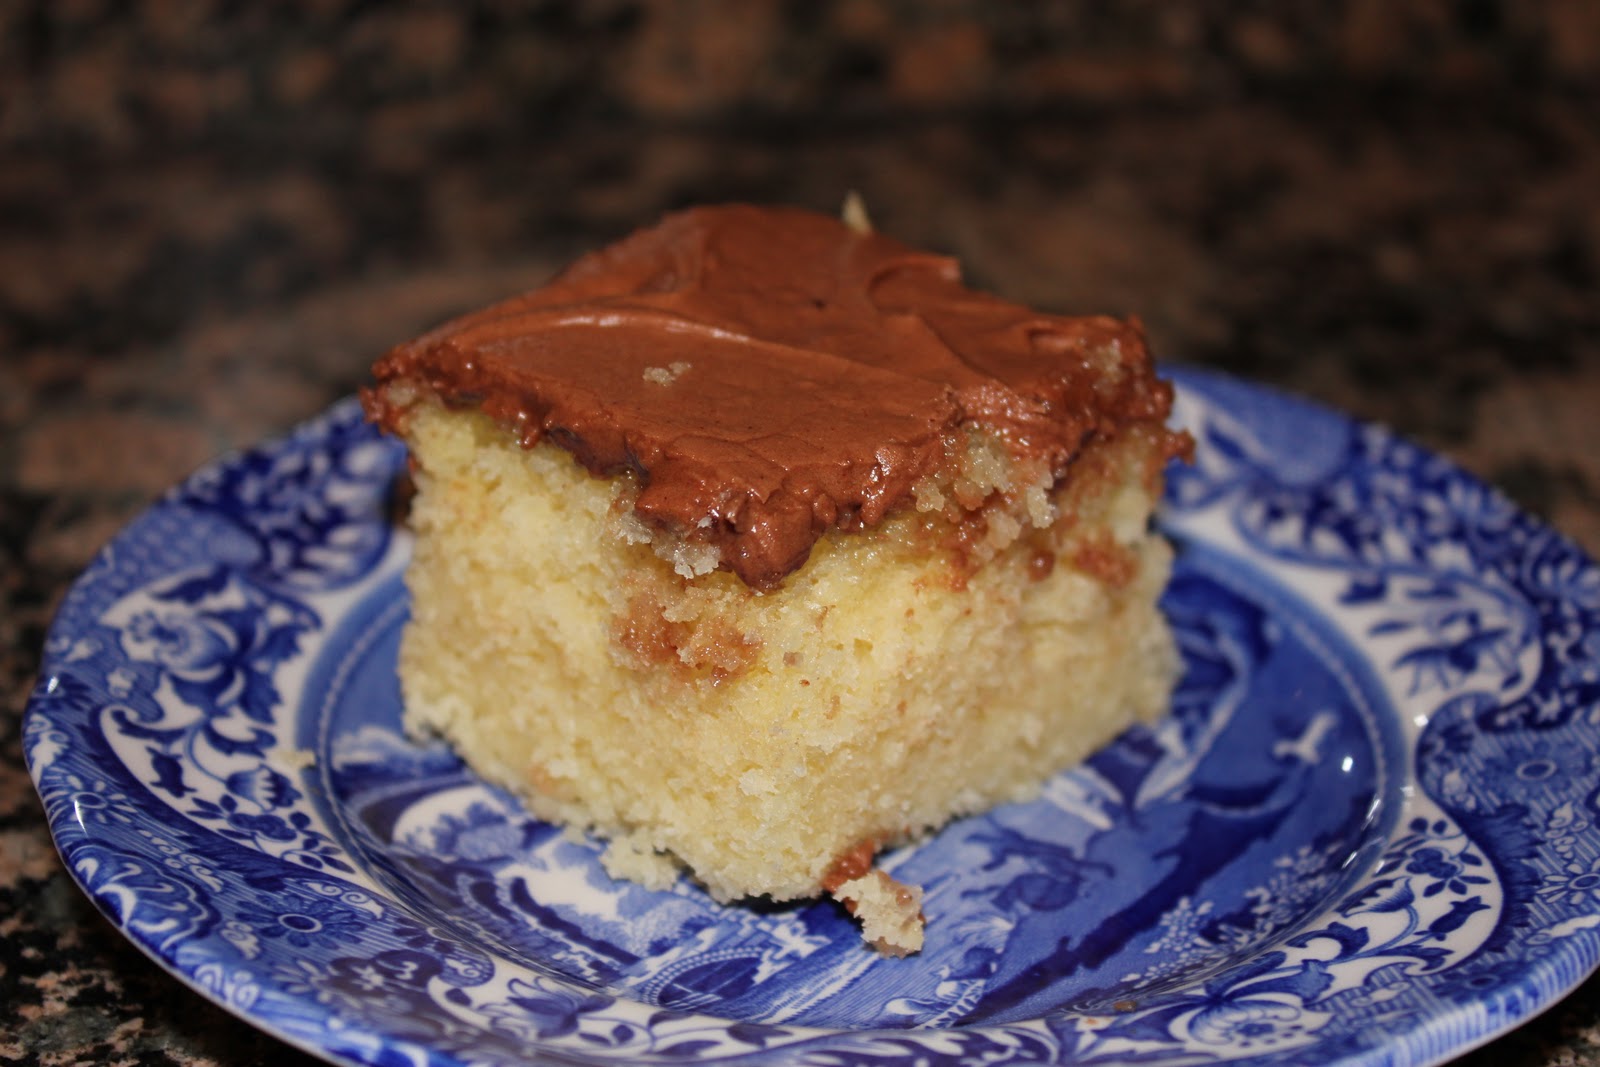
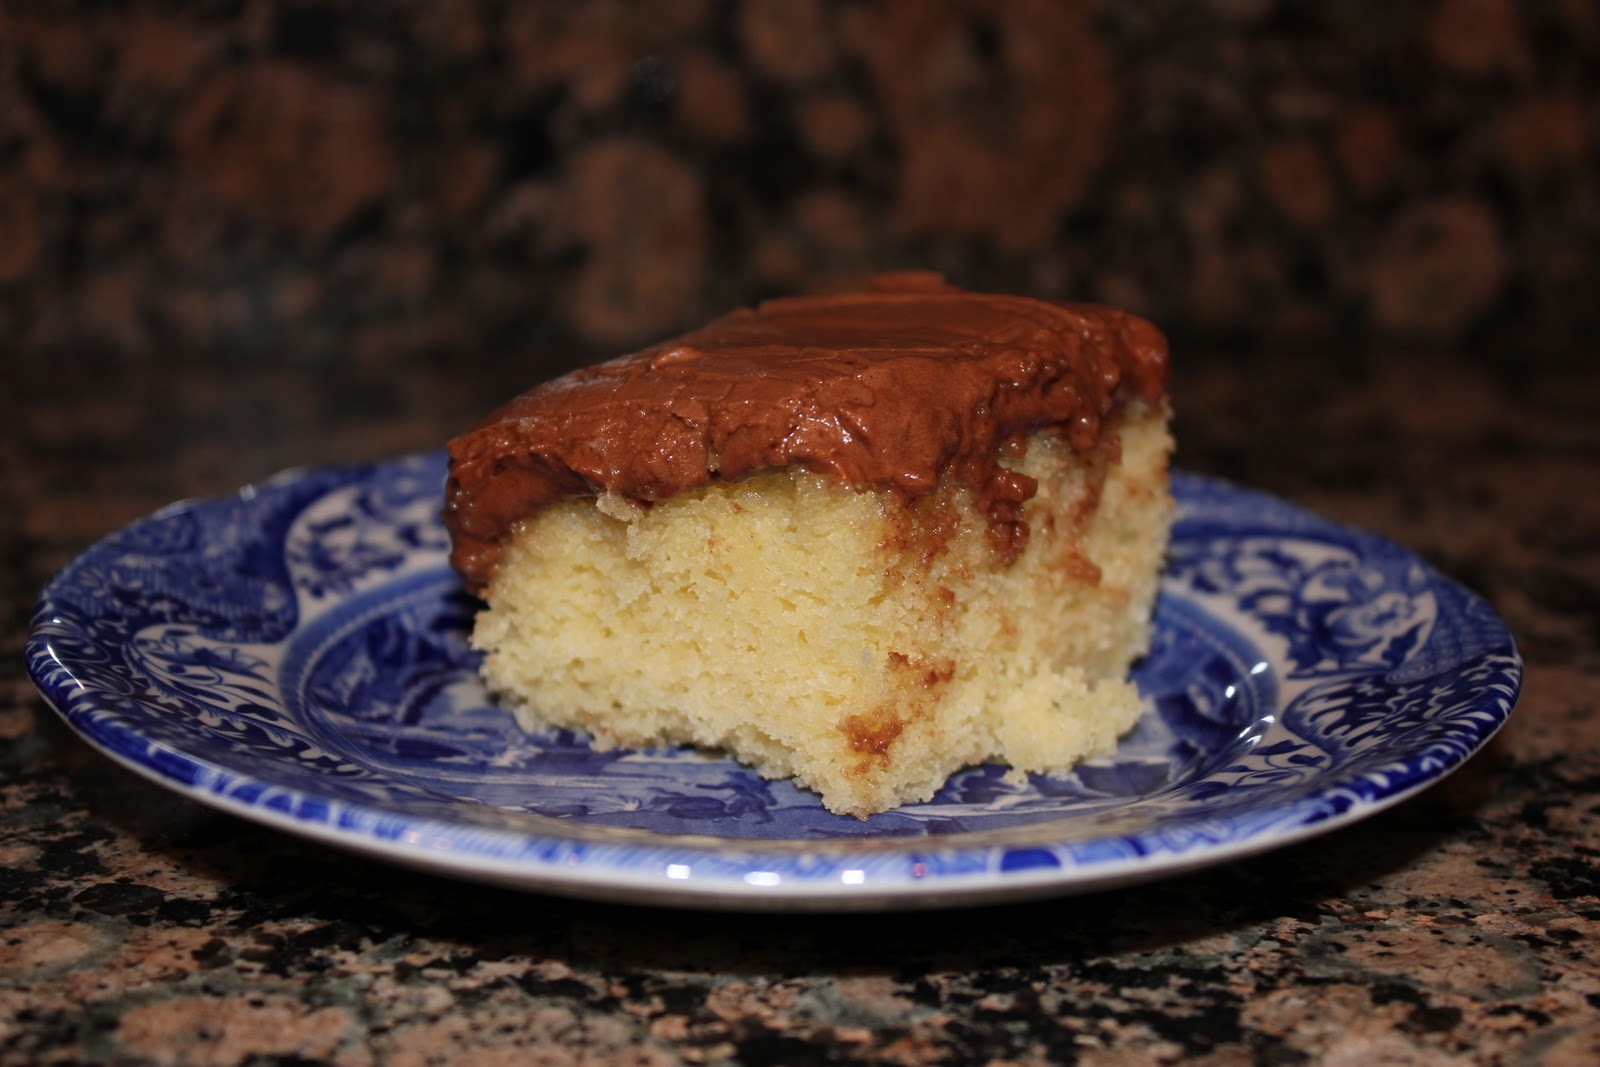
This Basic 1-2-3-4 cake can be modified in many ways.   You can make it an almond cake, an orange cake, a yellow cake, a chocolate cake, etc. based on the extra ingredients and modifications you use to personalize your cake.  I used one of the variations in the book, the Basic Yellow Cake, and topped it with with my favorite chocolate icing recipe from The Junior League of Houston, Inc.’s cookbook, Stop and Smell the Rosemary.  

Classic Yellow Cake with Chocolate Frosting
Basic 1-2-3-4
Ingredients
3 cups sifted all-purpose flour (12 3/4 ounces; 360g)
1 Tbsp baking powder
1/2 tsp salt
1 cup unsalted butter (2 sticks; 230g) at room temperature
2 cups granulated sugar (14 ounces; 400g)
*4 large eggs, separated
*1 cup milk (we used whole milk)
1 tsp vanilla extract

Directions
1.  Prepare pans (two 8 or 9-inch round cake pans or one sheet 13 x 9-inches) by spreading solid shortening all over the bottom and sides of pans, then dust evenly with flour; tap out excess flour.
2.  Sift together flour, baking powder, and salt.  Set aside.
3.  In the large bowl of an electric mixer, beat the butter until soft and smooth.  Add the sugar and beat until light and smooth.  Ad egg yolks, one at a time, beating after each addition.  Stop the mixer and scrape down the sides of the bowl and the beaters several times.
4.  With the mixer on low speed, alternatively add the flour mixture and milk, beginning and ending with flour.  Stir in the vanilla.  At this point, add any personal flavoring touches (grated lemon zest, coconut, etc.)
5.  In another bowl, with a clean beater, beat the whites until stiff but not dry.  Stir about 1/2 cup of whites into the batter to lighten it, then fold in remaining whites in several additions.
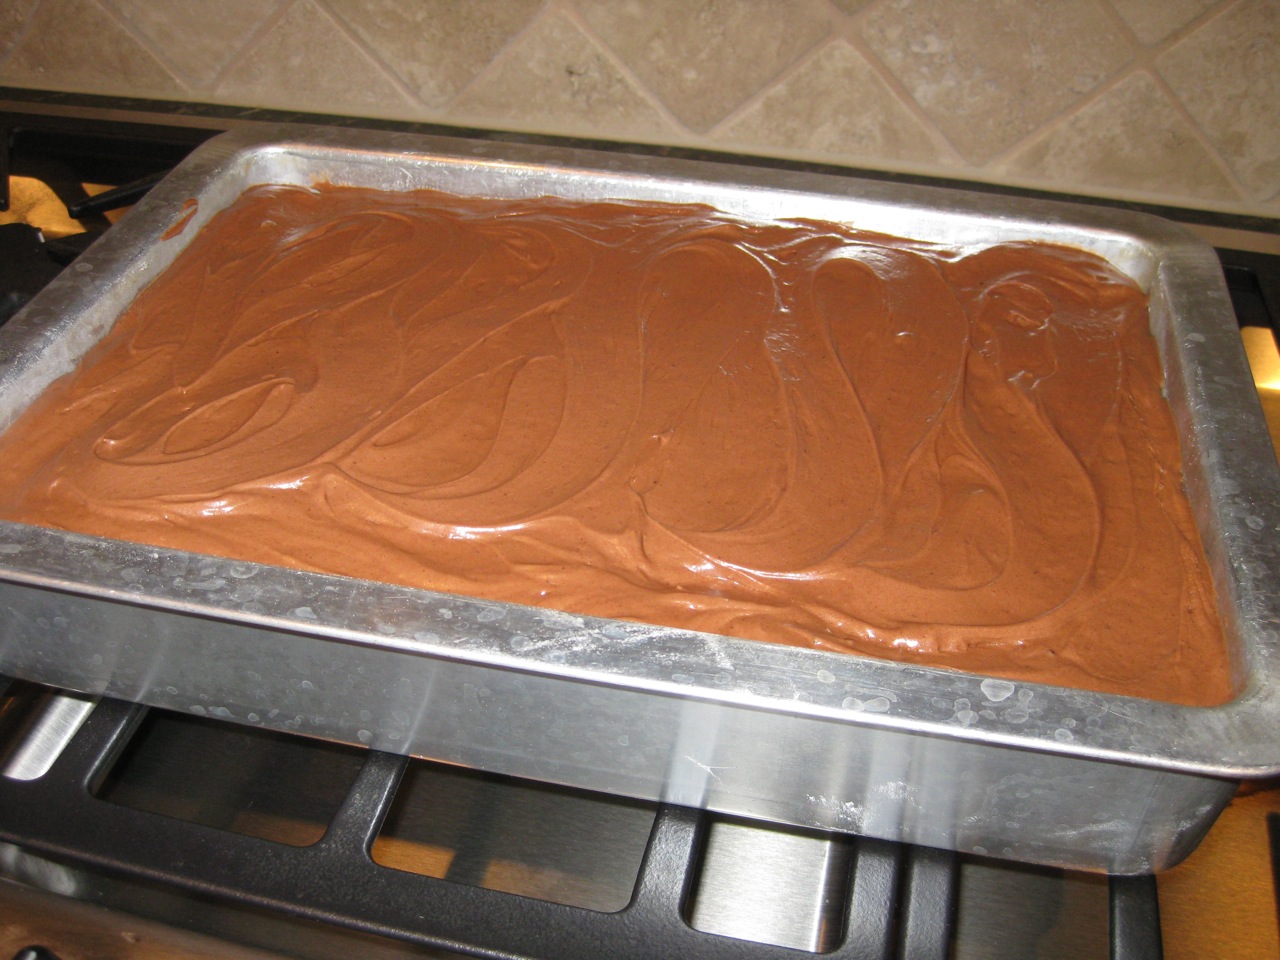
6.  Divide the batter evenly between the pans.  Smooth the batter level, then spread it slightly from the center toward the edges of the pan so it will rise evenly.  Bake 30 to 35 minutes, or just until a cake tester comes out clean and the cake tops are lightly springy to the touch.
7.  Cool the cakes in their pans on a wire rack for 10 minutes.  Top with a wire rack and invert; lift off pans.  Completely cool layers before frosting.  Or you can leave a sheet cake in its pan to cool, and frost and serve it from the pan (which is what we did).

*Variations (We used the variation below to turn the Basic 1-2-3-4 Cake into a Basic Yellow Cake)
Basic Yellow Cake:  Prepare Basic 1-2-3-4 Cake but use 5 eggs; do not separate them.  Add whole eggs in step 3.  Increase milk to 1 1/4 cups.

**Note:  For the lightest texture, follow the recipe as written, separating the eggs and beating the whites stiff.  For an even simpler method with just a slightly more compact texture, you can beat in whole eggs in place of the yolks, omitting the beaten whites.

Yield:  one 2-layer cake or one 9 x 13-inch cake
The Perfect Cake by Susan G. Purdy

Chocolate Frosting
Ingredients
1 pound powdered sugar, sifted
6 Tbsp milk
1 tsp vanilla extract
4 Tbsp unsalted butter, at room temperature
1 Tbsp brewed coffee
1/3 cup unsweetened cocoa
1 tsp ground cinnamon

Directions
Mix powdered sugar, milk, vanilla, butter, coffee, cocoa, and cinnamon.  Spread frosting on top of two layers, then stack layers on serving plate.  Hold together with wooden toothpicks.  Add third layer.  Frost top and sides.  (We spread the frosting on a single layer, 9 x 13-inch cake).

Yield:  one three-layer cake or one 9 x 13-inch cake
Stop and Smell the Rosemary:  Recipes and Traditions to Remember:  A Cookbook by the Junior League of Houston, Inc.

Arugula Feta Turkey Burgers

Oh my goodness…these Arugula Feta Turkey Burgers are my new favorite!! Ever since I went to Colorado this summer and discovered the Veggie burger, I have been on a quest for eating anything BUT your typical ground meat burger.  I’m up for all of the different kinds of meat and condiment combinations out there. 
On a blog called Eat.Live.Run. , I discovered a recipe for these delicious and healthy turkey burgers.  I am a huge fan of turkey and ever since high school I have packed myself a turkey and spinach sandwich for school everyday.  Well, now that I’ve found these turkey burgers, I grill up 4 to 5 burgers, freeze them and have a whole week’s worth of lunches ready for the week in less than 10 minutes!  
As you know, I am a huge fan of Greek food, in particular hummus, red onions, and FETA cheese!  I cannot get enough of it, so with these turkey burgers I can incorporate all my favorites in just one sandwich.  These burgers are moist, juicy, and flavorful from the feta, and pair perfectly well with extra arugula or spinach and a red onion sliced on top.  Hummus coats the Oroweat Sandwich Thin perfectly for my turkey burger and is full of healthy fats and proteins for a complete meal. 
Let me know what you think of these!  My husband never tried them because I didn’t give him the chance.  He is country boy, and likes his meat that way it should be (he won’t let you alter the classic “American hamburger”).  He also hates Feta cheese… he has no clue what good food he is missing!  Enjoy!
Combine feta, egg, arugula, and turkey together in large bowl.


Grill over medium-high heat on the stove for 5 minutes per side, or until cooked through.

Serve on a toasted Oroweat Sandwich Thin, sliced red onion, arugula, and extra Feta cheese.
Take a big bite and enjoy!

Arugula Feta Turkey Burgers
Ingredients
1 lb. ground turkey
1 egg, slightly beaten
1 handful of arugula
3/4 cup feta cheese
1 tsp salt
pinch of pepper

Directions
1.  Mix together all ingredients with a fork or your hands, and form four medium sized patties.
2.  Cook patties in a greased skillet over medium-high heat for about 5 minutes per side, or until meat is completely cooked.
3.  Serve on toasted buns with extra feta, sliced red onion, arugula, and ketchup, mustard, or hummus.

Serves:  4
Eat, Live, Run 

Grilled Shrimp and Green Bean Salad

My sister spent the night about a week ago, and as I told you before, all we did was cook.  If anyone knows my sister, you know that she will eat nothing but healthy food.  I feel the same, except you might catch me eating more “sweets” than she does.  So after flipping through one of our Southern Living cookbooks, we found this healthy recipe called Grilled Shrimp and Green Bean Salad.
I must admit, this is one of my favorite dinner recipes yet.  I kept raving about it to my husband (who liked this), and my mom.  The unique combination of bacon, almonds, green beans, and shrimp is absolutely delicious and makes for a wonderful meal to serve to a crowd on a nice summer evening.  It is light, flavorful, and succulent.  I don’t have a grill (and am scared of them), so I grilled my shrimp on the stovetop in a Le Creuset grill pan.  They turned out wonderfully.
I highly recommend making this salad for the spring and summer time as the weather gets warmer.  It is not one to disappoint.  Enjoy!
To make the basil vinaigrette, combine all of the ingredients together in a small bowl.
Place crumbled, cooked bacon and salted almonds in a bowl.
After marinating shrimp in half of the basil vinaigrette for 15 minutes, grill shrimp on stove or grill for about 2 minutes per side, until they turn pink.
Meanwhile, cook green beans in boiling water for 4 minutes.  Plunge in ice water to stop cooking process.  Drain.  Add shrimp and green beans to the large bowl with almonds and bacon.  Pour remaining basil vinaigrette on top.
Serve with warm and toasted corn bread.

Grilled Shrimp and Green Bean Salad
Ingredients
8 (12-inch) wooden skewers (optional)
1 1/2 pounds fresh green beans, trimmed
2 pounds peeled, medium-size raw shrimp
*Basil Vinaigrette, divided
6 cooked bacon slices, crumbled
1 1/3 cups shredded Parmesan cheese (we omitted)
3/4 cup chopped roasted, salted almonds
Cornbread (optional: we used Perfect Corn Bread)

Basil Vinaigrette:
1/2 cup balsamic vinegar
1/2 cup chopped fresh basil
4 large shallots, minced (we used red onions)
3 garlic cloves, minced
1 Tbsp. brown sugar
1 tsp. seasoned pepper
1/2 tsp. salt
1 cup olive oil

Whisk together balsamic vinegar and next 6 ingredients in a small bowl until blended; gradually add olive oil, whisking constantly until blended.

Directions
1.  Soak wooden skewers in water to cover 30 minutes.
2.  Cook green beans in boiling salted water to cover 4 minutes or until crisp-tender; drain.  Plunge into ice water to stop the cooking process; drain, pat dry, and place in a large bowl.
3.  Combine shrimp and 3/4 cup Basil Vinaigrette in a large zip-top plastic bag; seal and chill 15 minutes, turning occasionally.  Remove shrimp from marinade, discarding marinade.  Thread shrimp onto skewers.
4.  Grill, covered with grill lid, over medium-high heat (350 to 400 degrees F) 2 minutes on each side or just until shrimp turn pink.  Remove shrimp from skewers; toss with green beans, bacon, Parmesan cheese, almonds, and remaining 3/4 cup Basil Vinaigrette.  Serve over hot cornbread, if desired.

Yield:  4 to 6 servings
Southern Living

Moist Rosemary Chicken

Yum, yum!  This chicken lives up to its name, “Moist Rosemary Chicken.”  With only four ingredients, this grilled chicken recipe is too simple and delicious not to try.  I grilled this chicken in a Le Creuset grill pan on the stove over medium-high heat instead of using a charcoal or gas grill.  My reasoning…. I am scared to death of fire!  Let me clue you in to a little secret of mine:  in high school and college, I have never ever lit a bunsen burner in chemistry!  I was always too scared that I would either light myself or the room on fire, so I always had my partner do it.  To this day, I am still not a fan of fire, thus, I will probably never grill outside.
That’s not to say that I don’t like grilled food…it’s actually my favorite – burgers, grilled chicken, shrimp, chateaubriand steak, you name it, I like it!  However, to get to enjoy these types of food I have two options.  One, let my dad or husband use the grill (the later… my husband does not know how) or two, grill inside, on the stove (which is what I did tonight).

You’ve got to try this irresistible and extremely easy grilled chicken as soon as possible.  I got this recipe from Fine Cooking July 2004 issue.  I love that magazine.  Enjoy!

Moist Rosemary Chicken
Ingredients
3-1/2 to 4 lb. skinless, boneless chicken breasts or thighs, rinsed and patted dry
Kosher salt and fresh coarsely ground black pepper
1/3 cup Dijon mustard
1/3 cup mayonnaise or light mayo
1/2 tsp. chopped fresh rosemary

Directions
1.  Heat a gas grill to medium high (I grilled my chicken on a grill pan on the stove).  Remove tenderloins from the chicken breast for more even cooking; reserve for another use.
2.  Put the chicken in a large bowl and season with 1-1/2 tsp. salt and lots of fresh coarsely ground pepper. Add the mustard, mayonnaise, and rosemary and mix thoroughly to combine and to coat the chicken well.
3.  Spread the chicken out on the grill, watching the heat carefully.  Cover the grill.  Grill the chicken on one side until golden-brown grill marks form, 2 to 3 minutes.  Rotate the chicken 90 degrees and grill for another 2 to 3 minutes.  (To get a crosshatch of golden grill marks); flip and repeat on the other side, grilling for another 4 to 5 minutes (for a total cooking time of 8 to 10 minutes) until cooked through.  The chicken should be firm and golden brown all over.  Arrange on a platter and serve family style.

Yield:  8 servings
Fine Cooking July 1, 2004

Nutritional Information:  size based on eight servings
Calories (kcal): 280
Fat:  12g
Protein:  40g
Carbohydrates:  0g
Sodium:  710mg
Cholesterol:  115mg
Fiber:  0g

Kelly’s Favorite Dutch Babies

These are my friend Kelly’s, all-time favorite Dutch Babies that his mom makes. He requests them every time he goes home to visit and could probably eat a whole one! (Dutch babies, also called german pancakes, are a cross between a popover and a pancake).   My husband, Matt, and I got to experience these famous dutch babies this spring break as we traveled with Kelly and his wife to Washington DC to visit the capitol and stay with his parents.

Kelly’s mom, Terry, is a wonderful cook!  Not only did she make one, she made three dutch babies for all the guests and we devoured them!  Kelly squeezes a half of a lemon on each dutch baby slice, and two huge spoonfuls of powdered sugar to top it off.  I did the same and it was delicious!


I must give credit to Terry for the wonderful recipe she received from a friend for how to make these german pancakes.  There are simply four ingredients, and all you need is a blender and pie plate to make these miraculous concoctions.  Terry’s dutch babies are ten times better than my previous German Pancake recipe because they are fluffy, sweet, golden, and puffed up very nicely.  Try these today and enjoy!


Kelly’s Favorite Dutch Babies
Ingredients
4 eggs
1 cup milk
1 cup flour
1/3 cup melted butter

Directions
1.  Preheat oven to 425 degrees F.
2.  Beat eggs in blender for 1 minute.  Add milk and beat for 30 seconds.  Add flour and beat for 30 more seconds.
3.  Pour into oven proof skillet or pie pan with melted butter.  Cook for 20-25 minutes or until puffed and golden.
4.  Serve with fresh squeezed lemon juice and lots of powdered sugar

Yield:  2-4 servings
recipe from Terry Largent (Kelly’s mom)

Doodle Dreams

Here is another “Wow” from me in regards to these “Doodle Dream” cookies or Snickerdoodles.  As I’ve said before, Dream cookies (the chocolate chip dreams) are my absolute favorite cookie in the entire world because they are soft, chewy, and extremely moist.  They do not go dry and crumbly like your typical cookie.  There are about 30 different “Dream” cookies I want to try from Linda J. Amendt’s 400 Sensational Cookies cookbook, and trust me, you’ll see all 30 recipes sooner or later!
My sister spent the night at my house over our spring break and all we did was cook!  We love to bake and as I’ve told you before, she bakes cookies for her boyfriend and his OSU cross country team every time they have a race.  Well, since we were on spring break, we needed an excuse to bake and found one.  Our Aunt Jolene, her daughter, and three grandkids came to visit from Houston, and of course, we had to have something sweet for them when they came over.

My cousins and Aunt Jolene, were all extremely impressed by these Doodle Dreams.  Jolene even made Chocolate Chip Dream cookies for them when they returned home to Houston!

My sister saved a half a dozen Doodles for her boyfriend, and he, trying to be good, said he would just eat half of one.  Well, he couldn’t…right after he closed the ziplock bag, he opened it again to sneak another cookie.

If all these testimonies don’t convince you to try these Doodle Dreams, I don’t know what will.  You must bake them today.  Enjoy!

Doodle Dreams
Ingredients
2 3/4 cups all-purpose flour
1 package (3.4 oz or 102g) instant vanilla pudding mix
1 tsp baking powder
1/2 tsp baking soda
1/4 tsp salt
1/2 cup unsalted butter, softened
1/2 cup vegetable shortening
2/3 cup granulated sugar
1/3 cup packed light brown sugar
2 eggs
1 1/2 tsp vanilla extract
Topping
1/2 cup granulated sugar
1 Tbsp ground cinnamon
Directions
1.  Preheat oven to 375 degrees F.  Line cookie sheets with parchment paper.
2.  Cookies:  In a bowl, whisk together flour, pudding mix, baking powder, baking soda and salt until well combined.  Set aside.
3.  In a large bowl, using an electric mixer on medium speed, cream butter, shortening, granulated sugar, and brown sugar until light and fluffy, about 2 minutes.  Add eggs one at a time, beating well after each addition.  Beat in vanilla.  Scrape down sides of bowl.  On low speed or using a wooden spoon, gradually add flour mixture, beating just until blended.
4.  Topping:  In a small bowl, combine sugar and cinnamon until well blended.  Spread cinnamon sugar on a large plate or sheet of wax paper.
5.  Lightly grease hands with nonstick cooking spray.  Roll pieces of dough into 1-inch (2.5 cm) balls.  Roll dough balls in cinnamon sugar and place on prepared cookie sheets.  Bake one sheet at a time in preheated oven for 8 to 10 minutes or until edges start to turn lightly golden.
6.  Immediately slide parchment paper onto a wire cooling rack.  Cool cookies for 5 minutes, then transfer from parchment paper to cooling rack and cool completely.
Yield:  3 1/2 – 4 dozen cookies
400 Sensational Cookies by Linda J. Amendt