St. Louis Butter Cake

My mom and sister made this St. Louis Butter Cake a month ago for Father’s Day and brought it over to my house for us all to try.   I would consider this recipe (from The New York Times)  the “fancy pants” version of Paula Deen’s Ooey Gooey Butter Cake, (also known as the Neiman Marcus Cake/Bars) that you may be familiar with.
Both cakes are delicious, but let’s do a comparison of the two: The St. Louis version has a yeast-bread-like base and a crusty topping, whereas Paula Deen’s/Neiman Marcus Cake uses a cake mix and cream cheese, and is extremely gooey.  I call the St. Louis Cake the “fancy pants” version because it involves more work…no opening a cake box and dumping all your ingredients together like the former.  Instead, the St. Louis version requires you to be more precise in your measurements, and you must wait for your crust to rise due to the yeast.  
These recipes are similar in nature, yet have very different tastes and textures.  The crust in the St. Louis Cake has the texture you would expect in bread, due to the yeast, whereas the crust in Paula’s/Neiman Marcus Cake has a cakey/short-bread texture.  The toppings are very different too.  In the St. Louis version, the top is spongy, sticky, sweet, and buttery.  I would describe Paula Deen’s/NM Cake as ooey, gooey, rich, and buttery (just as the name suggests).  It all depends on what you like. My mom was a fan of the St. Louis Cake because she does not like cake mixes, nor is she a fan of the messy, gooey topping. I love gooey toppings, so I vote on Paula Deen’s/ the Neiman Marcus Cake.   (I’ll actually vote on Neiman’s version over Paula’s because as you all know, I am biased…I grew up shopping at Neiman Marcus and love that store! haha.)
What’s your vote? Make the two cakes today and let me know.  Enjoy!
 
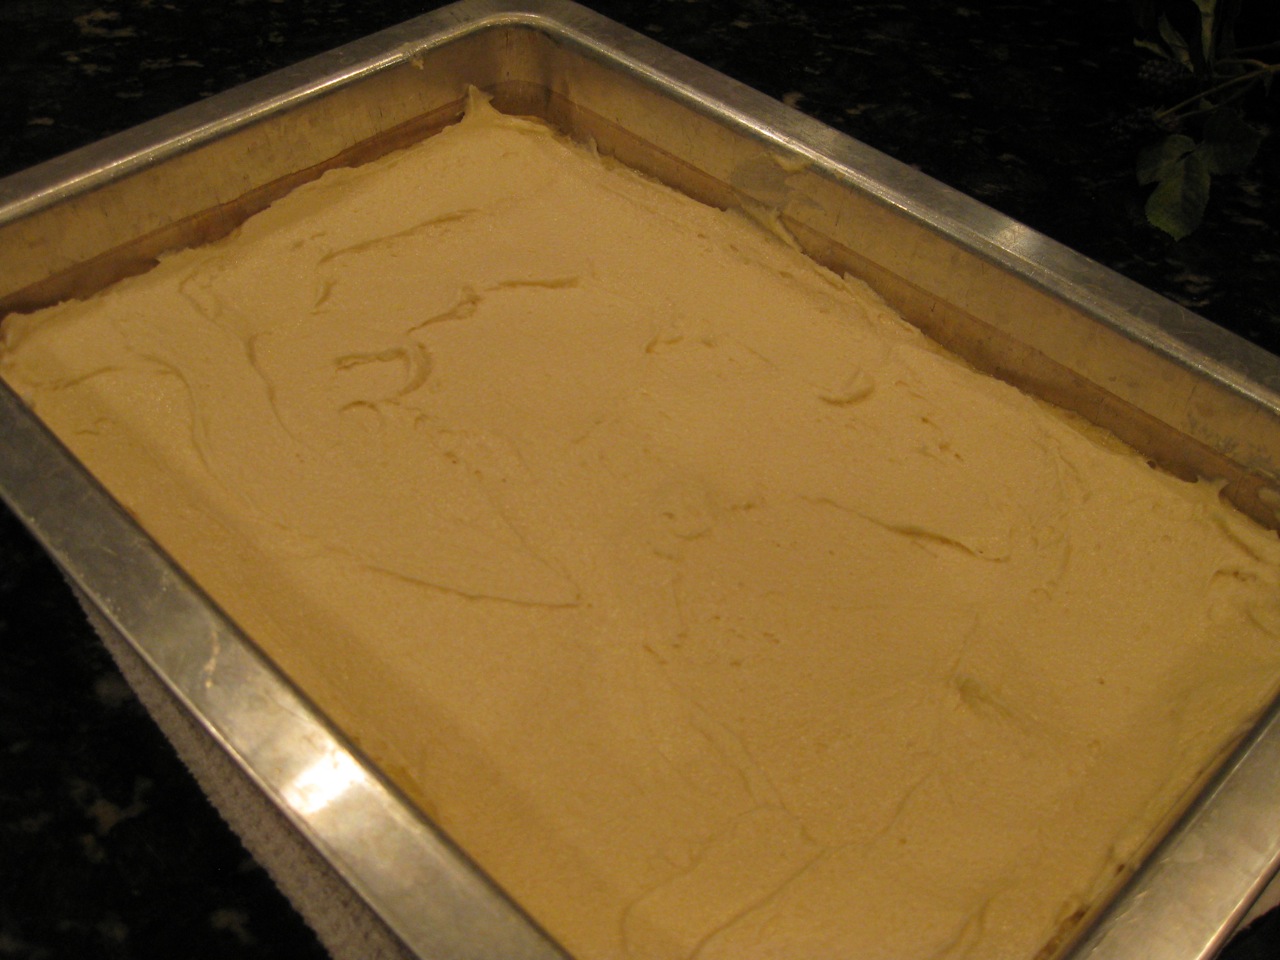
Whisk together milk, water and yeast in a small bowl.  In an electric mixer, cream butter, sugar, and salt. Beat in egg. Add flour and milk mixture. Beat dough for 7 to 10 minutes, then press into ungreased 9 x 13-inch baking pan. 

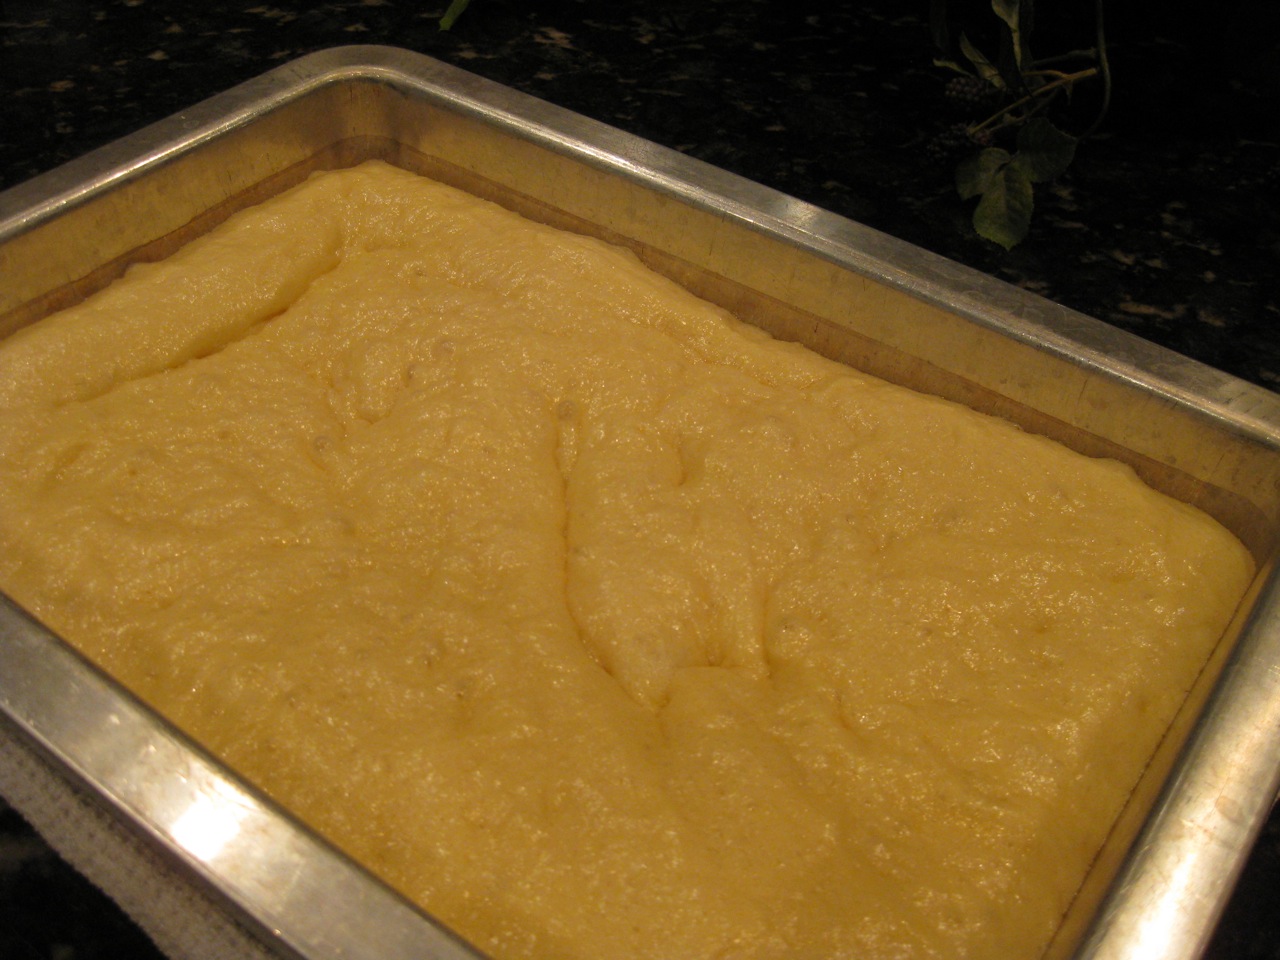
Cover and let rise 2 1/2 to 3 hours.

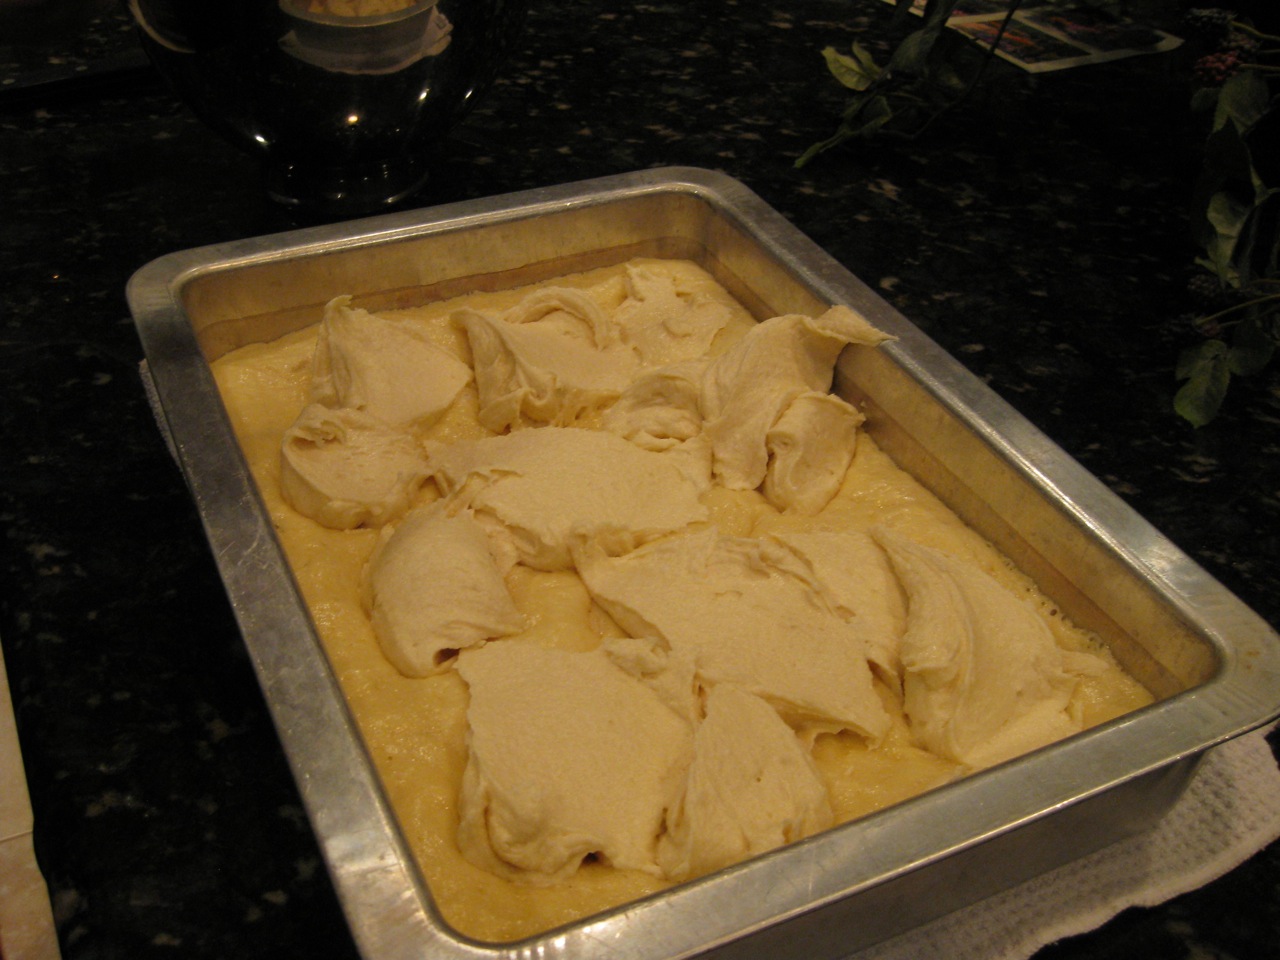
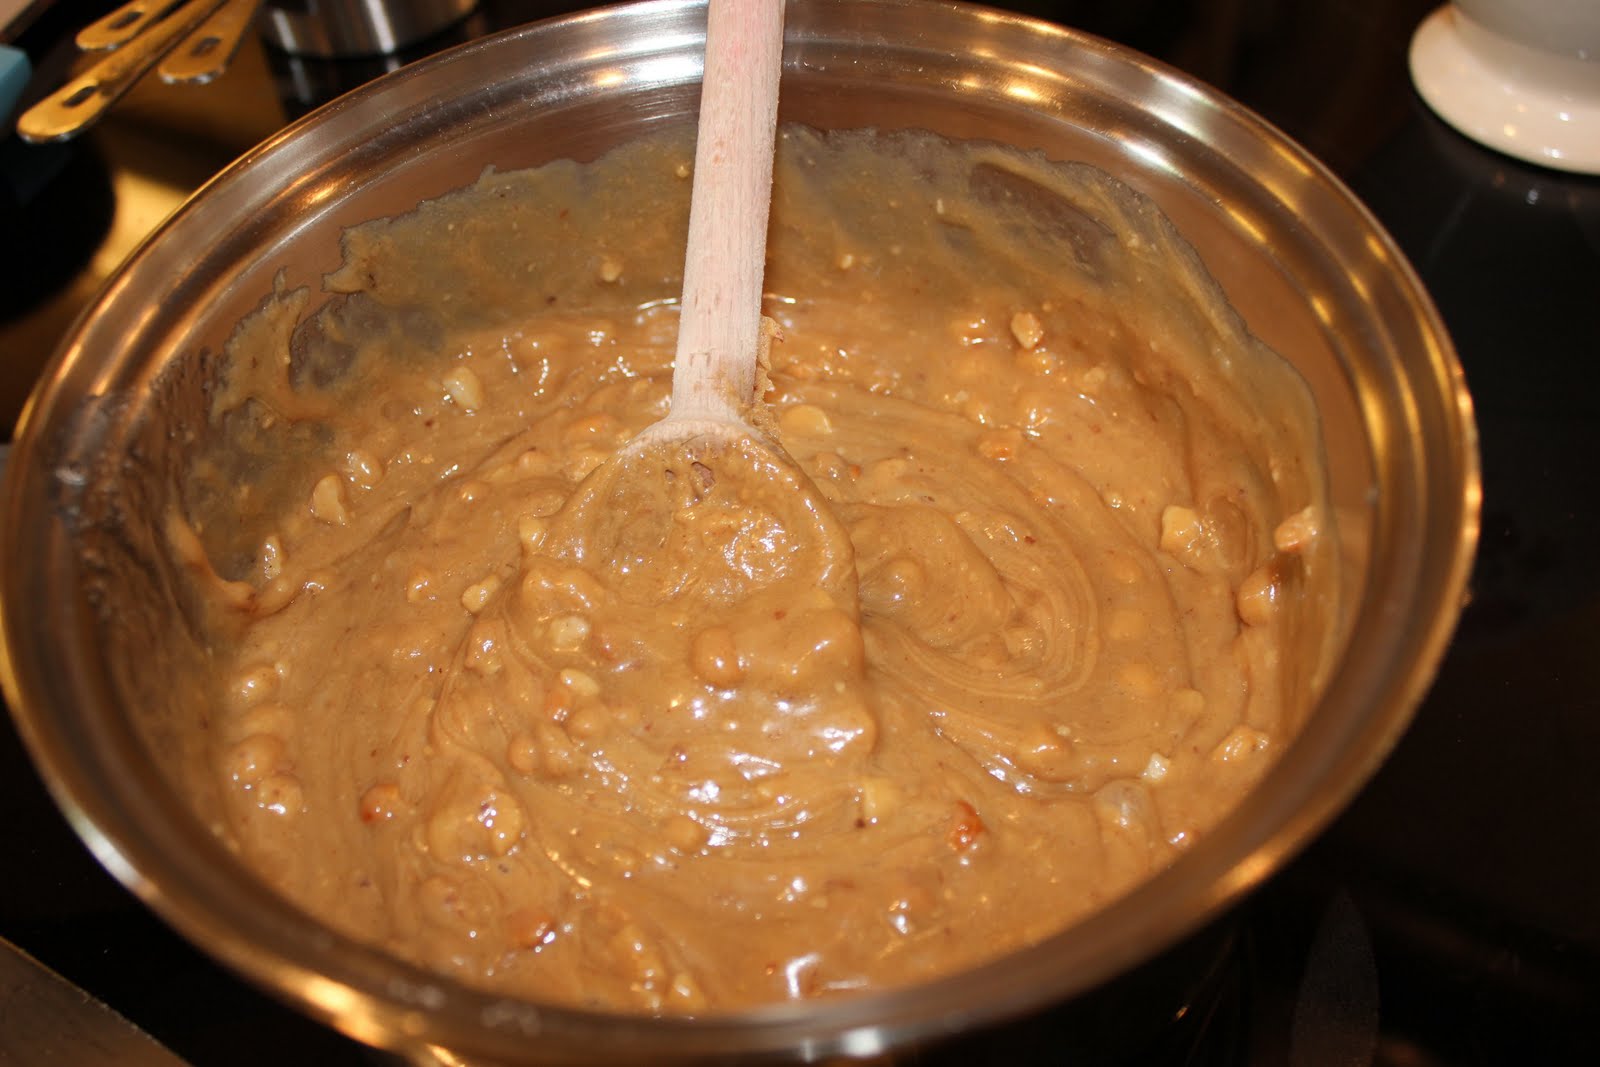
In a small bowl, mix corn syrup, water and vanilla.  In an electric mixer, cream butter, sugar and salt for 5 to 7 minutes. Beat in egg. Add flour and corn syrup mixture.  Spoon topping in large dollops over risen cake.

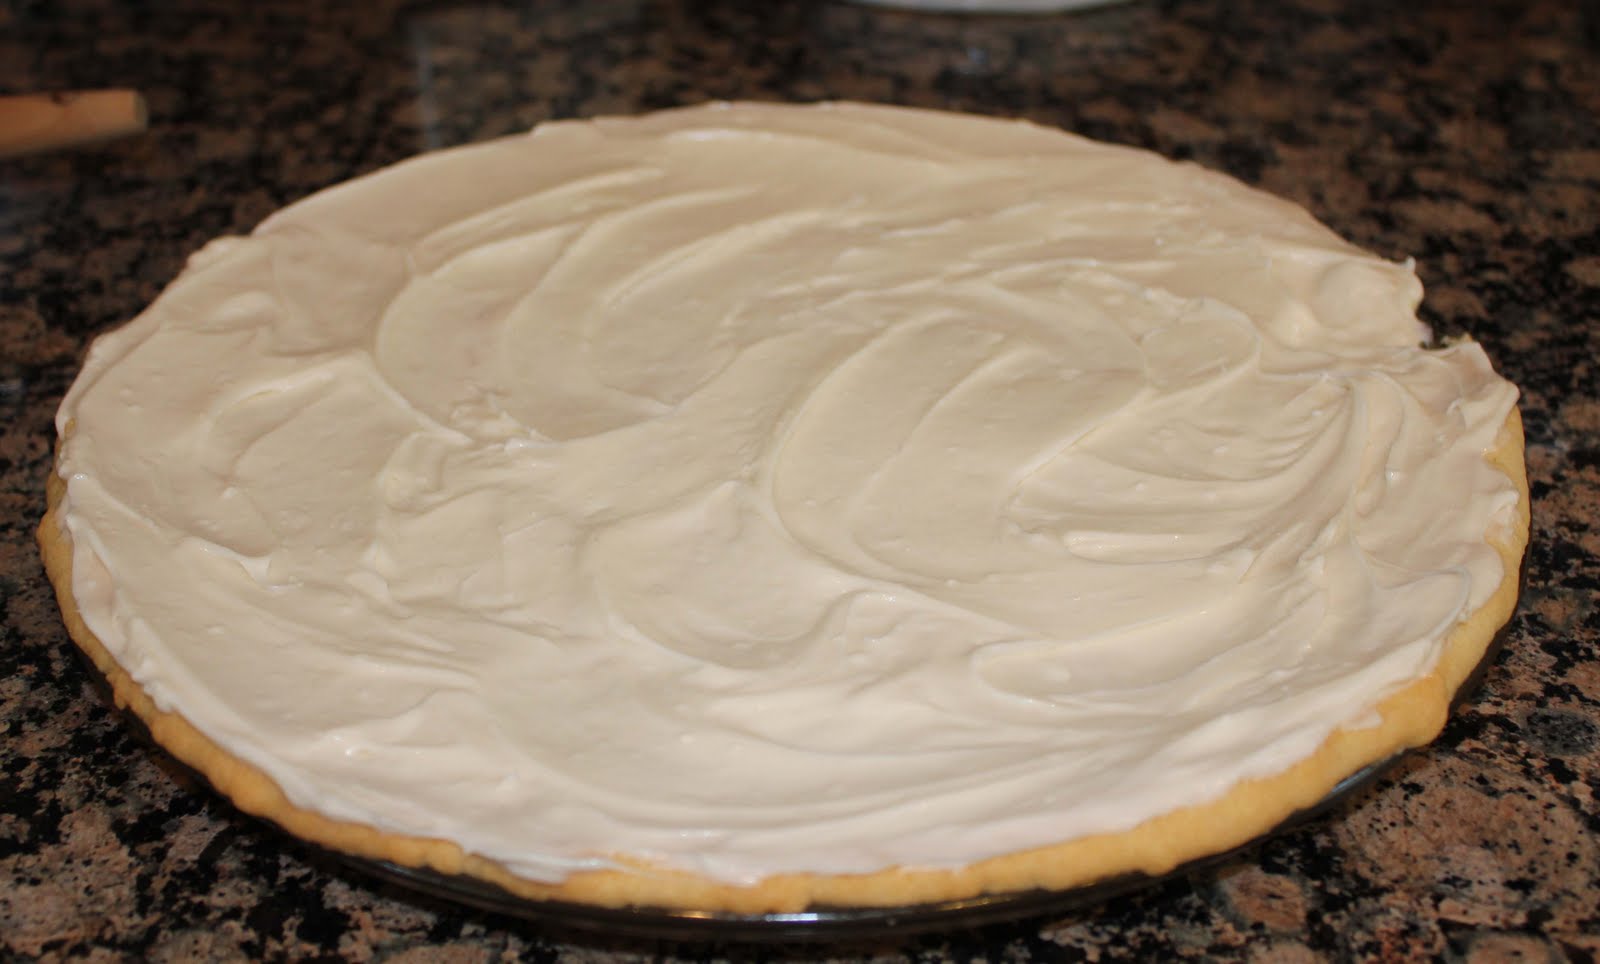
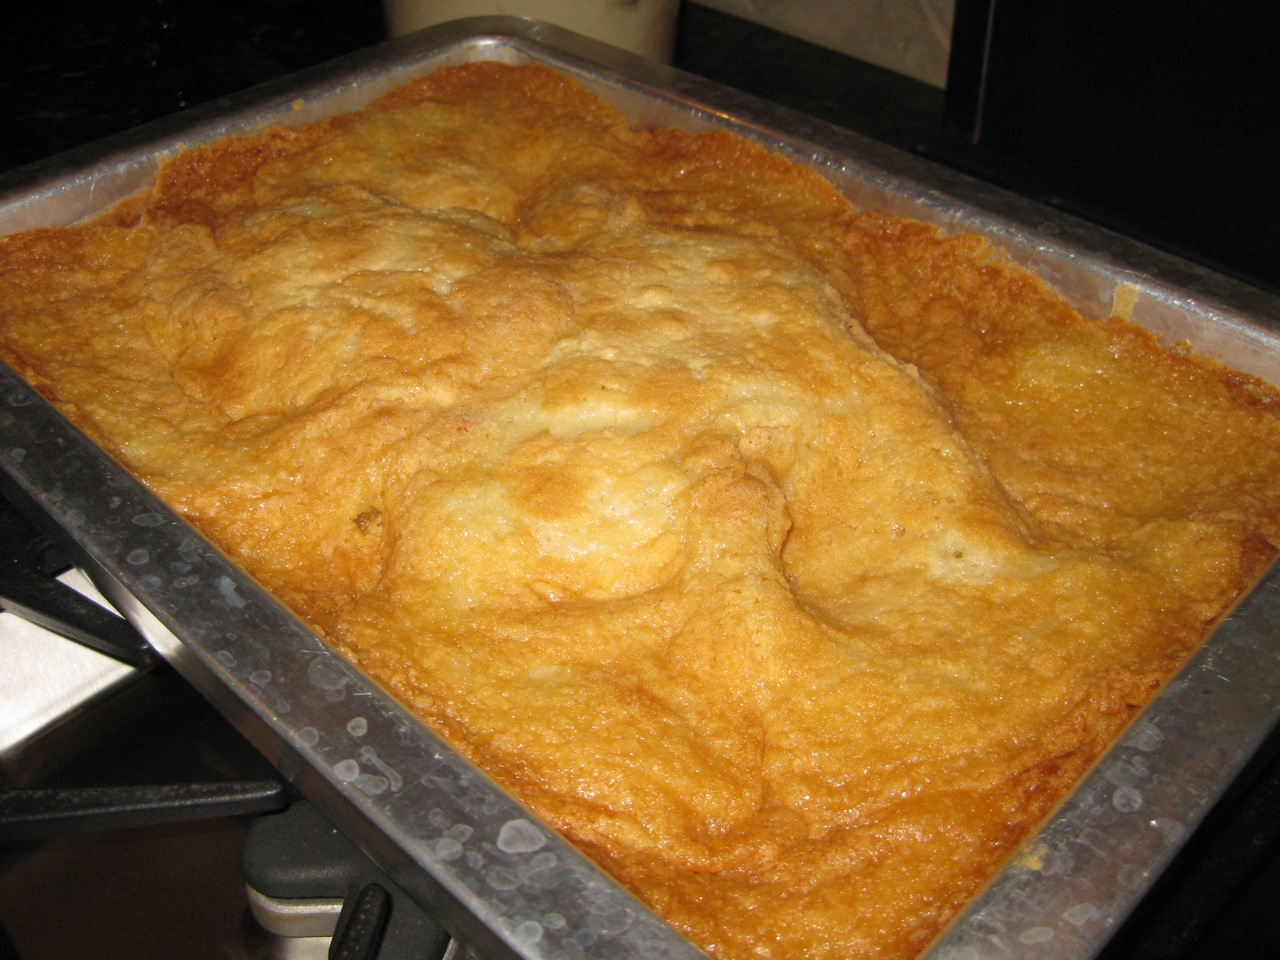
Spread topping to create an even layer.  Bake for 40 to 45 minutes.  

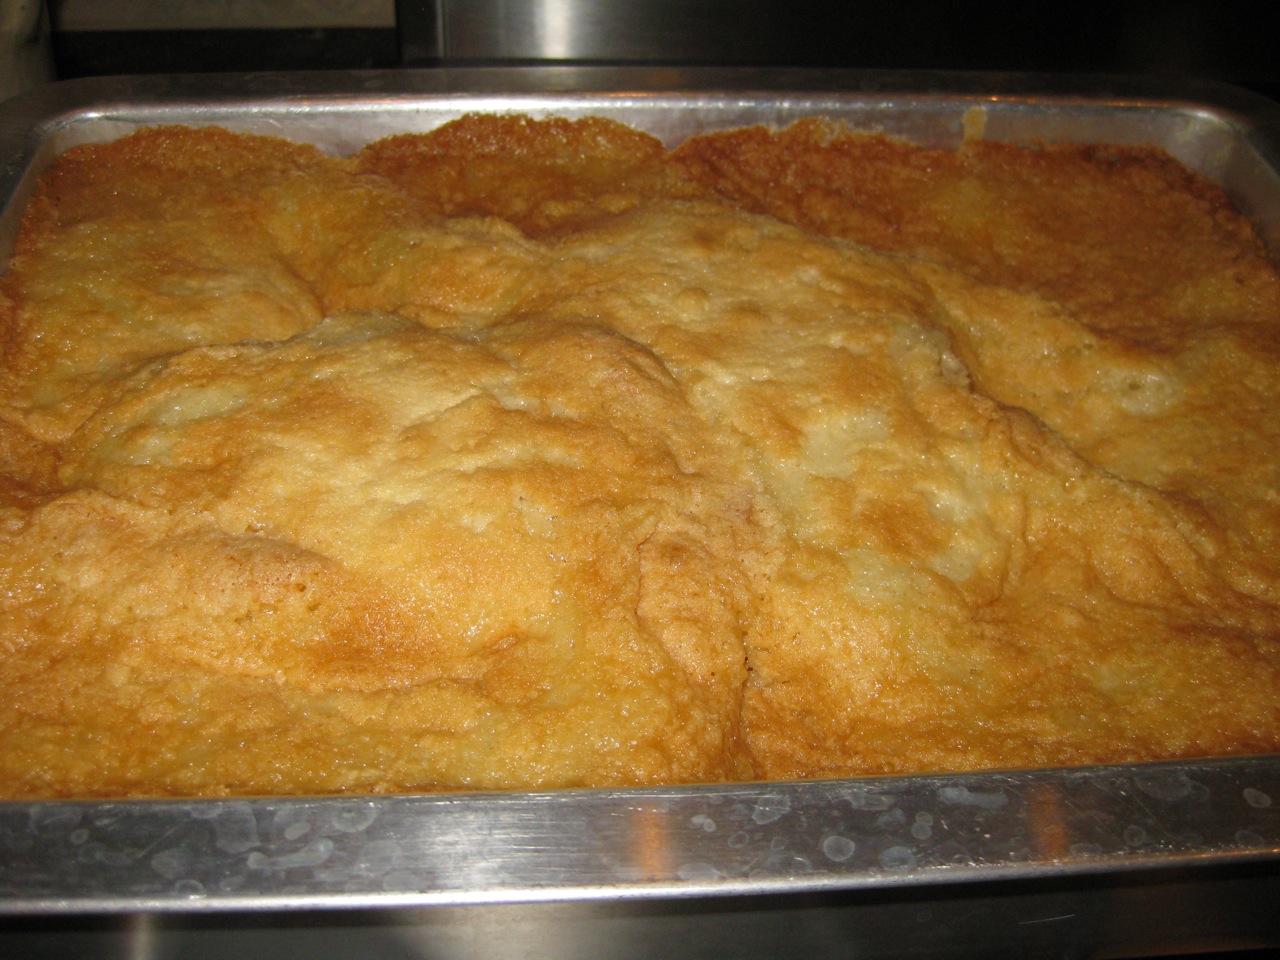
The cake will rise and fall in waves and have a golden brown top, but still be liquid in the center when done.

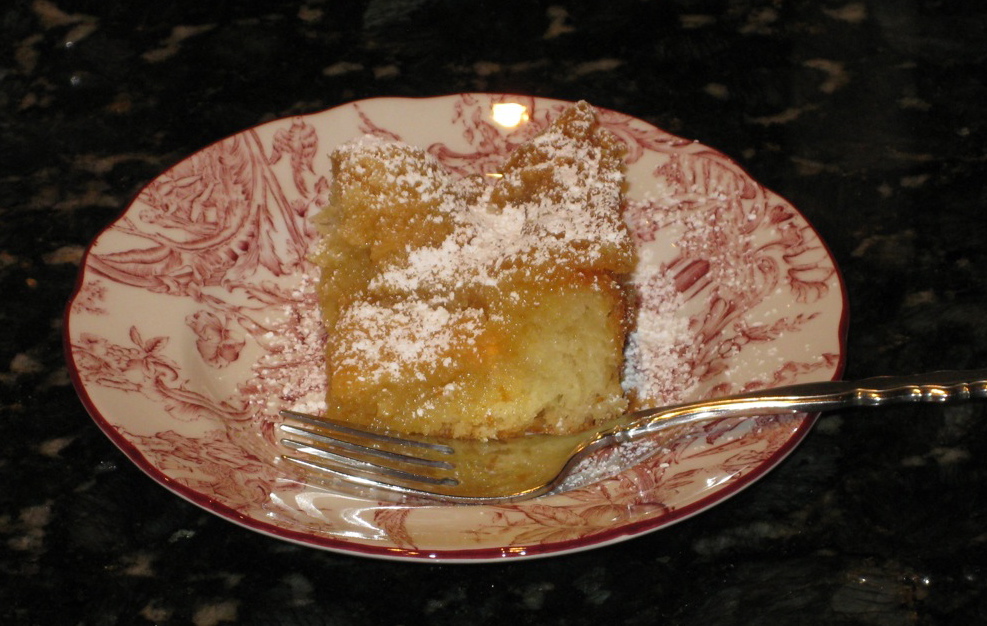
Cool in pan before sprinkling with confectioners’ sugar.

St. Louis Butter Cake
Ingredients
CAKE:

3 tablespoons milk at room temperature
1 3/4 teaspoons active dry yeast
6 tablespoons unsalted butter at room temperature
3 tablespoons sugar
1 teaspoon kosher salt
1 large egg
1 3/4 cups all-purpose flour
TOPPING:
3 tablespoons plus 1 teaspoon light corn syrup
2 1/2 teaspoons vanilla extract
12 tablespoons (1 1/2 sticks) unsalted butter, at room temperature
1 1/2 cups sugar
1/2 teaspoon kosher salt
1 large egg
1 cup plus 3 tablespoons all-purpose flour
Confectioners’ sugar, for sprinkling.
Directions
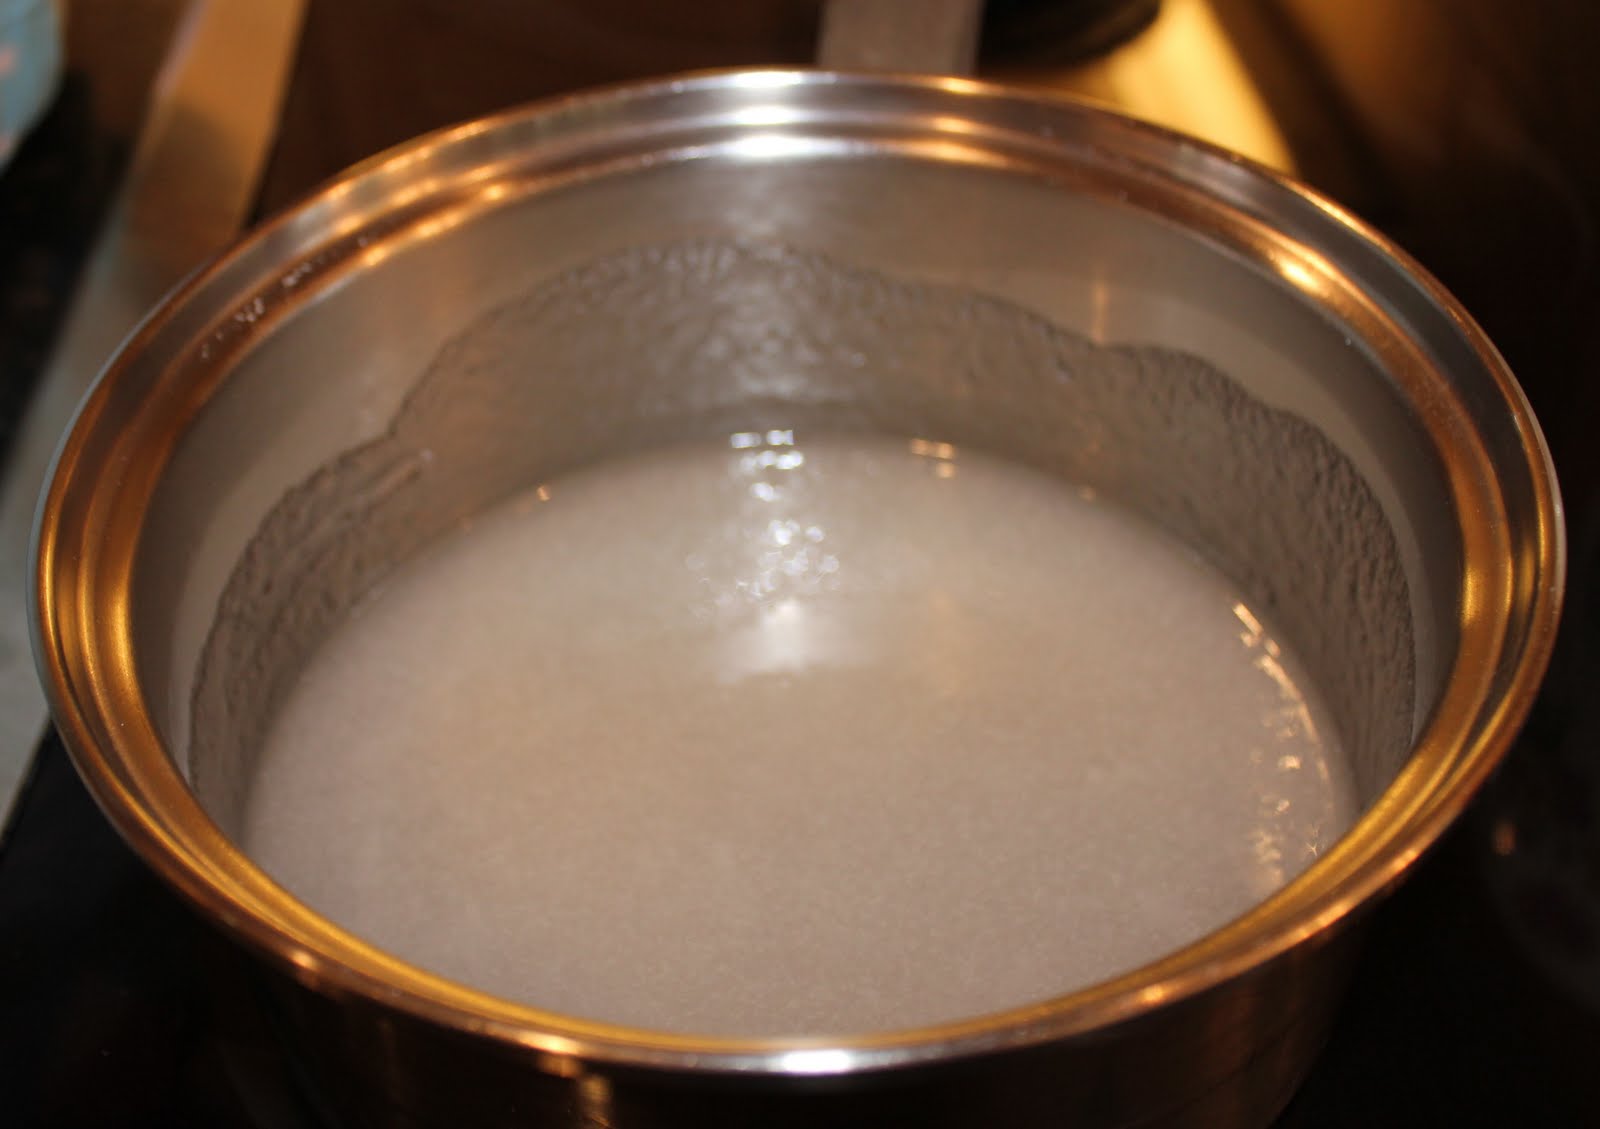
1. In a small bowl, mix milk with 2 tablespoons warm water. Add yeast and whisk gently until it dissolves. Mixture should foam slightly.
2. Using an electric mixer with paddle attachment, cream butter, sugar and salt. Scrape down sides of bowl and beat in the egg. Alternately add flour and the milk mixture, scraping down sides of bowl between each addition. Beat dough on medium speed until it forms a smooth mass and pulls away from sides of bowl, 7 to 10 minutes.
3. Press dough into an ungreased 9-by 13-inch baking dish at least 2 inches deep. Cover dish with plastic wrap or clean tea towel, put in a warm place, and allow to rise until doubled, 2 1/2 to 3 hours.
4.Heat oven to 350 degrees. To prepare topping, in a small bowl, mix corn syrup with 2 tablespoons water and the vanilla. Using an electric mixer with paddle attachment, cream butter, sugar and salt until light and fluffy, 5 to 7 minutes. Scrape down sides of bowl and beat in the egg. Alternately add flour and corn syrup mixture, scraping down sides of bowl between each addition.
5. Spoon topping in large dollops over risen cake and use a spatula to gently spread it in an even layer. Bake for 40 to 45 minutes; cake will rise and fall in waves and have a golden brown top, but will still be liquid in center when done. Allow to cool in pan before sprinkling with confectioners’ sugar for serving.

Yield: 16 to 20 servings.
The New York Times Published October 30, 2009

Sprinkles’ Strawberry Cupcakes with Strawberry Frosting

Okay, you would think I’m sick of strawberries after my weekend experience with them!  Let me tell you what happened…. 
I had full intentions of baking a strawberry cake made with strawberry Jell-O and strawberry frosting for the 4th of July.  My plans changed with a good friend of ours brought us an Apple and Pecan Pie instead. This past weekend, my husband’s grandparents celebrated their 60th Anniversary, so I thought I would attempt the strawberry cake again and bring it to the family celebration.  Everything started out like it should… the batter tasted awesome, which was a great sign, so I put it in the oven and eagerly anticipated the baked cake.  After about 30 minutes, things started to take a turn for the worse.  The cake seemed a little too jiggly, so I returned it to the oven for another few minutes.  Five minutes later, I pulled the cake from the oven, and it seemed perfect.  Looks can be deceiving….
Since I was looking forward to this cake, my eagerness got the best of me, and I flipped the cake out of it’s pan before it was completely cooled… BIG MISTAKE!  As soon as I flipped the pan over, the cake seemed to burst in half, and tumbled out of the pan like lava flowing out of a volcano.  I was so upset!  I then ruined it even more by attempting to make the cake into cake balls.  To my unfortunate luck, the balls did not set up… they seemed to turn into even more liquid. With that said, I don’t know if I will make that strawberry cake ever again….my mom will have to make it for me instead! haha.
This afternoon, my husband I started craving something sweet and he suggested I attempt the strawberry cake again…”NO WAY” I thought.  Instead, I had the “brilliant” idea of making strawberry cupcakes.  There is no way on earth I could mess those up, especially when they are in the paper liners!  I was right, the cupcakes were great and redeemed my self-esteem after the cake fiasco.

Has anyone heard of Sprinkles Cupcakes, the world’s first cupcake bakery in Beverly Hills?  Most of you would agree with me when I saw they are delicious.  They are also one of the largest cupcakes I’ve ever seen.  It would be really hard for little ole me to eat a whole Sprinkles Cupcake!  We have a Sprinkles here in Dallas, and I know Houston recently opened one too.

Well, these strawberry cupcakes are “supposedly” the Sprinkles Cupcakes’ Strawberry Cupcake recipe.  I thought they were wonderful, moist, and the icing was delectably sweet.  No cake mix in these…just pure, fresh, and from-scratch ingredients.  No food coloring either….the light pink color comes from the pureed strawberries in both the batter and frosting.

Enjoy and let me know what you think!


Sprinkles’ Strawberry Cupcakes
Ingredients
2/3 cup fresh or frozen whole strawberries (thawed if frozen)
1 1/2 cups all-purpose flour, sifted
1 tsp baking powder
1/4 tsp coarse salt
1/4 cup whole milk, room temperature
1 tsp pure vanilla extract
1/2 cup (1 stick) unsalted butter, room temperature
1 cup sugar
1 large egg, room temperature
2 large egg whites, room temperature
*Sprinkles’ Strawberry Frosting

Directions
1. Preheat oven to 350 degrees F. Line a 12-cup muffin tin with cupcakes liners; set aside.
2. Place strawberries in a small food processor; process until pureed. You should have about 1/3 cup of puree.  Add a few more strawberries if necessary, or save any extra puree for frosting; set aside.
3. In a medium bowl, whisk together flour, baking powder and salt; set aside.  In a small bowl, mix together milk, vanilla and strawberry puree; set aside.
4. In the bowl of an electric mixer fitted with the paddle attachment, cream butter on medium-high speed, until light and fluffy.  Gradually add sugar and continue to beat until well combined and fluffy.  Reduce the mixer speed to medium and slowly add egg and egg whites until just blended.
5. With the mixer on low, slowly add half the flour mixture; mix until just blended. Add the milk mixture; mix until just blended.  Slowly add the remaining flour mixture, scraping down the sides of the bowl with a spatula, as necessary, until just blended.
6. Divide batter evenly among prepared muffin cups. Transfer muffin tin to oven and bake until tops are just dry to the touch, 22 to 25 minutes.  Transfer muffin tin to a wire rack and let cupcakes cool completely in tin before icing.

Sprinkles’ Strawberry Frosting
Ingredients
1/2 cup frozen whole strawberries, thawed
1 cups (2 sticks) unsalted butter, firm and slightly cold
Pinch coarse salt
3 1/2 cups confectioners’ sugar, sifted
1/2 tsp pure vanilla extract

Directions
1. Place strawberries in the bowl of a small processor; process until pureed.
2. In a bowl of an electric mixer fitted with paddle attachment, beat together butter and salt on medium speed until light and fluffy.  Reduce mixer speed and slowly add confectioners’ sugar; beat until well combined.  Add vanilla and 3 tablespoons strawberry puree (save any remaining strawberry puree for another use); mix until just blended.
3. Do not overmix, or frosting will incorporate too much air. Frosting consistency should be dense and creamy, like ice cream.

Yield: 12 cupcakes
Sprinkles Cupcakes

Steak and Mushroom Stroganoff

photo courtesy of Williams-Sonoma’s Comfort Foods by Rick Rodgers

Love, love, love this Steak and Mushroom Stroganoff recipe from Williams-Sonoma’s Comfort Food: Warm, Homey, Rich and Hearty by Rick Rodgers. A 19th-century Russian classic, this Williams-Sonoma’ stroganoff recipe is sensational with it’s tender chunks of steak, sweet shallots, loads of sauteed mushrooms and an outrageously rich sour cream sauce.

If you don’t already own this cookbook, I strongly recommend buying it. It costs $34.95 at Williams-Sonoma, but you can get it for about $25 at Abebooks, an online website for used, new, rare and out of print books.  In this comfort food cookbook, there are lots of wonderful recipes worth trying such as blueberry pancakes, buttermilk fried chicken, mac ‘n’ cheese, and fresh peach cobbler with vanilla ice cream.  I’ve made their French Toast with Caramelized Bananas, which was wonderful.

Tonight instead of going out to eat (which is our Friday night norm),  I made steak and mushroom stroganoff, because I had not cooked all week! I felt the need and want to cook. 🙂  Growing up, I don’t remember eating beef stroganoff, but now I will make it all the time.  This recipe is very simple, especially the sauce, which is just sour cream and dill.  My favorite part are the sliced mushrooms.  They have so much flavor and combine so well with the steak, noodles, and sauce.  (Sometimes I’ll substitute ground beef for steak). If you have a Central Market, you need to buy your meat from them. Their steaks are tender, juicy, and fresh, unlike Kroger or Tom Thumb.

Steak and Mushroom Stroganoff
Ingredients
Beef sirloin steak, 1 1/2 pounds (can substitute ground beef)
Salt and pepper
Wide egg noodles, 3/4 pound
Canola oil, 2 tablespoons plus more as needed (I used olive oil)
Button or cremini mushrooms, 1 pound, sliced (I used cremini)
Unsalted butter, 3 tablespoons
Shallots, 1/3 cup minced
Sour cream, 1 1/2 cups at room temperature
Fresh dill, 1 tablespoon minced, plus more for garnish

Directions
1. Trim the steak of any surface fat. Cut the steak into slices 1/4 inch thick, then cut the slices into 2 inch lengths. Season with salt and pepper.
2. Bring a large pot of water to a boil over high heat. Add the egg noodles and cook according to the package directions until al dente.
3. While the noodles are cooking, brown the steak. In a large frying pan, heat the oil over medium-high heat until it shimmers. Add the steak in batches and cook, stirring frequently, until lightly browned, about 2 minutes per batch, adding more oil to the pan as needed. Transfer the beef to a plate.
4. When all the steak is cooked, add the mushrooms and 2 tablespoons of the butter to the frying pan and cook over medium-high heat, stirring frequently, until the mushrooms are lightly browned, about 6 minutes. Add the shallots and cook, stirring occasionally, until they soften, about 2 minutes. Remove from heat and stir in the steak, sour cream, and 1 tablespoon of dill. Return to medium heat and simmer, stirring constantly, until the sour cream is heated through, about 1 minute. Do not allow to boil. 
5. When the noodles are ready, drain them and return to the cooking pot. Add the remaining 1 tablespoon butter and toss to coat. Divide the noodles among dinner plates and top each serving with the steak and sauce. Sprinkle with dill and serve.

Yield: 4 servings
Recipe from: Williams-Sonoma’s Comfort Food: Warm, Homey, Rich and Hearty by Rick Rodgers.

White Chocolate Chip Cookies

Here is another cookie recipe for you to try.  No, there are not one of my famous “Dream” cookies (with pudding mix), but the recipe does come from the same cookbook, “400 Sensational Cookies” by Linda J. Amendt.

My sister has made these White Chocolate Chip Cookies countless times for her boyfriend up at Oklahoma State University as “post-race” dessert (for those of you who don’t know, her boyfriend, Colby runs cross country and track for OSU). The secret which makes these cookies like none other are the toffee bits and touch of almond extract.  The unique flavor is a perfect combination in addition to the decadent white chocolate chips and macadamia nuts.  The texture yields a chewy, melt-in-your mouth, buttery and irresistible cookie.

What a perfect treat for a Hawaiian Luau.  (Macadamia nuts make me think of Hawaii.) If only we lived in Maui instead of Texas!  Enjoy 🙂

White Chocolate Chip Cookies
Ingredients
2 2/3 cups all-purpose flour
2 tsp baking powder
1/4 tsp baking soda
1/4 tsp salt
1/2 cup unsalted butter, softened
1/2 cup vegetable shortening
1 cup packed light brown sugar
1/2 cup granulated sugar
2 eggs
1 tsp vanilla extract
1/2 tsp almond extract
2 cups chopped white chocolate or white chocolate chips
1 cup chopped roasted unsalted macadamia nuts (or walnuts)
1/3 cup toffee bits

Directions
1.  Preheat oven to 350 degrees F. Line cookie sheets with parchment paper.
2. In a bowl, whisk together flour, baking powder, baking soda, and salt until well combined. Set aside.
3. In a large bowl, using an electric mixer on medium speed, cream butter shortening, brown sugar and granulated sugar until light and fluffy, about 3 minutes.  Add eggs one at a time, beating well after each addition.  Beat in vanilla and almond extract.  Scrape down sides of bowl.  On low speed or using a wooden spoon, gradually add flour mixture, beating just until blended.  By hand, fold in chocolate and macadamia nuts.
4. Using a cookie scoop or spoons, drop tablespoonfuls (15 mL) of dough about 2 inches (5 cm) apart on prepared cookie sheets.  Bake one at a time in preheated oven for 10 to 12 minutes or until edges start to turn lightly golden.
5.  Immediately slide parchment paper onto a wire cooling rack.  Cool cookies for 5 minutes, then transfer from parchment paper to cooling rack and cool completely.

Yield: 3 1/2 dozen
400 Sensational Cookies by Linda J. Amendt

Fruit Pizza

In honor of the “Pizza Theme” week I’ve shown on my blog, here’s one more “pizza” recipe…but with a twist… Fruit!

This Fruit Pizza recipe comes from my mother-in-law, Paula, who has made it countless times for birthdays, get togethers, lakehouse trips, and just because!  For my 22nd birthday, the first one I celebrated as married, Paula brought over this fruit pizza, and I just fell in love with it.  She knew I LOVED fruit, and was right in thinking that I would adore this birthday treat.

Fruit Pizza is a “healthier” dessert, perfect for the summertime when you are craving something light and luscious.  As many of you know, this has been the hottest summer on record for Dallas, Texas (except for the summer of 1980).  We’ve already had 14 days of three-digit temperature days and it’s only the beginning of July!  Sometimes I notice that the extreme heat makes me less hungry, however, that’s not to say I don’t crave sweets still!  As I told you before, the weekends are my husband and my “cheat” days.  We eat whatever we want and then start back to our “normal”, eating-right diet on Monday.  So today, instead of making a heavy dessert such a brownies or cake, I thought this fruit pizza would be refreshing, sweet, and satisfying.  It sure was!

Send me pictures of your fruit pizza….you can decorate it with any fruit in this world and in any pattern! Enjoy the aesthetic beauty as well as taste in this dessert pizza!

Bake the crust for 15 minutes in a 350 degree oven.

While the crust cools, wash and prepare your fruit.  Or go to the store to buy cream cheese like I had to!

Make your cream cheese filling and spread it on the cooled crust.

Layer with fresh fruit in any sort of pattern.

Feel free to change up your design with different fruits. Below I used just strawberries, clementines, and bananas. This design is prettier than the one above. Have fun with it and enjoy!

fruit pizza fruit pizza

Fruit Pizza
Prep time:
Cook time:
Total time:
Serves: 10
Ingredients
  • CRUST
  • 1/4 cup butter
  • 1/4 cup shortening
  • 3/4 cup sugar
  • 1 egg
  • 1 1/2 cups flour
  • 1/2 tsp baking soda
  • 1 tsp cream of tarter
  • TOPPING
  • 8 oz. cream cheese (I used 1/3 less fat)
  • 1/2 cup sugar
  • 1 tsp vanilla
  • Fresh fruit of your choice
Instructions
  1. FOR THE CRUST: In an electric mixer, beat the butter, shortening, sugar, and egg on medium speed. Sift the flour, soda, and cream of tarter and than add to butter mixture. Beat until just combined.
  2. Press into a greased, round pizza pan. Bake for 15 minutes at 350 degrees. Let cool completely.
  3. FOR THE TOPPING: In an electric mixer, beat together the cream cheese, sugar and vanilla. Frost onto cooled crust.
  4. Arrange fresh fruit in any pattern on cream cheese. If desired, pour strawberry or a peach glaze over fruit.


Rosemary Chicken and Potato Pizza

Here is the Rosemary Chicken and Potato Pizza I referenced in Tuesday’s BBQ Chicken Pizza post.  My mom and sister made it a few weeks ago.
Let me warn you, the Rosemary Chicken and Potato Pizza recipe looks overwhelming, but it is really not that hard.  If you have your chicken already cooked, and your dough or pizza crust already made, the most time-consuming part is baking the potatoes.  “The time and effort is completely worth it”, my sister says… and she is not one to just love any pizza.  
This pizza recipe comes from The California Pizza Kitchen Cookbook.  Anyone I’ve ever asked who has been to California Pizza Kitchen, or CPK, had nothing but positive things to say.  CPK was my family’s Friday night tradition when I was growing up.  My parents would split this Rosemary Chicken and Potato Pizza and my sister and I would split a medium Cheese Pizza and then a kids-size Pepperoni Pizza (we were hungry as kids and ate a lot of pizza!)  Now that I’ve grown up, I’d probably eat the Rosemary Chicken and Potato Pizza instead…. they say your taste buds change every seven years or so, and I can testify that for you!
Again, I’d definitely say this pizza is worth the time and effort, especially when you are making it gourmet-style.  Enjoy and let me know what you think!

Rosemary Chicken and Potato Pizza
Ingredients
Garlic-Shallot Butter with Lemon
5 Tbsp unsalted butter
1/4 cup minced shallot
2 Tbsp minced garlic
1 tsp chopped fresh thyme leaves (or 1/2 tsp dried)
1/4 tsp salt
Pinch ground white pepper
1/3 cup full-bodied chardonnay (or chicken broth)
1 Tbsp freshly squeezed lemon juice
1 tsp chicken base or bouillon cube (no MSG)

Rosemary Potatoes
1/2 pound small red “new” potatoes, sliced into 1/8-inch thick rounds
1 Tbsp minced fresh garlic
1 tsp chopped fresh oregano (or 1/2 tsp dried)
2 tsp chopped fresh rosemary leaves (or 1 tsp dried)
1/4 tsp ground white pepper
1 tsp kosher salt
2 Tbsp olive oil

Grilled Garlic Chicken
2 tsp minced fresh garlic
1 tsp soy sauce
1/2 tsp kosher salt
2 Tbsp olive oil
2 (5 oz.) boneless, skinless chicken breasts

For the Pizza
1 recipe Basic Pizza Dough
Cornmeal, semolina or flour for handling
1 1/2 cups shredded mozzarella cheese
2 tsp chopped fresh rosemary leaves (or 1 tsp dried)
3 tsp chopped fresh oregano leaves (or 1 1/2 tsp dried)
4 tsp chopped fresh parsley

Directions
To make Garlic-Shallot Butter with Lemon:
1. Melt 1 tablespoon butter in a nonstick saucepan over medium-high heat.  Add shallot, garlic and thyme.  Cook, stirring until mixture is light brown, 7 to 8 minutes.
2. Add salt, pepper, wine, lemon juice and chicken base. Cook until mixture is reduced to about 1/2 cup (toward the end of the reduction, reduce the heat to low and stir frequently to prevent scorching).
3. Remove the pan from the heat; quickly and thoroughly whisk in the remaining 4 tablespoons of butter.

To make Rosemary Potatoes:
4. Preheat oven to 325 degrees F.  Combine sliced potatoes with the remainder of the ingredients; coat thoroughly. Transfer the potato slices to a sheet pan; spread them out in a single layer, do not overlap. Discard leftover marinade – do not pour it over the potatoes.
5. Cook the potatoes in the preheated oven for approximately 45 minutes.  Some of the slices may need to be flipped over to promote even browning.  Remove the potatoes from the oven when they begin to brown. Use a steel spatula to remove the potatoes from the sheet pan. Place potatoes on paper towels at room temperature to drain off any excess oil. Do not refrigerate.

To make Grilled Garlic Chicken:
6. Prepare a hot grill.
7. Combine garlic, soy sauce, salt and olive oil.  Marinate the chicken breasts in garlic oil for about 15 minutes.
8. Grill the chicken breasts for 5 to 7 minutes on each side (discard any uncooked marinade). Remove the cooked chicken from the grill and chill thoroughly.  Cut into 1/2 to 3/4 inch cubes and set aside in the refrigerator.

To make the pizza: 
9. Place the pizza stone in the center of the oven and preheat to 500 degrees F for one hour before cooking the pizza.
10. Use a large spoon to spread 2 tablespoons of Garlic-Shallot Butter over the surface of the prepared pizza dough, within the rim.  Cover the butter with half the mozzarella.  Distribute half the grilled garlic chicken evenly over the cheese.
11. Sprinkle half the rosemary and oregano over the chicken. Place the rosemary potatoes over the other toppings, spaced about 1 inch apart.
12. Transfer the pizza to the oven; bake until the crust is crisp and golden and the cheese at the center is bubbly, 8 to 10 minutes. When cooked, carefully remove the pizza from the oven. Sprinkle half the parsley over the hot potato topping. Slice and serve.
13. Repeat with remaining ingredients for a second pizza. (The two pizzas may be prepared simultaneously if you are careful in placing the pizzas at opposite corners of your pizza stone.)

Yield: 2 (9-inch) pizzas
The California Pizza Kitchen Cookbook by Larry Flax & Rick Rosenfield

CPK’s BBQ Chicken Pizza

I LOVE pizza and could eat my weight in it.  The good thing about this pizza recipe is that you can make it pretty healthy.  First of all, then thinner the crust, the better.  Well, my crust is very thin as you can see.  Second, you can cut fat by using low-fat or part-skim cheese.  I used part-skim Mozzarella, which is one of the few cheeses that are actually good for you.  Thirdly, BBQ sauce has no fat in it…just sodium.  The only thing left is chicken breast, which provides a lean meat/healthy protein source for you.  Finally, red onion and cilantro gives you wonderful flavor in this BBQ Chicken Pizza.
I adapted this recipe from Ree Drummond, or the Pioneer Woman, who in turn created her own version of California Pizza Kitchen’s BBQ Chicken Pizza.  If you’ve ever been to California Pizza Kitchen, also known as CPK, you know what I’m talking about.  Their pizzas are wonderful and come in almost every flavor or combination known to man.  Their frozen pizzas are quite good too! Last week my mom and sister made Rosemary Chicken and Potato Pizza from The California Pizza Kitchen Cookbook.  I’ll be sure to blog it as soon as I can!  
 
Making pizza is extremely fast and easy, especially if you buy a pre-made crust.  If you’ve ever heard of Naan bread, it makes for a great crust as well.  The neat thing about making pizza is that the baking time is so quick!  With an extremely high oven temperature, at least 500 degrees F, you can bake a pizza in literally 10 minutes.  For those of you who like to grill, grilling pizza is another tasty alternative.
Enjoy!
 
Bake chicken covered in BBQ sauce for 25-30 minutes in a 375 degree F oven.  Dice into thin pieces.

Roll out pizza dough.  Cover in a couple of tablespoonfuls of BBQ sauce, then chicken.

Sprinkle with Mozzarella cheese and thinly sliced red onion.

Bake for 10 minutes, or until crust is golden, and cheese is bubbly.  Top with freshly chopped cilantro.

CPK’s BBQ Chicken Pizza
Ingredients
2  Individual Pizza Crusts (I used Basic Pizza Dough recipe)
1 whole boneless, skinless chicken breast
1/4 cup barbecue sauce
Olive oil, for drizzling
Salt for sprinkling
Shredded Mozzarella cheese
1/4 whole red onion, cut in half, and sliced very thin
chopped Cilantro, to taste

Directions
1.  Preheat oven to 375 degrees F.
2.  Salt chicken breasts on both sides, then place in an ovenproof dish.  Pour BBQ sauce over the breasts and turn them over to coat.  Bake for 25 to 30 minutes, or until chicken is done.  Remove from oven and cut into a fine dice.  Set aside.
3.  Increase oven temperature to 500 degrees F.
4.  Roll/stretch out one pizza crust.  Lay it on a sheet pan sprinkled with cornmeal.  Spoon a couple of tablespoons of extra BBQ sauce on the crust and spread it evenly.  Top sauce with half the diced chicken.  Sprinkle on half of the Mozzarella and thinly sliced red onion.  Repeat with second pizza.
5.  Bake for about 10 minutes, or until crust is golden brown and toppings are bubbly.
6.  Remove from oven and sprinkle on plenty of chopped cilantro.  Cut into squares and serve immediately.

Yield: 2 servings
Adapted from Pioneer Woman 

Happy 4th of July Weekend!

I hope you’re enjoying the first few hours of your holiday weekend.  I know I am.  Again, I wanted to thank you all for voting on my Dallas Duo Facebook Page for the 4th of July Dessert I should bring to the lakehouse this weekend.  I received some great feedback, and an overwhelming majority vote for making a strawberry cake! Yum!

 
Well, my plans have changed… Dr. Hussey, a long-time friend of my husband, Matt, bought us two gourmet pies from a wonderful little bakery in Plano, Texas (I don’t know the name, but when I do, I will let you know.)  Dr. Hussey knows Matt loves apple pie, so every so often he will buy us one or two (it always seems like two) pies from his favorite bakery.  Today we received not only apple, but a pecan pie as well!

Apple Pie from Dr. Hussey…

Since my mother-in-law, Paula, has made Cold Banana Pudding and 4 Layer Pudding Dessert for this weekend’s lake trip, I figured four desserts will be enough for us….we don’t need five.

With that said, I am going to give you the recipe for the Strawberry Cake that you voted on, and I planned on making.  When I recover from my “sugar-high” I’m about to get this weekend, Strawberry Cake will be the next dessert I will blog for you.

Stawberry Cake
Ingredients
Cake
1 white cake mix
2 small boxes strawberry Jell-O
2/3 cup salad oil (Crisco)
4 eggs
1 cup frozen strawberries, thawed (reserve the juice)

Icing
1/2 box powdered sugar
1/2 stick butter
1/4 cup strawberry juice

Directions
1. For the cake: Preheat oven to 350 degrees F. Grease and flour one tube pan or two loaf pans.
2. Mix all of the cake ingredients together in an electric mixer.
3. Pour batter into prepared pans and bake for 35 to 40 minutes, or until firm.  Do not underbake.
4. For the icing: Beat the icing ingredients together until smooth. Spread over hot cake.

In the meantime, if you want a “low-fat” Strawberry Layer Cake, try this one (which I made a few months ago)  from Cooking Light.

Enjoy your weekend and be sure to watch the fireworks…my favorite part!

Stuffed Bell Peppers

Vegetables are very healthy for you, but if you make them into a casserole and add butter, cheese, and sodium-enriched soups, you’ve added an “un” in front of the word “healthy” = “Unhealthy!” That’s not to say vegetable casseroles are not tasty…. they’ve got lots of flavor and can be one of my favorite recipes (for example: Corn Casserole.)

This Stuffed Bell Pepper recipe comes from Cooking Light Magazine, and has only 312 calories and 9.8g of fat…quite “healthy” I might add.  You’ve get a whopping 27g of protein from the ground sirloin, and a good source of Vitamins A and C in the pepper. Part-skim Mozzarella cheese also has positive health benefits.  It is a good source of protein, which is important for energy and muscle maintenance.   In addition, the calcium in this cheese helps in weight loss and provides protection against breast cancer and metabolic syndrome.

What is not to like about Stuffed Bell Peppers now?  The meat is also nicely flavored with Italian seasoning and a cup of tomato-basil pasta sauce of your choice.  Feel free to substitute red, yellow, or orange bell peppers for green.  Green peppers are less sweet and slightly more bitter than the red, yellow, and orange ones.  In addition, red peppers contain 2-3 times as much Vitamin C as the green variety.  Maybe that is why they are so much more expensive! Enjoy and let me know what you think!

Stuffed Bell Peppers
Ingredients

2 large green bell peppers (about 10 ounces each)
3/4 pound ground sirloin
1/4 cup chopped onion
1 tsp. dried Italian seasoning
1/4 tsp. salt
1/4 tsp. black pepper
1 (8.8 ounce) package precooked whole-grain brown rice (such as Uncle Ben’s) or cook your own
1 cup tomato-basil pasta sauce (such as Classico)
1 cup (4 ounces) shredded part-skim mozzarella cheese
Directions
1.  Cut bell peppers in half lengthwise;  discard seeds and membrane.  Precook green pepper cups in boiling salted water about 5 minutes;  drain.  (Or microwave at HIGH for 6 to 7 minutes.)  (For crisp peppers, omit precooking.) 
2.  While bell peppers cook, heat a large nonstick skillet over medium high heat.  Cook beef and onion until browned, stirring to crumble beef.  Drain, if necessary, and return to pan.  Stir in Italian seasoning, 1/4 tsp. salt, pepper, rice and pasta sauce.  Cook 1 to 2 minutes or until warm, stirring occasionally.
3.  Fill bell pepper halves with beef mixture;  sprinkle evenly with cheese  Place in baking dish.  Bake, uncovered, at 350 degrees for 20 to 25 minutes. (or microwave at HIGH 2 to 3 minutes or until cheese melts.)  
Calories: 312, Fat: 9.8g, Protein: 27.4g, Carb: 29.9g, Fiber: 4.1g 
Yield: 4 servings (serving size:  1/2 pepper)
Cooking Light Magazine

Peanut Butter Balls

This Peanut Butter Ball recipe is as easy to make as Puppy Chow (which I am now craving), but instead of powdered sugar and chocolate, these have a sweet peanut buttery taste that keeps you coming back for more.
These Peanut Butter Balls are one of my favorite snacks.  Whenever I visit my Aunt Jolene in Houston, I always request that we make them.  I’d like to call them “healthy” due to the high protein count in the peanut butter and the low-fat nature of Special K cereal, but I just can’t!  There is absolutely too much Karo syrup and sugar in these balls for them to be “good for you”.
When making these, I have just two pieces of advice:
  1. Do not over-boil the Karo and sugar.  If you do, the peanut butter balls will become hard as a rock, not chewy like they should be.
  2. Do not use chunky peanut butter.  Jolene and I made that mistake, thinking that it would not make a difference, but it does.  The chunky peanut butter makes it harder to shape the balls, thus they fall apart, and are too dry.  You need smooth peanut butter to keep them moist and in a ball.
If you follow the directions just like I’ve stated, they ought to come out perfectly and you’ll be popping Peanut Butter Balls in your mouth one after the other.  Enjoy!
Combine the Special K cereal and flour together in a large bowl.

Bring Karo and sugar just to a boil.

Immediately remove from heat and stir in peanut butter.

Pour peanut butter over Special K cereal mixture and shape into balls.


Peanut Butter Balls
Ingredients
1 1/2 cups sugar
1 1/2 cups Karo syrup
18 oz. (1 jar) smooth peanut butter
4 Tbsp. flour
7 cups Special K cereal

Directions
1.  Place sugar and Karo into a saucepan and bring to a boil.  Immediately remove from heat once it starts to bubble and stir in peanut butter.
2.  Meanwhile, in a large bowl, stir together flour and Special K.  Pour peanut butter mixture over cereal.  With greased hands, shape peanut butter and cereal into tightly compressed balls.
3.  Place balls on wax paper and let cool completely.  Enjoy.

Yield:  6 dozen balls